
65
GitHub Actions Self-Hosted Runner on Kubernetes
Self-hosted runners are ideal for use-cases where you need to run workflows in a highly customizable environment with more granular control over hardware requirements, security, operating system, and software tools than GitHub-hosted runners provides.
Self-hosted runners can be physical, virtual, in a container, on-premises, or in a cloud. In this guide, we’ll deploy it as a container in the Kubernetes cluster in the AWS cloud.

If you already have an existing K8s cluster, feel free to skip this step.
In this guide, we’ll deploy a managed K8s cluster on AWS using eksctl— Official CLI for Amazon EKS which is written in Go and uses CloudFormation under the hood, and is by far the easiest way to spin up a managed Kubernetes cluster in AWS. See Installing eksctl
Our cluster will consist of a single worker node (c6g.large — 2 vCPU, 4GiB RAM) in
us-east-1 region with a dedicated VPC. Feel free to modify the cluster config as per your requirements. See more examples configsSave the following cluster config as
cluster-config.yaml
This file contains hidden or bidirectional Unicode text that may be interpreted or compiled differently than what appears below. To review, open the file in an editor that reveals hidden Unicode characters.
Learn more about bidirectional Unicode characters
| apiVersion: eksctl.io/v1alpha5 | |
| kind: ClusterConfig | |
| metadata: | |
| name: github-actions | |
| region: us-east-1 | |
| nodeGroups: | |
| - name: ng-1 | |
| instanceType: c6g.large | |
| desiredCapacity: 1 | |
| volumeSize: 14 |
And run the following command using the above cluster config:
$ eksctl create cluster -f cluster-config.yamlNOTE: The cluster creation may take upto 15–20 minutes.
2021-06-22 19:14:19 [✔] EKS cluster "github-actions" in "us-east-1" region is readyOnce the cluster is created and ready, you will find that cluster credentials were added to your kubeconfig in
$HOME/.kube/config automatically by eksctlNow, verify the cluster connectivity, access and nodes status:
$ kubectl get nodes
$ kubectl get namespacesHelm is a package manager for Kubernetes to easily install and manage Kubernetes applications. See Installing Helm

action-runner controller operates self-hosted runners for GitHub Actions on the Kubernetes cluster. It provides CRDs (Custom Resource Definition) such as Runner RunnerDeployment HorizontalRunnerAutoscaler which allows us to easily deploy a scalable self-hosted runners on Kubernetes.
# Add repository
$ helm repo add jetstack https://charts.jetstack.io
$ helm repo update

# Install chart
$ helm install --wait --create-namespace --namespace cert-manager cert-manager jetstack/cert-manager --version v1.3.0 --set installCRDs=true

# Verify installation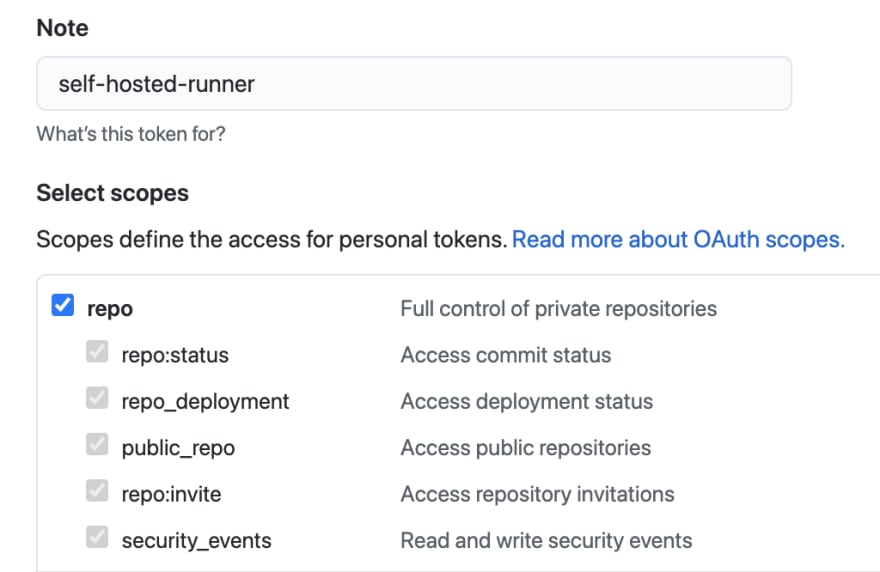
$ kubectl --namespace cert-manager get allNext, we need to create a Personal Access Token (PAT) which will be used by the controller to register self-hosted runners to GitHub Actions.
Generate new token button
repo (Full Control) scope.Generate Token
Now, store the access token in a YAML file called
custom-values.yaml as such:authSecret:
github_token: REPLACE_YOUR_TOKEN_HEREWe’re now ready to install the controller using Helm.
# Add repository
$ helm repo add actions-runner-controller https://actions-runner-controller.github.io/actions-runner-controller

# Install chart
$ helm install -f custom-values.yaml --wait --namespace actions-runner-system --create-namespace actions-runner-controller actions-runner-controller/actions-runner-controller

# Verify installation
$ kubectl --namespace actions-runner-system get allWe now have everything in-place to deploy a self-hosted runner tied to a specific repository.
First, create a namespace to host self-hosted runners resources.
$ kubectl create namespace self-hosted-runnersNext, save the following K8s manifest file as
self-hosted-runner.yaml, and modify the following:tuladhar/self-hosted-runner with your own repository.minReplicas and maxReplicas as required.
This file contains hidden or bidirectional Unicode text that may be interpreted or compiled differently than what appears below. To review, open the file in an editor that reveals hidden Unicode characters.
Learn more about bidirectional Unicode characters
| apiVersion: actions.summerwind.dev/v1alpha1 | |
| kind: RunnerDeployment | |
| metadata: | |
| name: runner-deployment | |
| spec: | |
| template: | |
| spec: | |
| repository: tuladhar/self-hosted-runner | |
| --- | |
| apiVersion: actions.summerwind.dev/v1alpha1 | |
| kind: HorizontalRunnerAutoscaler | |
| metadata: | |
| name: runner-deployment-autoscaler | |
| spec: | |
| scaleTargetRef: | |
| name: runner-deployment | |
| minReplicas: 1 | |
| maxReplicas: 5 | |
| metrics: | |
| - type: TotalNumberOfQueuedAndInProgressWorkflowRuns | |
| repositoryNames: | |
| - tuladhar/self-hosted-runner |
And apply the Kubernetes manifest:
$ kubectl --namespace self-hosted-runners apply -f self-hosted-runner.yamlVerify the runner is deployed and is in ready state.
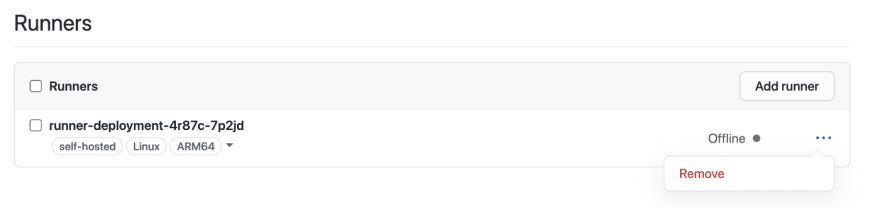
$ kubectl --namespace self-hosted-runners get runnerNow, navigate to your repository
Settings > Actions > Runner to view the registered runner.
🚀 We’re now ready to give our self-hosted runner a try!
Save and commit the following sample GitHub Actions workflow in
.github/workflows/hello-world.yml in your repository where the self-hosted runner is registered.NOTE: The important part of this workflow is runs-on: self-hosted
This file contains hidden or bidirectional Unicode text that may be interpreted or compiled differently than what appears below. To review, open the file in an editor that reveals hidden Unicode characters.
Learn more about bidirectional Unicode characters
| # This is a basic workflow to help you get started with Actions | |
| name: Hello World | |
| # Controls when the action will run. | |
| on: | |
| # Allows you to run this workflow manually from the Actions tab | |
| workflow_dispatch: | |
| # A workflow run is made up of one or more jobs that can run sequentially or in parallel | |
| jobs: | |
| # This workflow contains a single job called "build" | |
| build: | |
| # The type of runner that the job will run on | |
| runs-on: self-hosted | |
| # Steps represent a sequence of tasks that will be executed as part of the job | |
| steps: | |
| # Checks-out your repository under $GITHUB_WORKSPACE, so your job can access it | |
| - uses: actions/checkout@v2 | |
| # Runs a single command using the runners shell | |
| - name: Run a one-line script | |
| run: echo Hello, world! | |
| # Runs docker hello-world | |
| - name: Hello from Docker | |
| run: docker run hello-world |
Now, navigate to the Actions tab where you will see Hello World workflow listed. Let’s manually trigger by clicking Run Workflow

… and voila! 🎉 The workflow has successfully ran on our self-hosted runner, and we can see all the steps and logs.

Once, you’re done exploring the self-hosted runner, you can easily destroy the cluster and associated resources like VPC, etc.
$ eksctl delete cluster -f cluster-config.yamlOutput:
2021-06-22 20:16:02 [ℹ]  eksctl version 0.54.0
2021-06-22 20:16:02 [ℹ]  using region us-east-1
2021-06-22 20:16:02 [ℹ]  deleting EKS cluster "github-actions"
2021-06-22 20:16:06 [ℹ]  deleted 0 Fargate profile(s)
2021-06-22 20:16:10 [✔]  kubeconfig has been updated
2021-06-22 20:16:10 [ℹ]  cleaning up AWS load balancers created by Kubernetes objects of Kind Service or Ingress
2021-06-22 20:16:23 [ℹ]  2 sequential tasks: { delete nodegroup "ng-1", delete cluster control plane "github-actions" [async] }
2021-06-22 20:16:23 [ℹ]  will delete stack "eksctl-github-actions-nodegroup-ng-1"
2021-06-22 20:16:23 [ℹ]  waiting for stack "eksctl-github-actions-
2021-06-22 20:18:21 [ℹ]  will delete stack "eksctl-github-actions-cluster"
2021-06-22 20:18:22 [✔]  all cluster resources were deleted
And remove the dangling offline registered runner as well.
65