
26
Kubernetes AutoScaling Series: Cluster AutoScaler
A Complete Zero-to-Hero Guide to Kubernetes Cluster AutoScaler which allows scaling the number of nodes based on the resource requests and avoids having your pods waiting in the Pending State.
Kubernetes is feature filled with all the good-ness one of which is scaling, it’s often & assumption that Kubernetes comes with AutoScaling **as default, but that’s hardly the case, we often need to tweak the bars to make things actually work. Today we would discuss how we can use *Kubernetes Cluster AutoScaler *to **scale Kubernetes Nodes.
Cluster Autoscaler is an amazing utility that automatically upscales & down-scales the number of nodes based on the request of the resource for pods.
Cluster Autoscaler can be used to scale both the Kubernetes Control Plane(master nodes) or Data plane (worker nodes aka minion). For the purpose of this demo, we would choose an AWS-based on-premise cluster provisioned using KOPS.
In order for Cluster AutoScaler deployment to authenticate to AWS and scale the number of nodes, there are a couple of ways to do so.
Attaching the nodes IAM policy with appropriate permissions.
Creating an IAM user and create Kubernetes secrets and attaching the secrets to Cluster AutoScaler Deployment.
{
"Version": "2012-10-17",
"Statement": [
{
"Effect": "Allow",
"Action": [
"autoscaling:DescribeAutoScalingGroups",
"autoscaling:DescribeAutoScalingInstances",
"autoscaling:DescribeLaunchConfigurations",
"autoscaling:SetDesiredCapacity",
"autoscaling:DescribeTags",
"autoscaling:TerminateInstanceInAutoScalingGroup"
],
"Resource": [
"*"
]
}
]
}
kubectl CLI
Kubernetes Cluster (v.1.14.0+ preferably)
Metrics Server (The Complete Guide on Metrics Server? -> link )
Cluster Autoscaler follows a cycle through which it continuously checks if there is any pod that is Pending state because of inadequate resources of the available nodes in the cluster, if that's the case it adds new nodes to make sure the pods get scheduled. The way it determines is also based on the request which is specified the pod spec, that's why it's pretty much expected to make sure that we provide a realistic request value to the pods (nothing less, nothing more)
Cluster Autoscaler decreases the number of nodes that are consistently unneeded for a significant amount of time. A node is unneeded when it has low utilization and all of its important pods can be moved elsewhere.

In this demo, we would be using an on-premise Kubernetes Cluster already set up on AWS using kops.
Clone the Github repo **https://github.com/chrisedrego/clusterautoscaler**
For testing, we would create a dedicated Instance group with nodeSelector as node: test-node *so while testing the pods would only get scheduled on this node. We have selected the *t3.medium type as it has the following configuration.
**compute/vcpu:** 2vcpu
**memory:** 4Gi
This file contains hidden or bidirectional Unicode text that may be interpreted or compiled differently than what appears below. To review, open the file in an editor that reveals hidden Unicode characters.
Learn more about bidirectional Unicode characters
| apiVersion: kops.k8s.io/v1alpha2 | |
| kind: InstanceGroup | |
| metadata: | |
| labels: | |
| kops.k8s.io/cluster: <CLUSTER_NAME> | |
| name: test-node | |
| spec: | |
| image: 099720109477/ubuntu/images/hvm-ssd/ubuntu-focal-20.04-amd64-server-20210415 | |
| machineType: t3.medium | |
| maxSize: 2 | |
| minSize: 1 | |
| nodeLabels: | |
| kops.k8s.io/instancegroup: test-node | |
| node: test-node | |
| role: Node | |
| subnets: | |
| - <SUBNET_NAME> |
export KOPS_STATE_STORE='s3://STATE_STORE_URL'
export KOPS_CLUSTER_NAME='CLUSTER_NAME'
kops create -f ./kops/test-node.yaml

kops update cluster --yes
kops rolling-update cluster --yes
Verifying the new InstanceGroup & nodes are Ready.
***# Specify the new Instance Group Name***
INSTANCE_GROUP=''
aws autoscaling describe-auto-scaling-groups | grep $INSTANCE_GROUP

***# Check if new nodes are added***
kubectl get nodesFor Testing, we will create a test deployment that has **nodeSelector *set to *test-node *with the **request* values set accordingly. In this case, we have provided the requested memory to 2Gi.
This file contains hidden or bidirectional Unicode text that may be interpreted or compiled differently than what appears below. To review, open the file in an editor that reveals hidden Unicode characters.
Learn more about bidirectional Unicode characters
| apiVersion: apps/v1 | |
| kind: Deployment | |
| metadata: | |
| name: test-app | |
| labels: | |
| app: test-app | |
| spec: | |
| replicas: 1 | |
| selector: | |
| matchLabels: | |
| app: test-app | |
| template: | |
| metadata: | |
| labels: | |
| app: test-app | |
| spec: | |
| containers: | |
| - name: test-app | |
| image: nginx:1.14.2 | |
| ports: | |
| - containerPort: 80 | |
| resources: | |
| requests: | |
| cpu: 200m | |
| memory: 1Gi | |
| limits: | |
| cpu: 2000m | |
| memory: 4Gi | |
| nodeSelector: | |
| node: test-node |
Once you have already cloned the repo, there is a folder called **cluster-auto-scaler, **which contains three different ways of deploying, for the sake of simplicity we would use a single auto-scaling group.
Single Auto-Scaling Group
Multiple Auto-Scaling Group
On-Control Plane (on the master nodes)
Autodiscover (auto-discover using tags)
There will be a slight change required before applying the changes.
- --skip-nodes-with-local-storage=false

- --nodes=**<MIN_COUNT>:<MAX_COUNT>:<INSTANCE_GROUP>**MIN_COUNT: Minimum number of nodes.
MAX_COUNT: Maximum number of nodes.
INSTANCE_GROUP: AutoScalingGroup / InstanceGroup
Make sure before applying the min-count and max-count should be between the actual range of InstanceGroup.
We would be stimulating the load by increasing the number of replicas.
As we already know that the machine t3.medium has 4Gi memory, **as *there are other resources as well that makes the usable memory around *~3.7Gi
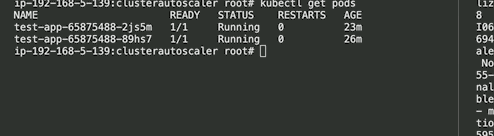
Before ClusterAutoScaler, we assigned the test app memory of 2Gi and tried scaling the application to 2 replicas. In this case, it fails as a single node (t3.medium) doesn't have enough resources and we have the pod in a Pending state. (2Gi X 2 = 4Gi > 3.7~Gi)
kubectl scale deploy test-app --replicas=2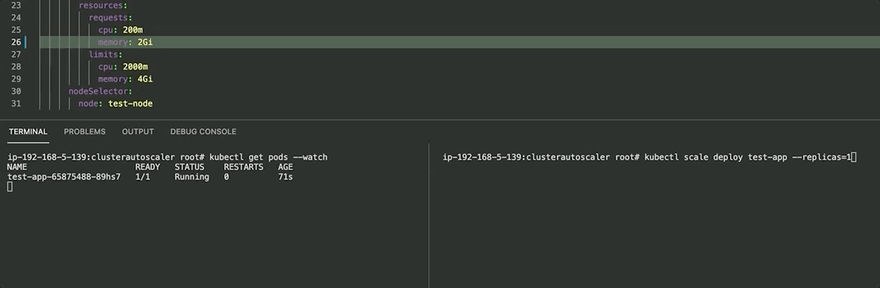
After ClusterAutoScaler, it finds that the pod is in a Pending state and hence tries to assign a new node to the cluster, after doing so the Pod is scheduled onto the new node, once it's part of the cluster and everything works fine.
Here are few recommendations to keep in mind.
Specifying the request helps CA to get details of the resource request and accordingly can scale the cluster. Make sure to keep the value realistic and not too high as that might lead to false upscaling and can burn your cloud budgets.
HPA ensures that pods scale automatically based on the increase in the request which ideally will trigger CA to scale the nodes accordingly and scale down when needed.
Avoid running ClusterAutoScaler where we can have a mission-critical application that can have issues while getting rescheduled on different nodes.
26