19
Build a Full-Stack Notebook App using React and Firebase 📓 🔥
In this blog tutorial, we are going to set up and build full-stack notebook applications using react.js from absolutely scratch. We will be creating everything from absolute scratch. However, before we begin, the final version of the app should resemble this. You can also view the application's final live version.

Let's get our first react application up and running. So, if you don't already have Node.js installed on your PC, the first thing you need to do is install it. To do so, go to the official Node.js website and download the relevant and necessary version. We require node js in order to use the NPM feature of the node package manager.

Now create a folder and open it in your preferred coding editor. I'll be using VScode. Next, open the integrated terminal and type npx create-react-app react-firebase-notebook The app will be named react-firebase-notebook and will be created in the current directory using this command.


Installing it normally only takes a few minutes. Normally, we would use npm to get packages into a project, but here we're using npx, the package runner, which will download and configure everything for us so that we can get started with an excellent template right away. Now it's time to start our development server, so simply run npm start and react-app will open in the browser immediately.
Now it's time to look into the file and folder structure that create-react-app provides. All of our node dependencies are stored in a subdirectory called node module. Then there's the public folder, where the index.html file is the only thing that matters. So far, it appears that this is a regular HTML file, replete with head, body, and meta tags. Inside our body tag, you'll find a div with the id root, followed by the fallback noscript tag, which will only be visible if the user's browser doesn't support javascript.
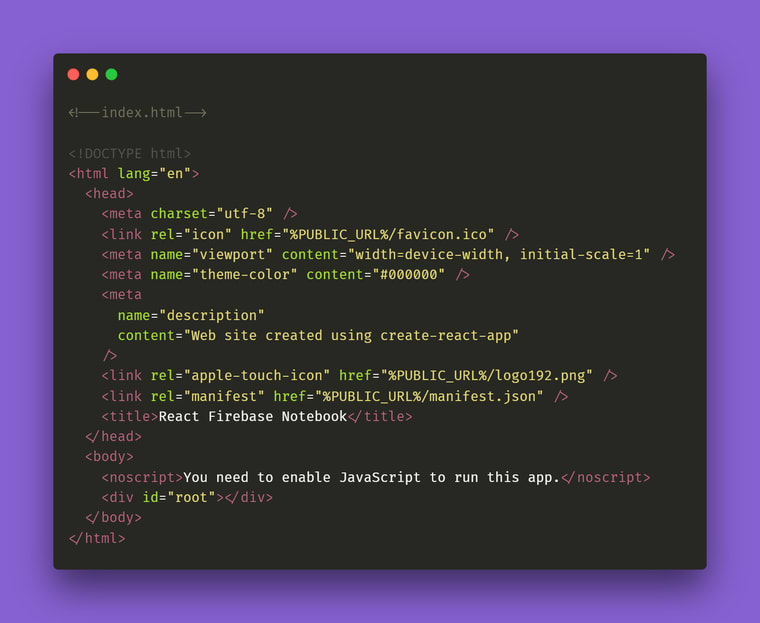
So you're undoubtedly curious about the source of the content. Remember that all of our source code is housed in the src folder, and react will inject it into the root div element. Look in the src folder for some stylesheets, javascript scripts, and SVG files.

Now, head over to our App.js file

In this situation, we're simply using regular javascript to import react from react and logo from our logo. Following that, we have a regular javascript function called App, which is known as a functional component in react, and this function returns a react-element that looks like HTML but is actually a jsx, as you can see there is a div tag with a className of APP, which we can't say class by itself because the class is a reserved word in javascript, so we have to use className in jsx. Following that, we have the header and then the image, and notice on the image source that we have our logo, which is actually a javascript variable that we imported at the top, so we must surround it with curly brackets in order to use the javascript within JSX, and then we have a paragraph, an anchor tag, and that's it for this component.
Let's take a look at the index.js file now.

So, we're importing react from react again, and this time we're also importing react-dom, and then we're importing the CSS stylesheet file, and finally, we're importing App from App.js, which is the file we just discussed, and there's also service worker, which is used to make your app work completely offline. After that, we use ReactDom.render, which takes two parameters. The first parameter is the jsx object, which contains our user-defined components (react strict mode is a react defined component, whereas App is a user-defined component), and the second parameter is document.getElementById('root'), which targets the root div in our index.html file and is how we access the content in our webpage. Always keep in mind that ReactDom renders our content into our index.html file's root div.
Let's start from the ground up and build a small notebook application in react, but before, let's make a prototype or mindmap of our end product. So, here is how our finished app will look.

We must first tidy up our projects by eliminating some of the files provided by create-react-app before we can begin creating them. After you've cleaned up your src files, they should look like this.

Let's get started configuring firebase on our project now that we've finished configuring react.
Firebase is a serverless mobile and web application platform for Web developers. This implies we won't have to start from the ground up when it comes to setting up a server. We don't need to buy and configure a server to serve our webpage to the World Wide Web because Firebase is a pre-configured server. We already have all of those functions in place. All we have to do now is make use of their backend services. Backend activities are straightforward with Firebase. Let's set up these tools so that you have a general notion of what we'll be using for our project.
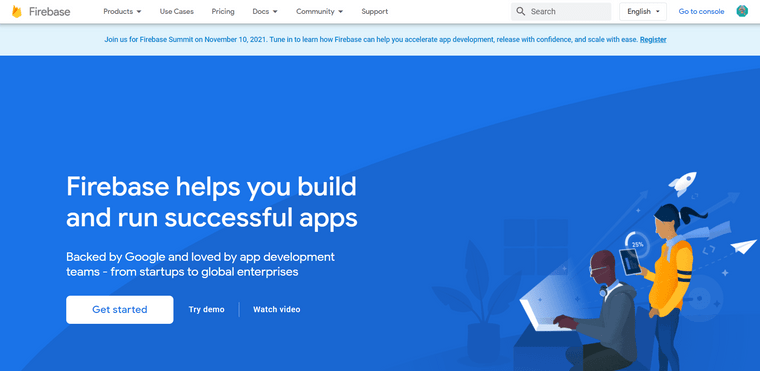
You'll need a Google account to set up Firebase. Sign up for a Firebase account. Then, from the top bar, select Go to Console to access the Firebase console, which should resemble something like this:
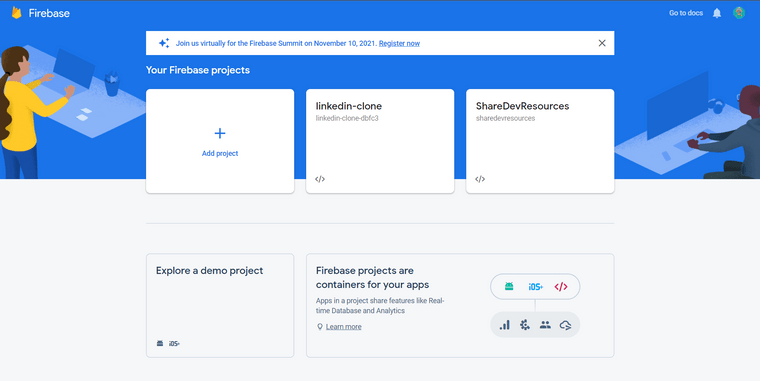
We can now create a new project in firebase.
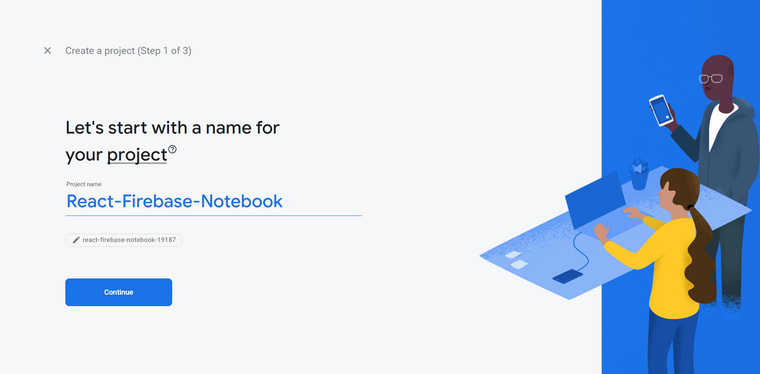
We are making a project with the name: React-Firebase-Notebook . Give your app name whatever you want.

You have the option of enabling or disabling Google Analytics.

Now, select the google analytics account. So, a new Google Analytics property will be generated in your chosen Google Analytics account and linked to your Firebase project when you build the project. This link will allow data to move back and forth between the products.

Creating a project may take a few seconds.

Now, if we click continue, we'll be sent to our new React-Firebase-Notebook project. This is a free tier, and it's extremely generous because it allows you so much free and awesome stuff to try.

Now the only thing that we need on this project overview page is to click on the “Add firebase to web app” and then register the app name.

After that, you'll have access to the API key, the database URL, the auth domain, the app ID, and a ton of other cool stuff.
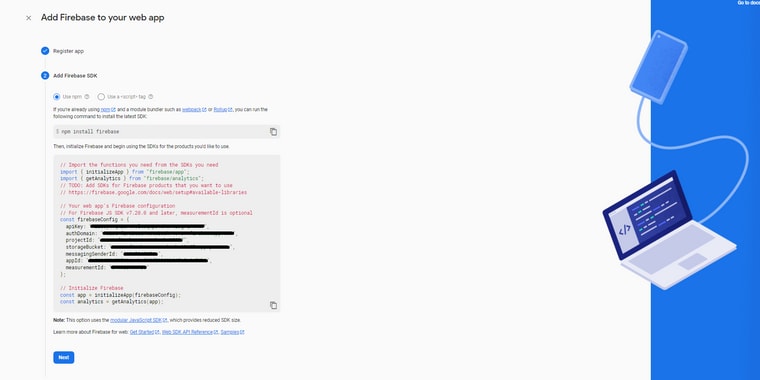
We'll use that config to initialize our Firebase application, so copy it and put it someplace in your notepad or any other program. After that, simply click next, and you'll be given CLI commands to install Firebase, which you should copy somewhere on the notepad as well.

Finally, you will be given the command for deploying the program, which you should copy and store somewhere on your notepad.
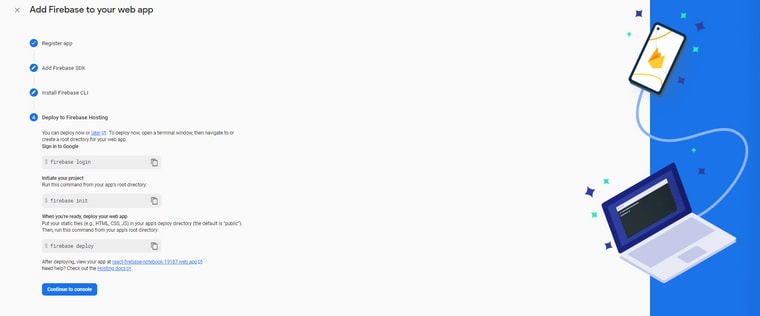
Continue to console now that you've finished configuring the Firebase project.

Let's return to our react application and open the App.js file, where we'll copy and paste the firebase config.
// App.js
import React from "react";

const firebaseConfig = {
  apiKey: "--------------------",
  authDomain: "--------------------",
  databaseURL: "--------------------",
  projectId: "--------------------",
  storageBucket: "--------------------",
  messagingSenderId: "--------------------",
  appId: "--------------------",
  measurementId: "--------------------",
};

const App = () => {
  return <div>Hello there</div>;
};

export default App;
Now let's head over to our terminal and make sure we're in the right project folder before installing Firebase. It might take few minutes to get installed.

After that, your package.json file should resemble something like this.
{
   "name":"react-firebase-notebook",
   "version":"0.1.0",
   "private":true,
   "dependencies":{
      "@testing-library/jest-dom":"^5.11.4",
      "@testing-library/react":"^11.1.0",
      "@testing-library/user-event":"^12.1.10",
      "firebase":"^9.2.0",
      "react":"^17.0.2",
      "react-dom":"^17.0.2",
      "react-scripts":"4.0.3",
      "web-vitals":"^1.0.1"
   },
   "scripts":{
      "start":"react-scripts start",
      "build":"react-scripts build",
      "test":"react-scripts test",
      "eject":"react-scripts eject"
   },
   "eslintConfig":{
      "extends":[
         "react-app",
         "react-app/jest"
      ]
   },
   "browserslist":{
      "production":[
         ">0.2%",
         "not dead",
         "not op_mini all"
      ],
      "development":[
         "last 1 chrome version",
         "last 1 firefox version",
         "last 1 safari version"
      ]
   }
}
Now that Firebase is installed, let's import all (*) of the firebase's exports.
import firebase from "firebase/app"Also, don't forget to initialize your Firebase configuration.

//App.js
import React from "react";
import firebase from "firebase/compat/app";
import "firebase/compat/database";

const firebaseConfig = {
  apiKey: "--------------------",
  authDomain: "--------------------",
  databaseURL: "--------------------",
  projectId: "--------------------",
  storageBucket: "--------------------",
  messagingSenderId: "--------------------",
  appId: "--------------------",
  measurementId: "--------------------",
};
firebase.initializeApp(firebaseConfig);

const App = () => {
  return <div>Hello there</div>;
};

export default App;
After we've installed and setup all of the necessary components for this project, we'll go ahead and create it. To do so, we'll need to make a few changes to our App.js file. The first thing we'll do is put up our Navbar section, so inside our src folder, create a components folder, and inside that components folder, create another folder called Navbar, with three files titled index.js , Navbar.js and Navbar.css your folder structure should resemble like this.

// components/Navbar/index.js
import Navbar from "./Navbar.js"
export default Navbar;
Let's get started on crafting our navbar section.
// components/Navbar/Navbar.js
import React from "react";
import "./Navbar.css";

const Navbar = () => {
  return (
    <>
      <header className="navbar">
        <h2 className="heading">📓 React firebase Notebook </h2>
      </header>
    </>
  );
};

export default Navbar;
Now it's time to give our Navbar some styling.
/*components/Navbar/Navbar.css */
 .navbar {
     display: flex;
     justify-content: center;
     align-items: center;
     width: 99vw;
     height: 70px;
     background: rgba( 255, 255, 255, 0.15 );
     box-shadow: 0 8px 32px 0 rgba( 31, 38, 135, 0.37 );
     backdrop-filter: blur( 7.5px );
     -webkit-backdrop-filter: blur( 7.5px );
     border-radius: 20px;
     border: 1px solid rgba( 255, 255, 255, 0.18 );
}
 .navbar .heading {
     color: #fd5252;
     font-size: 20px;
     font-weight: 700;
     font-family: 'Poppins', sans-serif;
}
Let's now import and initialize our Navbar component within the App component

// App.js
import React from "react";
import firebase from "firebase/compat/app";
import "firebase/compat/database";
import Navbar from "./components/Navbar";

const firebaseConfig = {
  apiKey: "--------------------",
  authDomain: "--------------------",
  databaseURL: "--------------------",
  projectId: "--------------------",
  storageBucket: "--------------------",
  messagingSenderId: "--------------------",
  appId: "--------------------",
  measurementId: "--------------------",
};
firebase.initializeApp(firebaseConfig);

const App = () => {
  return (
    <div>
      <Navbar />
    </div>
  );
};

export default App;
Its time to create another component for adding notes so for that create another folder called NoteAdd, with three files titled index.js , NoteAdd.js and NoteAdd.css your folder structure should resemble like this.

// components/NoteAdd/index.js
import NoteAdd from "./NoteAdd";
export default NoteAdd
Let's get started on crafting our skeleton for our NoteAdd section
// components/NoteAdd/NoteAdd.js
import React from "react";
import "./NoteAdd.css";

const NoteAdd = () => {
  return (
    <>
      <div className="noteadd">
        <h1>Add a New Note</h1>
        <div className="form-group">
          <input
            type="text"
            className="noteadd-header"
            name="noteadd-header"
            placeholder="Note Title"
          />
        </div>
        <div className="form-group">
          <textarea
            name="noteadd-description"
            className="noteadd-description"
            placeholder="Note Description"
          ></textarea>
        </div>
        <div className="noteadd-button">
          <button>Add a Note</button>
        </div>
      </div>
    </>
  );
};

export default NoteAdd;
Now it's time to give our NoteAdd section some styling.
/* components/NoteAdd/NoteAdd.css */
 .noteadd {
     display: block;
     width: 100%;
     max-width: 500px;
     margin: 10px auto;
}
 .noteadd h1 {
     display: flex;
     background: rgba(255, 255, 255, 0.15);
     justify-content: center;
     align-items: center;
     color: #8661d1;
     font-family: "poppins";
     margin-bottom: 10px;
}
 input {
     border-style: none;
     background: transparent;
     outline: none;
}
 textarea {
     border-style: none;
     background: transparent;
     outline: none;
}
 .noteadd-header {
     display: flex;
     justify-content: center;
     align-items: center;
     flex-direction: row;
     width: 100%;
     max-width: 400px;
     height: 10px;
     margin: 0 auto;
     border-radius: 5px;
     padding: 1rem;
     background: white;
}
 .noteadd-header input {
     flex-grow: 1;
     color: white;
     font-size: 1.8rem;
     line-height: 2.4rem;
     vertical-align: middle;
}
 .noteadd-description {
     position: relative;
     display: flex;
     flex-direction: row;
     width: 100%;
     max-width: 400px;
     height: 40px;
     margin: 0 auto;
     border-radius: 5px;
     padding: 1rem;
     background: white;
}
 .noteadd-header textarea {
     flex-grow: 1;
     color: white;
     font-size: 1.8rem;
     line-height: 2.4rem;
     vertical-align: middle;
}
 .noteadd .form-group {
     display: flex;
     flex-direction: column;
     margin-bottom: 15px;
     justify-content: center;
}
 .noteadd-button {
     display: flex;
     justify-content: center;
     align-items: center;
}
 button {
     padding: 10px 15px;
     font-size: 24px;
     text-align: center;
     cursor: pointer;
     outline: none;
     color: #fff;
     background-color: #8661d1;
     border: none;
     border-radius: 15px;
     box-shadow: 0 5px rgb(109, 57, 129);
}
 button:hover {
     background-color: #906ed3;
}
 button:active {
     background-color: #fd5252e5;
     box-shadow: 0 5px rgb(212, 93, 93);
     transform: translateY(4px);
}
Let's now import and initialize our NoteAdd component within the App component

// App.js
import React from "react";
import firebase from "firebase/compat/app";
import "firebase/compat/database";
import Navbar from "./components/Navbar";
import NoteAdd from "./components/NoteAdd";
import "./App.css";

const firebaseConfig = {
  apiKey: "--------------------",
  authDomain: "--------------------",
  databaseURL: "--------------------",
  projectId: "--------------------",
  storageBucket: "--------------------",
  messagingSenderId: "--------------------",
  appId: "--------------------",
  measurementId: "--------------------",
};
firebase.initializeApp(firebaseConfig);

const App = () => {
  return (
    <div className="app">
      <Navbar />
      <div className="note-section">
        <NoteAdd />
      </div>
    </div>
  );
};

export default App;
Create a useState() hook in your NoteAdd.js file since this hook will allow us to integrate the state into our functional component. Unlike state in class components, useState() doesn't work with object values. If necessary, we can create numerous react hooks for multiple variables by using primitives directly.
const [state, setState] = useState(initialState);
Hooks must always be declared at the beginning of a function in React. This also aids in the component's state maintenance as well as preservation between renderings.

Now that we have the tilte and descripton as a state variable, we can use the setter function to modify them in functions. So, let us build the second section of the application that allows us to add notes onto our firebase real-time database. We'll make a separate component for displaying the notes. NoteAdd component includes a form with an input field where the user can enter the title and description of the new notes. It also includes a button for adding the notes to the list. A variable is also required to store the title as well as a description as the user types in the input text box. To accomplish this, we will create a title and description state that is unique to this component and also we will be pushing the value of title and description present on that state to our firebase real-time database. The NoteAdd component will then look like this:

// components/NoteAdd/NoteAdd.js
import React, { useState } from "react";
import firebase from "firebase/compat/app";
import "firebase/compat/database";
import "./NoteAdd.css";

const NoteAdd = () => {
  const [title, setTitle] = useState("");
  const [description, setDescription] = useState("");

  const handleTitleChange = (event) => {
    setTitle(event.target.value);
  };

  const handleDescriptionChange = (event) => {
    setDescription(event.target.value);
  };

  const addNote = () => {
    if (title !== "" && description !== "") {
      firebase.database().ref("notebook").push({
        title: title,
        description: description,
      });
    }
  };

  return (
    <>
      <div className="noteadd">
        <h1>Add a New Note</h1>
        <div className="form-group">
          <input
            type="text"
            className="noteadd-header"
            name="noteadd-header"
            placeholder="Note Title"
            value={title}
            onChange={(val) => handleTitleChange(val)}
          />
        </div>
        <div className="form-group">
          <textarea
            name="noteadd-description"
            className="noteadd-description"
            placeholder="Note Description"
            value={description}
            onChange={(val) => handleDescriptionChange(val)}
          ></textarea>
        </div>
        <div className="noteadd-button">
          <button onClick={() => addNote()}>Add a Note</button>
        </div>
      </div>
    </>
  );
};

export default NoteAdd;
Now that you've changed your NoteAdd component, you'll want to go to your Firebase console and select realtime database.

You'll be prompted to configure the database location, so choose your preferred location and then click next.

Following that, you'll be prompted to choose between test mode and locked mode for the Firebase rules. Select either of them and click “next” to proceed.

Finally, now that you've successfully created your Firebase real-time database, let's update our security rules. We're not going to implement any security here, so simply set "read" and "write" to "true."

Its time to create another component for displaying notebooks so for that create another folder called Notebook, with three files titled index.js , Notebook.js and Notebook.css inside it. So, your folder structure should resemble like this.

// components/Notebook/index.js
import Notebook from "./Notebook";
export default Notebook;
Let's get started on crafting our skeleton for our NoteAdd section
// components/Notebook/NoteAdd.js
import React from "react";
import firebase from "firebase/compat/app";
import "firebase/compat/database";
import "./Notebook.css";

const Notebook = (props) => {
  const deleteNotebook = (id) => {
    firebase.database().ref("notebook").child(id).remove();
  };

  return (
    <>
      <section className="notebook-container">
        <div className="notebook">
          {props.notebook.map((note, index) => (
            <React.Fragment key={index}>
              <div className="notebookInfo" key={note.id}>
                <div className="notebookInfo-title">
                  <h3>{note.title}</h3>
                  <div
                    className="remove"
                    onClick={() => deleteNotebook(note.id)}
                  >
                    🗑️
                  </div>
                </div>
                <div className="notebookInfo-description">
                  <p>{note.description}</p>
                </div>
              </div>
            </React.Fragment>
          ))}
        </div>
      </section>
    </>
  );
};

export default Notebook;
Now it's time to give our Notebook section some styling.
.notebook {
  display: grid;
  grid-template-columns: 1fr;
  grid-gap: 20px;
  padding: 20px;
}
.notebook .notebookInfo {
  background: rgba(209, 97, 175, 0.25);
  box-shadow: 0 8px 32px 0 rgba(135, 31, 100, 0.37);
  backdrop-filter: blur(2.5px);
  border-radius: 20px;
  border: 1px solid rgba(255, 255, 255, 0.18);
  display: flex;
  flex-direction: column;
  justify-content: center;
  padding: 2rem;
  min-height: 1rem;
  width: 20rem !important;
  margin: 0rem auto;
}

.notebook .notebookInfo .notebookInfo-title {
  background: rgba(212, 134, 98, 0.25);
  box-shadow: 0 8px 32px 0 rgba(135, 31, 130, 0.37);
  border-radius: 15px;
  border: 1px solid rgba(255, 255, 255, 0.18);
  backdrop-filter: blur(2.5px);
  display: flex;
  justify-content: space-between;
  align-items: center;
}

.notebookInfo-title h3 {
  padding-left: 1rem;
}

.notebookInfo-title .remove {
  padding-right: 1rem;
}

.notebook .notebookInfo .notebookInfo-title {
  color: #f3f3f3;
  margin: 0;
  padding: 0;
  font-family: "Poppins";
}

.notebook .notebookInfo .notebookInfo-title .remove {
  color: #ff0000;
  font-size: 24px;
  font-weight: 700;
}

.notebook .notebookInfo .notebookInfo-description {
  padding: 10px;
}

.remove {
  cursor: pointer;
}

@media screen and (min-width: 768px) {
  .notebook {
    grid-template-columns: repeat(3, 1fr);
  }
}
Let's now import and initialize our Notebook component within the App component but before that, let’s dive into useEffect() hook. By using this Hook, you tell React that your component needs to do something after render. React will remember the function you passed (we’ll refer to it as our “effect”), and call it later after performing the DOM updates. To this effect, we set the document title, but we could also perform data fetching or call some other imperative API. Placing useEffect() inside the component lets us access the count state variable (or any props) right from the effect. We don’t need a special API to read it — it’s already in the function scope. Hooks embrace JavaScript closures and avoid introducing React-specific APIs where JavaScript already provides a solution.useEffect() the hook is somewhat similar to the life-cycle methods that we are aware of for class components. It runs after every render of the component including the initial render. Hence it can be thought of as a combination of componentDidMount, componentDidUpdate, and componentWillUnmount.If we want to control the behavior of when the effect should run (only on initial render, or only when a particular state variable changes), we can pass in dependencies to the effect to do so. This hook also provides a clean-up option to allow cleaning up of resources before the component is destroyed. basic syntax of the effect: useEffect(didUpdate) .
Let's make a function that adds and removes notes from the Firebase database, and then preserve it inside the useEffect hooks.
const updateNotes = () => {
  firebase
    .database()
    .ref("notebook")
    .on("child_added", (snapshot) => {
      let note = {
        id: snapshot.key,
        title: snapshot.val().title,
        description: snapshot.val().description,
      };
      let notebook = noteBookData;
      notebook.push(note);
      setNoteBookData([...noteBookData]);
    });

  firebase
    .database()
    .ref("notebook")
    .on("child_removed", (snapshot) => {
      let notebook = noteBookData;
      notebook = noteBookData.filter((note) => note.id !== snapshot.key);
      setNoteBookData(notebook);
    });
};

useEffect(() => {
  updateNotes();
}, []);
Finally, Import the Notebook as a component and pass the noteBookData as props.

// components/Notebook/Notebook.js
import React, { useState, useEffect } from "react";
import firebase from "firebase/compat/app";
import "firebase/compat/database";
import Navbar from "./components/Navbar";
import NoteAdd from "./components/NoteAdd";
import Notebook from "./components/Notebook";
import "./App.css";

const firebaseConfig = {
  apiKey: "--------------------",
  authDomain: "--------------------",
  databaseURL: "--------------------",
  projectId: "--------------------",
  storageBucket: "--------------------",
  messagingSenderId: "--------------------",
  appId: "--------------------",
  measurementId: "--------------------"
};
firebase.initializeApp(firebaseConfig);

const App = () => {
  const [noteBookData, setNoteBookData] = useState([]);

  const updateNotes = () => {
    firebase
      .database()
      .ref("notebook")
      .on("child_added", (snapshot) => {
        let note = {
          id: snapshot.key,
          title: snapshot.val().title,
          description: snapshot.val().description,
        };
        let notebook = noteBookData;
        notebook.push(note);
        setNoteBookData([...noteBookData]);
      });

    firebase
      .database()
      .ref("notebook")
      .on("child_removed", (snapshot) => {
        let notebook = noteBookData;
        notebook = noteBookData.filter((note) => note.id !== snapshot.key);
        setNoteBookData(notebook);
      });
  };

  useEffect(() => {
    updateNotes();
  }, []);

  return (
    <div className="app">
      <Navbar />
      <div className="note-section">
        <NoteAdd />
        <Notebook notebook={noteBookData} />
      </div>
    </div>
  );
};

export default App;
Finally, let's incorporate more styles into our project. Now, go to your App.css file and update your style, or simply copy and paste the following CSS code.
* {
     margin: 0;
     padding: 0;
}
 .app {
     background-image: linear-gradient( to right, rgb(242, 112, 156), rgb(255, 148, 114) );
     min-height: 100vh;
     width: 100vw;
     align-items: center;
}
 .note-section {
     padding: 15px;
}
If you followed all of the steps correctly, your project should look like this.

The full source code of the project can be found here.
In this blog tutorial, we successfully created an awesome-looking notebook app that lets you add notes and save that notes on the database. From here, we can be extremely creative and come up with a variety of ways to improve the app while also honing or mastering your React and Firebase skills. If you found this to be very simple, experiment with the code and try to add more functionality like User Authentication functionality, personalized profiles of notes, notifications and so on. Cheers!! Happy coding!!
Main article available here => https://aviyel.com/post/1277
Happy Coding!!
Follow @aviyelHQ or sign-up on Aviyel for early access if you are a project maintainer, contributor, or just an Open Source enthusiast.
Join Aviyel's Discord => Aviyel's world
Twitter =>[https://twitter.com/AviyelHq]
19
