37
Contact Form with Emailjs - React
This article is majorly for frontend engineers/developers who have no backend skill or do not want to delve into it but needs a way to get contacted from their website at minimum cost. We will be using the REACT library/framework for the purpose of this article. Adapting to VUE, ANGULAR or any other framework isn't much of a task from here.
This article continues from where we stopped last time we discussed how to implement Emailjs in our plain JavaScript code.
We now want to turn attention to implementing Emailjs in our React application.
This article assumes that you already have basic knowledge of Emailjs such as setting up an account, Email service and Email template. We learnt all those in the previous article.

Get the starter code here or you can create a react project and replace the App.js code with the following:
import "./App.css";

function App() {
  return (
    <div class="container">
      <div class="row">
        <div class="col align-self-center">
          <h1 class="text-center">Email - JavaScript Contact Form</h1>
          {/* <!-- contact form --> */}
          <form>
            {/* <!-- name --> */}
            <div class="form-group">
              <label for="name">Name</label>
              <input
                type="name"
                name="name"
                class="form-control"
                id="name"
                placeholder="enter your name"
              />
            </div>

            {/* <!-- email --> */}
            <div class="form-group">
              <label for="email">Email address</label>
              <input
                type="email"
                name="email"
                class="form-control"
                id="email"
                placeholder="enter your email"
              />
            </div>

            {/* <!-- subject --> */}
            <div class="form-group">
              <label for="subject">Subject</label>
              <input
                type="text"
                name="subject"
                class="form-control"
                id="subject"
                placeholder="enter email subject"
              />
            </div>

            <div class="form-group">
              <label for="email_body">Message</label>
              <textarea
                class="form-control"
                id="email_body"
                rows="5"
              ></textarea>
            </div>

            <button type="submit" class="btn btn-primary">
              Submit
            </button>
          </form>
        </div>
      </div>
    </div>
  );
}

export default App;- The following should replace the
index.htmlcode
<!DOCTYPE html>
<html lang="en">
  <head>
    <meta charset="utf-8" />
    <link rel="icon" href="%PUBLIC_URL%/favicon.ico" />
    <meta name="viewport" content="width=device-width, initial-scale=1" />
    <meta name="theme-color" content="#000000" />
    <meta
      name="description"
      content="Web site created using create-react-app"
    />
    <link rel="apple-touch-icon" href="%PUBLIC_URL%/logo192.png" />
    <!--
      manifest.json provides metadata used when your web app is installed on a
      user's mobile device or desktop. See https://developers.google.com/web/fundamentals/web-app-manifest/
    -->
    <link rel="manifest" href="%PUBLIC_URL%/manifest.json" />
    <!--
      Notice the use of %PUBLIC_URL% in the tags above.
      It will be replaced with the URL of the `public` folder during the build.
      Only files inside the `public` folder can be referenced from the HTML.

      Unlike "/favicon.ico" or "favicon.ico", "%PUBLIC_URL%/favicon.ico" will
      work correctly both with client-side routing and a non-root public URL.
      Learn how to configure a non-root public URL by running `npm run build`.
    -->
    <!-- bootstrap CSS -->
    <link
      rel="stylesheet"
      href="https://cdn.jsdelivr.net/npm/bootstrap@4.5.3/dist/css/bootstrap.min.css"
      integrity="sha384-TX8t27EcRE3e/ihU7zmQxVncDAy5uIKz4rEkgIXeMed4M0jlfIDPvg6uqKI2xXr2"
      crossorigin="anonymous"
    />
    <title>React Emailjs</title>
  </head>
  <body>
    <noscript>You need to enable JavaScript to run this app.</noscript>
    <div id="root"></div>
    <!--
      This HTML file is a template.
      If you open it directly in the browser, you will see an empty page.

      You can add webfonts, meta tags, or analytics to this file.
      The build step will place the bundled scripts into the <body> tag.

      To begin the development, run `npm start` or `yarn start`.
      To create a production bundle, use `npm run build` or `yarn build`.
    -->

    <!-- bootstrap js -->
    <script
      src="https://code.jquery.com/jquery-3.5.1.slim.min.js"
      integrity="sha384-DfXdz2htPH0lsSSs5nCTpuj/zy4C+OGpamoFVy38MVBnE+IbbVYUew+OrCXaRkfj"
      crossorigin="anonymous"
    ></script>
    <script
      src="https://cdn.jsdelivr.net/npm/bootstrap@4.5.3/dist/js/bootstrap.bundle.min.js"
      integrity="sha384-ho+j7jyWK8fNQe+A12Hb8AhRq26LrZ/JpcUGGOn+Y7RsweNrtN/tE3MoK7ZeZDyx"
      crossorigin="anonymous"
    ></script>
  </body>
</html>- Run
npm ito install dependencies if you cloned the app - Run
npm startto load the project in a browser
Run the following command to install Emailjs
npm install emailjs-com --saveTo initialise Emailjs, Import it in the App.js file like so:
import emailjs from 'emailjs-com';- To submit the form, we need to import the
useRefhook like so:
import { useRef } from 'react';Learn more about useRef hook here
- Next, initialise an instance of the useRef hook and name it
formlike so:
const form = useRef();- Next, Replace the opening
formtag with the following:
<form ref={form} onSubmit={sendEmail}>this gets the form inputs and submits it when the form is submitted
- Now enter the following function just below the
const form = useRef();line:
const sendEmail = (e) => {
    e.preventDefault();

    emailjs.sendForm('YOUR_SERVICE_ID', 'YOUR_TEMPLATE_ID', form.current, 'YOUR_USER_ID')
      .then((result) => {
          console.log(result.text);
      }, (error) => {
          console.log(error.text);
      });
  };
In the code above, we stop page from refreshing when the form is submitted. Then we call the sendForm function provided for us by emailjs. For this to be successful, you need to replace 'YOUR_SERVICE_ID', 'YOUR_TEMPLATE_ID' and 'YOUR_USER_ID' with your own details.
To get your USER_ID, go to your dashboard and click on the Integrations link on the side menu. You should be on a page like this:

Your USER_ID is down below under the API Keys
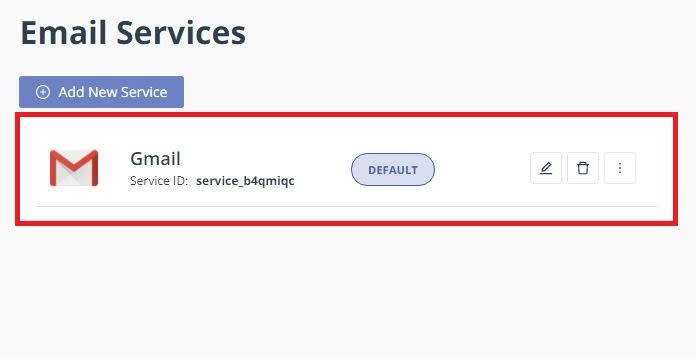
To get YOUR_SERVICE_ID, click on the Email Services link in your dashboard's side menu

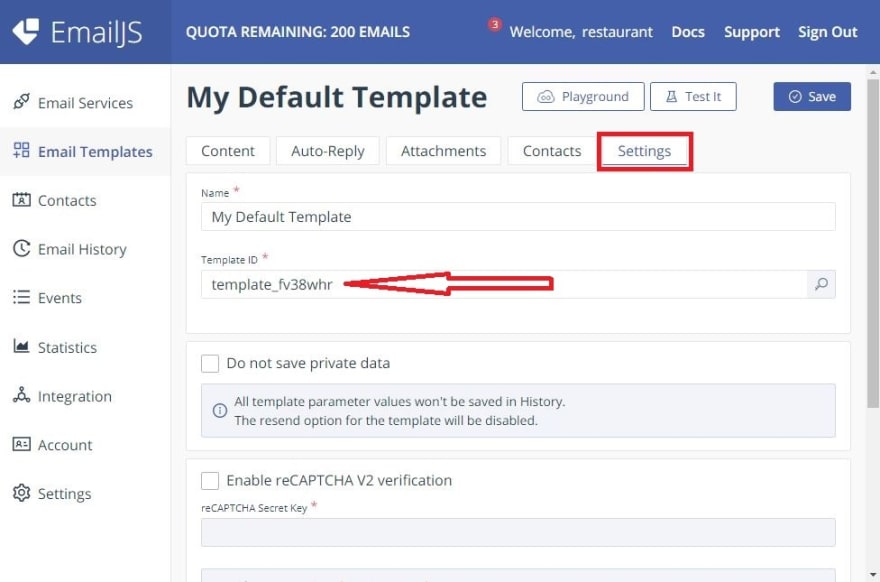
To get YOUR_TEMPLATE_ID, click on the Email Templates link in your dashboard's side menu and go to the settings tab like so:

NOTE: You will need a new template for this tutorial if you have used the one you created before in another project like the last project.
I now have this
sendEmailfunction:
const sendEmail = (e) => {
    e.preventDefault();

    emailjs
      .sendForm(
        "service_b4qmiqc",
        "template_h9rzd14",
        form.current,
        "user_UHpNJFij8MtQD1aAfs38X"
      )
      .then(
        (result) => {
          console.log(result.text);
          alert("SUCCESS!");
        },
        (error) => {
          console.log(error.text);
          alert("FAILED...", error);
        }
      );
  };
Very Well Then, Let’s Proceed!
If you have replaced the dummy strings with your value, then let's test our application by filling the form, submitting it, checking our console and email for new message.
Congratulations! You are a Champion for Getting this far...

This tutorial assumed that you came from the previous tutorial where we laid the basis for using Emailjs. We have gone ahead to learn how frontend developers can make their contact form work with minimal effort and cost.
I hope you enjoyed this tutorial. I enjoy writing about new discoveries like this as they are usually helpful to many developers.
All Codes are here
Keep Building!
37


