
34
Making a URL Shortener website using Axios
In this article I will tell you how I made and you can also make a URL shortener Website. Check out the result of what we are gonna make: here.
Well basically no library mentioned above was necessary for this project, they are here just cause they will make our work easier and will save a lot of time.
Logic/Working:
We will add a input tag in which the user will be able to paste his link and a 'Shorten' button. On click of that button a AXIOS request will be fired and then we will pass the response to the output box. However this seems easy and it is! for a person who knows how to handle API'S response, JSON data and manage errors for multiple cases.
As a beginner you don't have to worry I have covered each and every step mentioned above with good examples.
First of all what we need is a Good Design so that it will also look good. I have already designed a Website for this project here it is:
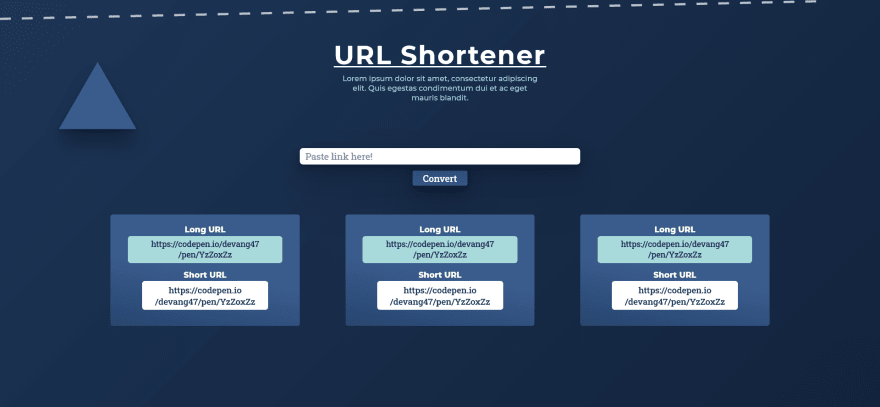
(However I am not a designer so sorry if the design is bad)
In this design there is a heading, a sub-heading, a input tag for pasting link, a convert button and three boxes for displaying result.
I've used button tags for displaying output (You can also use Input tag).
In this design there is a heading, a sub-heading, a input tag for pasting link, a convert button and three boxes for displaying result.
I've used button tags for displaying output (You can also use Input tag).
If you want, you can make the whole website from starting or if you want to follow along or save some time start with this codepen (for basic HTML and CSS) :
First of all we will add a event to 'convert' button i.e. onclick and pass a function which will execute when the button is clicked:
// function name is 'shorten'
<button type="submit" class="shorten-button font-2" onclick="shorten()">
    Convert
</button>
Then we will define this function in JS:
const shorten = () => {
    console.log('button clicked')
}
Don't forget to link the JS file if you are editing outside of codepen.
Then when the button is clicked a message should appear on console.
Then when the button is clicked a message should appear on console.
Now we will work on the Axios request when the button is clicked.
Don't know Axios here's a quick intro:
Don't know Axios here's a quick intro:
Axios is a popular, promise-based HTTP client that sports an easy-to-use API and can be used in both the browser and Node.
- It's syntax is super simple and beginner friendly.
Basic Axios syntax:
axios.get('API url')
.then((response) => {
    // if the request was Sucessful and no errors were caught
    console.log(response)
})
.catch((error) => {
    // if errors were there.
    console.log(error)
})
Before using Axios don't forget to link the Axios package to your HTML file
<script src="https://cdnjs.cloudflare.com/ajax/libs/axios/0.21.1/axios.min.js" integrity="sha512-bZS47S7sPOxkjU/4Bt0zrhEtWx0y0CRkhEp8IckzK+ltifIIE9EMIMTuT/mEzoIMewUINruDBIR/jJnbguonqQ==" crossorigin="anonymous" referrerpolicy="no-referrer"></script>For the URL shortening we will use a free URl shortening api provider SHRTCODE. You can visit the website and read the docs for more info.
This is the main link for calling the API:
https://api.shrtco.de/v2/shorten?url=YOUR_URLNow we will just add the link to our Axios request in the 'get' method:
let longUrl = 'https://developer.mozilla.org/en-US/docs/Web/JavaScript/Reference/Template_literals'

axios
.get(`https://api.shrtco.de/v2/shorten?url=${longUrl}`)
.then((responseData) => {
    console.log(responseData);
})
.catch((err)=> {
    alert('Error check your connectivity or link')
})
Here I am using template strings to add the URL to the get method so that we will be able to change it later.
As this api is free it will take some time to give the response (5 - 10sec), just wait until then. Here is a Codepen Example of a working API call.
As this api is free it will take some time to give the response (5 - 10sec), just wait until then. Here is a Codepen Example of a working API call.
After some time we will have the response in the form of JSON data, we will store it in a variable for later use or if a Error is caught we will simply alert 'Error check your connectivity or link'.
However we will not give the same link everytime or will change the JS everytime we have a new link, so we fetch the link from the input tag by value attribute.
let  longUrl  =  document.querySelector("#url-box").value;
// we will also declare a variable for later storage of processed url
let shortUrl;
Till now we have the full URL, working JSON request, and processed data.
Now we will get the main Information from that JSON data which is something like this:
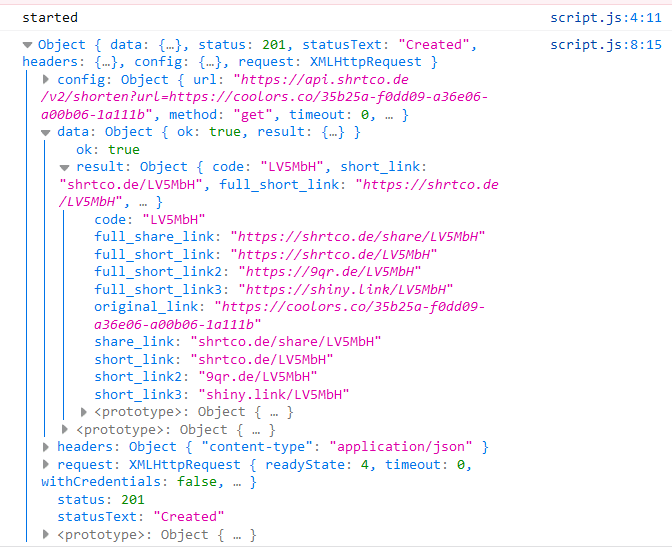
Now we will get the main Information from that JSON data which is something like this:
The processed URL is
full_short_link which is inside result which is inside of data.Well, how to get this URL?
We will simple do
for ex:
We will simple do
resdata.data.result.full_short_link to get Processed link inside of then. Here resdata is response data from API.for ex:
axios .get(`https://api.shrtco.de/v2/shorten?url=${longUrl}`)
    .then((resdata) => {
        //storing Processed URL in already declared variable
        shortUrl  =  resdata.data.result.full_short_link;
        console.log(shortUrl)
        //check console for Processed URL or errors
    })
    .catch((err) => {
        alert("Error check your connectivity or link");
    });
Now half of the work is Done! Congratulations.
What is left is we have to display it to screen which is not a big deal.
First of all Logic:
We will make a function which will create a element (a div tag) and store it in a variable then through
We will make a function which will create a element (a div tag) and store it in a variable then through
.innerHtml property, We will pass this Markup (as a string) and pass variables (longUrl , shortUrl) using template strings:` <div class="item">
<div class="long-url">
<div class="title font-1">
Long URL
</div>
<button id="long-url" class="font-2">
${longUrl}
</button>
</div>
<div class="short-url">
<div class="title font-1">
Short URL
</div>
// providing shortUrl variable in value attribute for the copy function⏬
<button id="short-url" class="font-2" value='${shortUrl}' onclick='copyLink(this)'>
${shortUrl}
</button>
</div>
</div> `// compressed version (spaces and tabs removed) because JS will
// give errors on 'tab' and 'enter'
<div class="item"><div class="long-url"><div class="title font-1">Long URL</div> <button id="long-url" class="font-2"> ${longUrl} </button></div><div class="short-url"><div class="title font-1">Short URL</div> <button id="short-url" class="font-2 hint--bottom" aria-label="Click link to Copy" onclick='copy(this)' value='${shortUrl}' onclick='copyLink(this)'>${shortUrl}</button></div></div>and then finally this tag will append to the Parent link container. I know this is kinda complicated but this will help you get clear:
//Final working:
function  addResult(longUrl, shortUrl) {
    let parentEle = document.querySelector("#shortened-links");
    let data = `<div class="item"><div class="long-url"><div class="title font-1">Long URL</div> <button id="long-url" class="font-2"> ${longUrl} </button></div><div class="short-url"><div class="title font-1">Short URL</div> <button id="short-url" class="font-2" value='${shortUrl}' onclick='copyLink(this)'>${shortUrl}</button></div></div>`;

    let  newEle  =  document.createElement("div");
    newEle.innerHTML  =  data;
    parentEle.appendChild(newEle);
}
We will pass
longUrl and shortUrl as parameters.Now we will pass this function in
then method, which will execute when data is Fetched from API:.then((resdata) => {
shortUrl = resdata.data.result.full_short_link;
addResult(longUrl, shortUrl);
})and What will happen is this markup will be added to the Html when the data is fetched and as we have already styled their 'class' attributes in CSS, the markup will execute and a processed
item will show up on the screen.The copyLink function will execute when the short Url box is clicked i.e.

The function will be:
The function will be:
function  copyLink(tag){
    let  text  =  tag.value;
    // copy link to clipboard
    navigator.clipboard.writeText(text);
}
The parameter of this function will be the Tag and the argument will be
this keyword. for ex:// usage of this function:
onclick='copyLink(this)'this keyword will pass the full button tag through an argument so that we will later be able to use value property in CopyLink func.Thats why i've used Button tags for displaying Output and added value attribute to
shortUrl tag. (you can use input tag also)
Now it is upto you how much animations you want to add in this site.
As for error handling we can suppose certain situations in which a Error will occour like
'What if the input tag is empty and button is clicked' :
As for error handling we can suppose certain situations in which a Error will occour like
'What if the input tag is empty and button is clicked' :
// we can do something like this:
if (longUrl){
    //if their is value in input tag then only Axios request is sent
    axios.get()....
}else{
    alert('Enter some data first!!')
}
Now If you want to do more customizations in this project that is totally upto you.
If you have any questions ask them in the Comment section and don't forget to leave a like If this post helped you.😊
A post by Devang. Hope it helps!
34