
24
How to execute JUnit 4 tests with JUnit 5 [Tutorial]
JUnit is a powerful framework for Selenium test automation that has been popularly used by developers to perform unit testing. It is extensively used to perform testing on small parts of code. The entire application which is being developed undergoes unit testing, which is performed on small code chunks.
By testing individual chunks of code, the developer would be able to test his code and find bugs or incorrect functionality, if any. This testing framework, though most widely used by developers, is also used by automation testers for different purposes in their automation framework, among which assertion tops the list.
In this JUnit 5 Tutorial, we deep dive into how to run JUnit 4 tests with JUnit 5 (the latest release of the JUnit framework).
JUnit 5 is the latest version of JUnit, which is primarily composed of three different sub-components – JUnit Platform, JUnit Jupiter, and JUnit Vintage. Before getting to know about these components, one essential requirement about JUnit 5 is that runtime JUnit 5 requires Java version 8 (or any other higher versions). However, the unit tests can still be compiled with the previous Java versions and tested with JUnit 5. Now let me take you all through the three sub-components that have been mentioned earlier.
JUnit platform is the basic foundation of the testing framework, which helps in framework development. JUnit Jupiter is used for writing the tests and the JUnit Vintage is used for running earlier versions of JUnit tests such as JUnit 3 and JUnit 4 based tests.
In further sections of this JUnit 5 tutorial, we would deep dive into JUnit 5 vs JUnit 4 comparison along with the demonstration of the respective JUnit versions from Selenium automation testing point of view.
In this section of the JUnit 5 tutorial, we look at how JUnit 5 stacks in front of JUnit 4?
JUnit 5 is different from JUnit 4? Let us understand the differences in the JUnit 5 vs JUnit 4 comparison:
In JUnit 4,
public static void assertEquals(String message, long expected, long actual)In JUnit 5,
public static void assertEquals(long expected, long actual, String message)Here are some of the annotations that changed in JUnit 5:
| JUnit 4 | JUnit 5 |
|---|---|
| @ Before | @ BeforeEach |
| @ After | @ AfterEach |
| @ BeforeClass | @ BeforeAll |
| @ AfterClass | @ AfterAll |
| @ Ignore | @ Disabled |
| @ Category | @ Tag |
@ Rule and @ ClassRule annotations in JUnit 4 are removed. Instead, @ ExtendWith and @ RegisterExtension should be used.
Now that we know about the JUnit 4 and JUnit 5 annotations, let’s look at the annotations in more detail in this section of the JUnit 5 Tutorial:
Usage of @ Test annotation in JUnit 4
@Test(expected = Exception.class)
public void testThrowsException() throws Exception {
}
Usage of @test
annotation in JUnit 5
@Test
void testThrowsException() throws Exception {
    Assertions.assertThrows(Exception.class, () -> {

    });
}In this section of JUnit 5 tutorial, we look at major JUnit annotations used in JUnit 4 and JUnit 5. Most of the annotations in JUnit 5 are similar to annotations in JUnit 4. Let us first look into the annotations used in JUnit 5 and then list out the detailed JUnit 5 vs JUnit 4 comparison.
@RepeatedTest(5)
public void print(){
  // write some code to be executed
}
Let us see the sequence in which these annotations are executed in JUnit 5.
Step 1: The method implemented under the @BeforeAll annotation is executed once.
Step 2: The method implemented under the @BeforeEach annotation executes before the first test.
Step 3: The method implemented under the @test
annotation is executed.
Step 4: The method implemented under the @AfterEach annotation runs after the test case is executed.
Step 5: The method implemented under the @AfterAll annotation will be executed at the end.
In Selenium Automation Testing with the JUnit, you might want to implement multiple test scenarios (or methods) under the same class (or different classes). As seen in the earlier part of the JUnit 5 tutorial, it is essential to know the execution order of the methods implemented under different annotations.
Here is order of execution in case there are two or more test methods in the class:
Step 1: The method implemented under the @ BeforeAll annotation is executed once.
Step 2: The method implemented under the @ BeforeEach annotation executes before the first test.
Step 3: The method implemented under the @ Test annotation is executed.
Step 4: The method implemented under the @ AfterEach annotation runs after the test case is executed.
Step 5: The method implemented under the @ BeforeEach annotation is executed before the second test case.
Step 6: The method implemented under the @ Test annotation is executed.
Step 7: The method implemented under the @ AfterEach annotation is executed after the execution of the second test case.
Step 8: The method that has been annotated with @ AfterAll is executed once at the end.
Thus, for multiple test cases, the methods implemented under @ BeforeAll and @ AfterAll annotations are executed only once, at the beginning and end of the test.On the other hand, test methods implemented under the @ BeforeEach and @ AfterEach annotations are executed before and after respectively for each and every test case.
So far in this JUnit 5 tutorial, we have covered the basics of JUnit 5 framework, annotations of JUnit 5, and life cycle of the annotations.
You might be eager to know what should be done with the tests created using the JUnit 4 framework? It is relatively easy to migrate JUnit 4 to JUnit 5 framework, let’s have a detailed look at the migration process in further sections of the JUnit 5 tutorial.
One of the common questions that comes to JUnit users is ‘Is it possible to run JUnit 4 tests in JUnit 5’? By the end of this section of JUnit 5 tutorial, you would be in a position to run JUnit 4 tests in JUnit 5. You can migrate tests written in JUnit 4 to JUnit 5 with minimal effort. Here are the steps to perform the migration:
We take a simple example on how to run the tests written in JUnit 4 and JUnit 5 together in a project.
For example, let us see how to run the project that contains unit tests built using JUnit 4 and JUnit 5.
For example, let us see how to run the project that contains unit tests built using JUnit 4 and JUnit 5.
In our project demonstrating the aspects listed so far in this JUnit 5 tutorial, let us assume that we have tests written using JUnit 4. Now we shall add the tests using JUnit 5 for which we would be adding few dependencies. So our pom.xml file would look like below:
<?xml version="1.0" encoding="UTF-8"?>
<project xmlns="http://maven.apache.org/POM/4.0.0"
         xmlns:xsi="http://www.w3.org/2001/XMLSchema-instance"
         xsi:schemaLocation="http://maven.apache.org/POM/4.0.0 http://maven.apache.org/xsd/maven-4.0.0.xsd">
    <modelVersion>4.0.0</modelVersion>

    <groupId>RunJUnitTest</groupId>
    <artifactId>RunJUnitTest</artifactId>
    <version>1.0-SNAPSHOT</version>

    <dependencies>
        <dependency>
            <groupId>org.slf4j</groupId>
            <artifactId>slf4j-nop</artifactId>
            <version>1.7.28</version>
            <scope>test</scope>
        </dependency>
        <dependency>
            <groupId>org.junit.platform</groupId>
            <artifactId>junit-platform-launcher</artifactId>
            <version>1.2.0</version>
        </dependency>
        <dependency>
            <groupId>org.junit.jupiter</groupId>
            <artifactId>junit-jupiter-engine</artifactId>
            <version>5.2.0</version>
        </dependency>
        <dependency>
            <groupId>org.junit.vintage</groupId>
            <artifactId>junit-vintage-engine</artifactId>
            <version>5.2.0</version>
        </dependency>
        <dependency>
            <groupId>org.junit.jupiter</groupId>
            <artifactId>junit-jupiter-api</artifactId>
            <version>5.2.0</version>
            <scope>test</scope>
        </dependency>
        <dependency>
            <groupId>junit</groupId>
            <artifactId>junit</artifactId>
            <version>4.12</version>
            <scope>test</scope>
        </dependency>
        <dependency>
            <groupId>org.slf4j</groupId>
            <artifactId>slf4j-nop</artifactId>
            <version>1.7.28</version>
            <scope>test</scope>
        </dependency>
        <dependency>
            <groupId>org.seleniumhq.selenium</groupId>
            <artifactId>selenium-java</artifactId>
            <version>4.0.0-alpha-7</version>
        </dependency>
        <dependency>
            <groupId>org.seleniumhq.selenium</groupId>
            <artifactId>selenium-remote-driver</artifactId>
            <version>4.0.0-alpha-7</version>
        </dependency>
        <dependency>
            <groupId>org.seleniumhq.selenium</groupId>
            <artifactId>selenium-chrome-driver</artifactId>
            <version>4.0.0-alpha-7</version>
        </dependency>
        <dependency>
            <groupId>junit</groupId>
            <artifactId>junit</artifactId>
            <version>4.12</version>
            <scope>test</scope>
        </dependency>
        <dependency>
            <groupId>org.apache.httpcomponents</groupId>
            <artifactId>httpclient</artifactId>
            <version>4.5.13</version>
        </dependency>
        <!-- https://mvnrepository.com/artifact/net.coobird/thumbnailator -->
        <dependency>
            <groupId>net.coobird</groupId>
            <artifactId>thumbnailator</artifactId>
            <version>0.4.14</version>
        </dependency>
        <!-- https://mvnrepository.com/artifact/ru.yandex.qatools.ashot/ashot -->
        <dependency>
            <groupId>ru.yandex.qatools.ashot</groupId>
            <artifactId>ashot</artifactId>
            <version>1.5.4</version>
        </dependency>
    </dependencies>

    <properties>
        <maven.compiler.source>15</maven.compiler.source>
        <maven.compiler.target>15</maven.compiler.target>
    </properties>

</project>
For demonstration of JUnit 4 and JUnit 5, we perform operations on the LambdaTest ToDo App which is also used in the blog titled How to run JUnit tests from command line.
Test Scenario
This demonstrates the use of the JUnit framework for the purpose of Selenium Automation Testing.
Below is the test written using JUnit 4
import org.openqa.selenium.By;
import org.openqa.selenium.JavascriptExecutor;
import org.openqa.selenium.WebDriver;
import org.openqa.selenium.remote.DesiredCapabilities;
import org.openqa.selenium.remote.RemoteWebDriver;
import java.net.MalformedURLException;
import java.net.URL;

/* JUnit related imports */
import org.junit.*;

public class JUnit4Demo
{
    static WebDriver driver = null;
    static String URL = "https://lambdatest.github.io/sample-todo-app/";
    public static String status = "passed";
    static String username = "user-name";
    static String access_key = "access-key";

    @Before
    public void beforeMethod() throws MalformedURLException {
        System.out.println("=======Running @Before for JUnit 4=======");
        DesiredCapabilities capabilities = new DesiredCapabilities();
        capabilities.setCapability("build", "[Java] Demonstration of running JUnit4 tests on LambdaTest Grid");
        capabilities.setCapability("name", "[Java] Demonstration of running JUnit4 tests on LambdaTest Grid");
        capabilities.setCapability("platform", "Windows 10");
        capabilities.setCapability("browserName", "Chrome");
        capabilities.setCapability("version","latest");
        capabilities.setCapability("tunnel",false);
        capabilities.setCapability("network",true);
        capabilities.setCapability("console",true);
        capabilities.setCapability("visual",true);

        driver = new RemoteWebDriver(new URL("https://" + username + ":" + access_key + "@hub.lambdatest.com/wd/hub"), capabilities);

        /* driver = new ChromeDriver(); */
        System.out.println("Started session");
    }

    @Test
    public void simpleJunit4Test() throws InterruptedException
    {
        System.out.println("Running a simple Junit 4 test.");
        driver.navigate().to(URL);
        driver.manage().window().maximize();

        try
        {
            /* Let's mark the first two items in the list. */
            driver.findElement(By.name("li1")).click();
            driver.findElement(By.name("li2")).click();

            /* Let's add an item to the list. */
            driver.findElement(By.id("sampletodotext")).sendKeys("Happy Testing at LambdaTest");
            driver.findElement(By.id("addbutton")).click();

            /* Let's check that the item we added is added in the list. */
            String enteredText = driver.findElement(By.xpath("/html/body/div/div/div/ul/li[6]/span")).getText();
            if (enteredText.equals("Happy Testing at LambdaTest"))
            {
                System.out.println("Demonstration of running JUnit tests is complete");
            }
        }
        catch (Exception e)
        {
            System.out.println(e.getMessage());
        }
    }

    @After
    public void afterMethod()
    {
        System.out.println("=======Running @After for JUnit 4=======");
        if (driver != null)
        {
            ((JavascriptExecutor) driver).executeScript("lambda-status=" + status);
            driver.quit();
        }
    }
}
Let us add a test using JUnit 5 in the same project
import org.openqa.selenium.By;
import org.openqa.selenium.JavascriptExecutor;
import org.openqa.selenium.WebDriver;
import org.openqa.selenium.remote.DesiredCapabilities;
import org.openqa.selenium.remote.RemoteWebDriver;
import java.net.MalformedURLException;
import java.net.URL;
/* JUnit related imports */
import org.junit.jupiter.api.AfterEach;
import org.junit.jupiter.api.BeforeEach;
import org.junit.jupiter.api.Test;
public class RunUnitTests
{
static WebDriver driver = null;
static String URL = "https://lambdatest.github.io/sample-todo-app/";
public static String status = "passed";
static String username = "user-name";
static String access_key = "access-key";
@BeforeEach
public void beforeEachMethod() throws MalformedURLException {
System.out.println("=======Running @BeforeEach for JUnit 5=======");
DesiredCapabilities capabilities = new DesiredCapabilities();
capabilities.setCapability("build", "[Java] Demonstration of running JUnit5 tests on LambdaTest Grid");
capabilities.setCapability("name", "[Java] Demonstration of running JUnit5 tests on LambdaTest Grid");
capabilities.setCapability("platform", "Windows 10");
capabilities.setCapability("browserName", "Chrome");
capabilities.setCapability("version","latest");
capabilities.setCapability("tunnel",false);
capabilities.setCapability("network",true);
capabilities.setCapability("console",true);
capabilities.setCapability("visual",true);
driver = new RemoteWebDriver(new URL("https://" + username + ":" + access_key + "@hub.lambdatest.com/wd/hub"), capabilities);
/* driver = new ChromeDriver(); */
System.out.println("Started session");
}
@Test
public void simpleJunit5Test() throws InterruptedException
{
System.out.println("Running a simple Junit 5 test.");
driver.navigate().to(URL);
driver.manage().window().maximize();
try
{
/* Let's mark the first two items in the list. */
driver.findElement(By.name("li1")).click();
driver.findElement(By.name("li2")).click();
/* Let's add an item to the list. */
driver.findElement(By.id("sampletodotext")).sendKeys("Happy Testing at LambdaTest");
driver.findElement(By.id("addbutton")).click();
/* Let's check that the item we added is added in the list. */
String enteredText = driver.findElement(By.xpath("/html/body/div/div/div/ul/li[6]/span")).getText();
if (enteredText.equals("Happy Testing at LambdaTest"))
{
System.out.println("Demonstration of running JUnit tests is complete");
}
}
catch (Exception e)
{
System.out.println(e.getMessage());
}
}
@AfterEach
public void afterEachMethod()
{
System.out.println("=======Running @AfterEach for JUnit 5=======");
if (driver != null)
{
((JavascriptExecutor) driver).executeScript("lambda-status=" + status);
driver.quit();
}
}
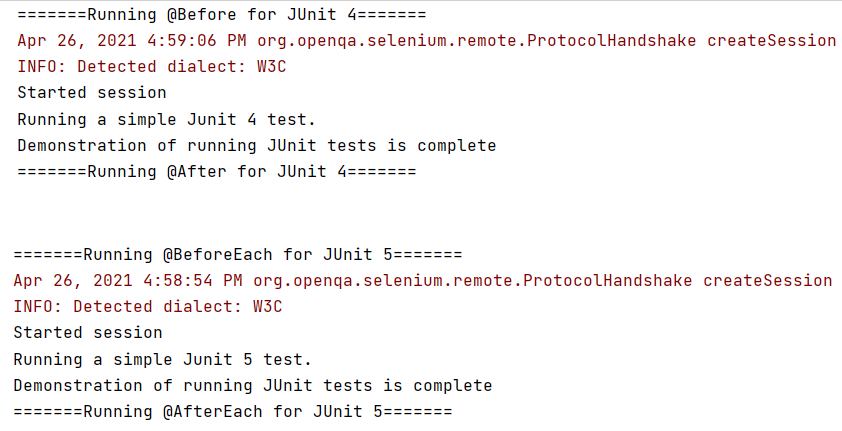
}Upon execution,you will see the results of both the tests in the console like the one below.
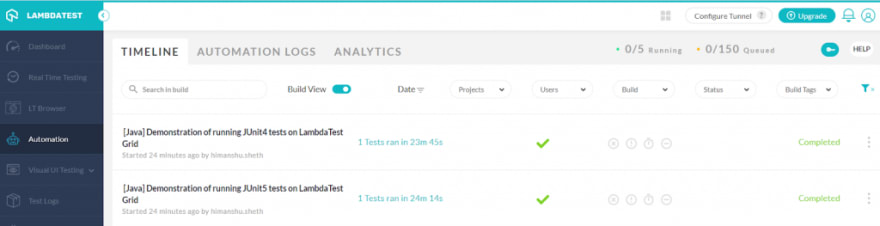
Here is the execution snapshot from the Automation dashboard of LambdaTest. As seen below, the tests have executed successfully.
So far, in this JUnit 5 tutorial, we have covered all the essential aspects of JUnit 4 as well as Junit 5, including a head-on JUnit 5 vs JUnit 4 comparison. Now that you are aware about the annotations in JUnit 5, let’s look at the advantages of using JUnit 5 for unit testing. Some of the major advantages are mentioned below:
In this JUnit 5 tutorial, we looked into JUnit 5 components and their features, newly introduced annotations, and approach to migrate tests from JUnit 4 to Junit 5. I hope you got a good grasp of the JUnit 5 framework. If you are an existing JUnit user, this JUnit 5 tutorial can be used as a handy guide for migration of tests to JUnit 5 as well as to get started with the JUnit framework.
Feel free to share this article with your peers and let us know how you are using JUnit 5 for Selenium automation testing.
Happy Testing…! 😊
24