
24
How to Build a Flower Recognition App with Teachable Machine and SashiDo
Hello! I recently built a machine learning based web application that can identify a flower (daisy, dandelion, sunflower, rose and tulip for now) using Google's Teachable Machine for training a machine learning model and SashiDo for storing images. I thought this was an interesting idea where users can either upload an image or use their webcam to get predicted results and now I'll walk you through it.
Here's a short demo video showing how the application works:
For classifying flowers, the first step is to generate a ML model. Teachable machine is a web-based tool that can be used to generate 3 types of models based on the input type, namely Image, Audio and Pose. I created an image project and uploaded images of flowers which were taken from a kaggle dataset.

There are a few advanced settings for epochs,learning rate and batch size, but I felt the default ones were good enough for the task.After training, I exported the model and uploaded it. This stores it in the cloud and gives a shareable public link which can be then used in the project.
The next step would be to use to model to perform classification. There are two ways of providing input,we shall go through both of them.
<script src=https://unpkg.com/parse/dist/parse.min.js></script>Next step would be working on the frontend.
I've created two buttons to start/stop the webcam and to upload image, an input element for file upload and 3 empty divs to display the webcam input,image input and the output(prediction result). I have used Bootstrap, so in case you're not familiar with it, the class names basically correspond to various utilities in it.
<div class="container" id="main">
        <div class="row justify-content-center">
            <div class="col-lg-10 col-md-12">
                <div class="card m-4">
                    <div class="card-body" id="box-cont" style="text-align: center;">
                        <h3 class="card-title py-3 title" id="detect">Flower Recognition Application
                        </h3>
                        <p class="px-3">
                            To identify a <strong><span class="yellow">Daisy</span>, <span style="color: pink;">Rose</span>, <span class="yellow">Dandelion</span>, <span style="color: pink;">Tulip</span>, or <span class="yellow">Sunflower</span></strong>, either use your web camera and show the flower
                            or upload an image from your device.
                        </p>
                        <label for="webcam" class="ps-3 pt-3 pb-3" style="color: #fcfcfc">USE WEBCAM:</label>
                        <button id="webcam" type="button" class="btn btn-primary ms-3"
                            onclick="useWebcam()">Start
                            webcam
                        </button>
                        <div id="webcam-container" class="px-3"></div>
                        <div id="label-container" class="px-3 pt-3" style="color: #fcfcfc;"></div>
                        <label class="p-3" for="fruitimg" style="color: #fcfcfc">UPLOAD IMAGE:</label>
                        <div class="input-group px-3 pb-3" id="inputimg" style="text-align: center;">
                            <input type="file" class="form-control" accept="image/*" id="fruitimg">
                            <button class="btn btn-primary" id="loadBtn">Load</button>
                        </div>
                        <div id="uploadedImage" class="px-3"></div>
                        <div id="label-container-cam" class="px-3 pt-3"></div>
                    </div>
                </div>
            </div>
        </div>
    </div>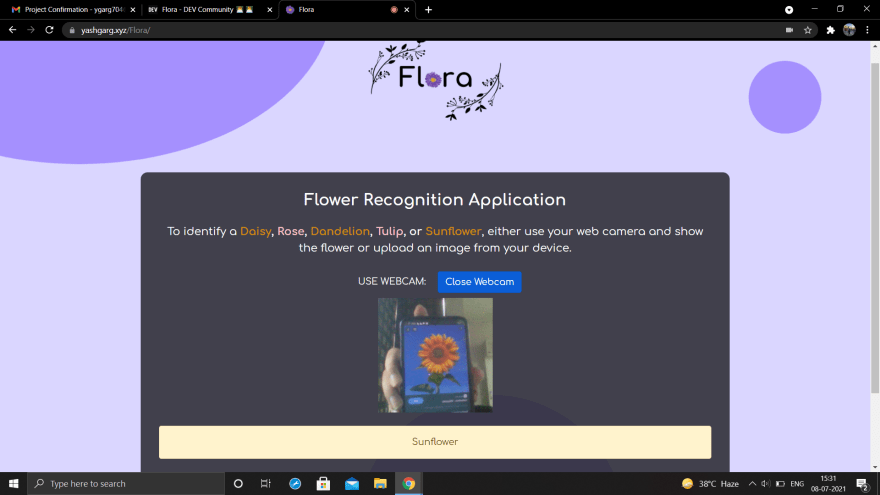
The model can be used in our javascript project easily using the Teachable machine library for images. To use the library, just add the following scripts at the bottom of the html file. Alternatively, you could also install the library from NPM package installer.
<script src="https://cdn.jsdelivr.net/npm/@tensorflow/tfjs@1.3.1/dist/tf.min.js"></script>
<script
    src="https://cdn.jsdelivr.net/npm/@teachablemachine/image@0.8/dist/teachablemachine-image.min.js">
</script>
The following code helps in toggling the webcam button and declares some variables.The URL constant is set to the model link.
let model, webcam, newlabel, canvas, labelContainer, maxPredictions, camera_on = false, image_upload = false;

function useWebcam() {
    camera_on = !camera_on;

    if (camera_on) {
        init();
        document.getElementById("webcam").innerHTML = "Close Webcam";
    }
    else {
        stopWebcam();
        document.getElementById("webcam").innerHTML = "Start Webcam";
    }
}

async function stopWebcam() {
    await webcam.stop();
    document.getElementById("webcam-container").removeChild(webcam.canvas);
    labelContainer.removeChild(newlabel);
}
Now,we can load the model and perform the prediction and display the class having highest probability.
// Load the image model and setup the webcam
async function init() {

    const modelURL = URL + "model.json";
    const metadataURL = URL + "metadata.json";

    // load the model and metadata
    model = await tmImage.load(modelURL, metadataURL);
    maxPredictions = model.getTotalClasses();

    // Convenience function to setup a webcam
    const flip = true; // whether to flip the webcam
    webcam = new tmImage.Webcam(200, 200, flip); // width, height, flip
    await webcam.setup(); // request access to the webcam
    await webcam.play();
    window.requestAnimationFrame(loop);

    // append element to the DOM
    document.getElementById("webcam-container").appendChild(webcam.canvas);

    newlabel = document.createElement("div");
    labelContainer = document.getElementById("label-container");
    labelContainer.appendChild(newlabel);
}

async function loop() {
    webcam.update(); // update the webcam frame
    await predict(webcam.canvas);
    window.requestAnimationFrame(loop);
}

// run the image through the image model
async function predict(input) {
    // predict can take in an image, video or canvas html element
    const prediction = await model.predict(input);

    var highestVal = 0.00;
    var bestClass = "";
    result = document.getElementById("label-container");
    for (let i = 0; i < maxPredictions; i++) {
        var classPrediction = prediction[i].probability.toFixed(2);
        if (classPrediction > highestVal) {
            highestVal = classPrediction;
            bestClass = prediction[i].className;
        }
    }

    if (bestClass == "Daisy" || bestClass == "Dandelion" || bestClass == "Sunflower") {
        newlabel.className = "alert alert-warning";
    }
    else {
        newlabel.className = "alert alert-danger";
    }

    newlabel.innerHTML = bestClass;
}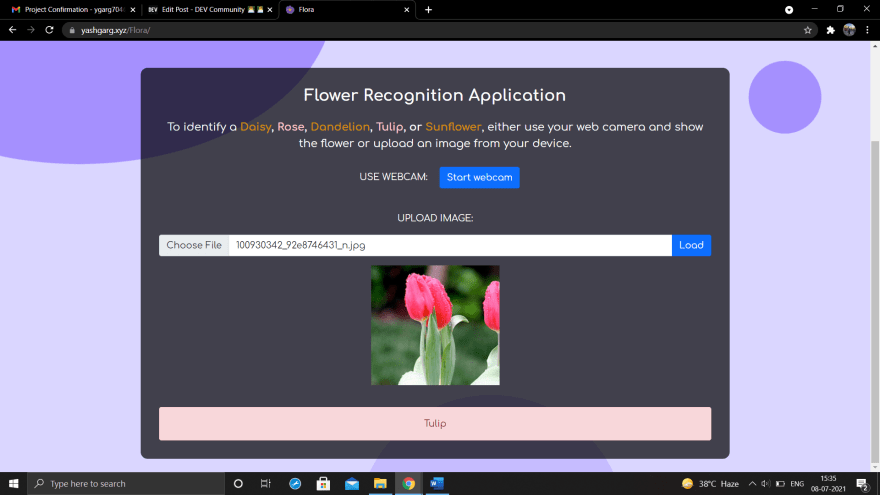
The second way of providing input is by uploading an image. I've used a little bit of jQuery code to do this. Essentially, once a user selects an image file using the input element on the client side and clicks load,the reference to the file is obtained using a click handler and a new Parse file is created. A Parse file lets us store application files in the cloud that would be too large to store in a object. Next, I created a canvas element to display the saved image and used it to predict the class of the uploaded image.
$(document).ready(function () {
    $("#loadBtn").on("click", async function () {

        labelContainer = document.getElementById("label-container-cam");

        image_upload = !image_upload;

        if (!image_upload) {
            labelContainer.removeChild(newlabel);
            document.getElementById("uploadedImage").removeChild(canvas);
        }

        const fileUploadControl = $("#fruitimg")[0];
        if (fileUploadControl.files.length > 0) {

            const modelURL = URL + "model.json";
            const metadataURL = URL + "metadata.json";

            // load the model and metadata
            model = await tmImage.load(modelURL, metadataURL);
            maxPredictions = model.getTotalClasses();

            const file = fileUploadControl.files[0];

            const name = "photo.jpg";
            const parseFile = new Parse.File(name, file);

            parseFile.save().then(async function () {
                //The file has been saved to the Parse server

                img = new Image(224, 224);
                img.crossOrigin = "Anonymous";
                img.addEventListener("load", getPredictions, false);
                img.src = parseFile.url();

            }, function (error) {
                // The file either could not be read, or could not be saved to Parse.
                result.innerHTML = "Uploading your image failed!";
            });
        }
        else {
            result.innerHTML = "Try Again!";
        }
    });
});
In the below code, a canvas is created to display the image and prediction is done using the same predict function that was used for webcam.
async function getPredictions() {

    canvas = document.createElement("canvas");
    var context = canvas.getContext("2d");
    canvas.width = "224";
    canvas.height = "224";
    context.drawImage(img, 0, 0);
    document.getElementById("uploadedImage").appendChild(canvas);

    newlabel = document.createElement("div");
    labelContainer = document.getElementById("label-container-cam");
    labelContainer.appendChild(newlabel);

    await predict(canvas);
}
That's it! The project is now ready to classify flowers.
I learnt a lot by doing this project. I hadn't used SashiDo, this is my first time using it, but it made the backend process really simple. Also, I had to learn about jquery, as this is my first time writing code in jquery. Google's Teachable machine helped a lot in making the machine learning model, it made the overall process very smooth and efficient. I hope you enjoyed reading this. This is a pretty simple project, so if you have some time and are interested, go ahead and try building it yourself!
24