
39
Clean up your storage using Appwrite Cloud functions!
Appwrite 0.9 adds support for both Java and Kotlin runtimes in Cloud Functions, growing the list of supported runtimes to over 15(!)
This example will walk you through the process of creating and uploading a Kotlin cloud function. In particular, we'll teach you how to use cloud functions to periodically clean up your storage and delete unnecessary files! This example also highlights how Appwrite can integrate seamlessly with 3rd party APIs and coexist with your existing stack. Without further ado, let's dive right in!
At this stage, we assume that you already have an Appwrite instance up and running. If you do not have Appwrite setup yet, you can follow the super easy installation step over at appwrite.io. It's not a typo. There really is only 1 step!
You also need to create an API Key from the Appwrite dashboard with the following scopes granted
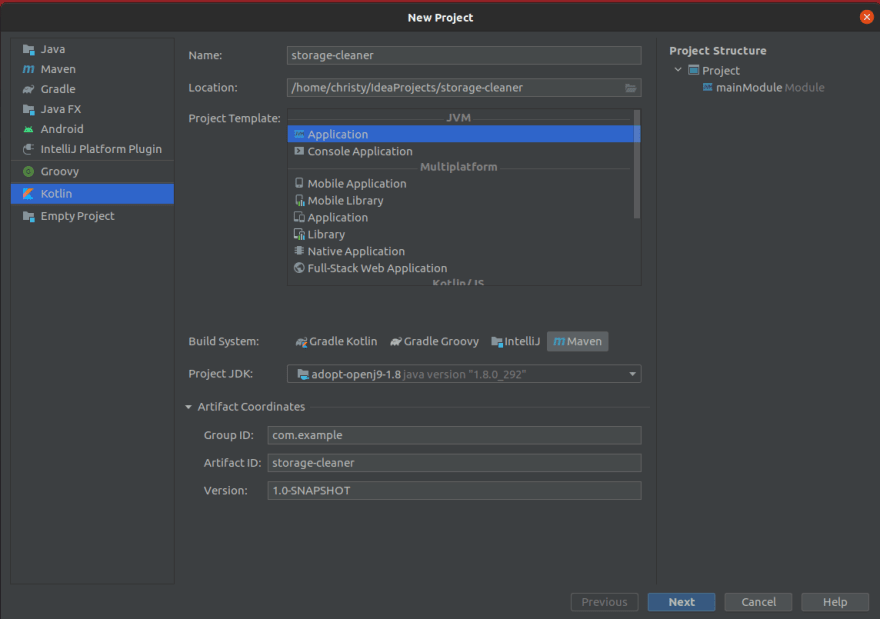
files.read files.write Create a new Kotlin project using IntelliJ ( or Eclipse ) and choose Maven as your build system. Set the artifact ID accordingly and click proceed.
Once the project is created, we'll add our dependencies. For this example, we will be using two dependencies.
Add the following lines to the
<dependencies> section of your pom.xml file.<dependencies>
<dependency>
<groupId>io.appwrite</groupId>
<artifactId>sdk-for-kotlin</artifactId>
<version>0.0.0-SNAPSHOT</version>
</dependency>
<dependency>
<groupId>com.google.code.gson</groupId>
<artifactId>gson</artifactId>
<version>2.8.7</version>
</dependency>
</dependencies>Load the Maven changes from the UI or using the shortcut

Ctrl + Shift + O Now that the dependencies are fetched, it's time to write some code.
Create a new Kotlin file under
src/main/kotlin and name it StorageCleaner.kt.Next, create a main function and initialize the Appwrite Client and Storage APIs. We'll be using environment variables to store our secrets and other configurable values. We will also store the file expiry date as an environment variable so that the cloud function can be configured without a redeployment.
import io.appwrite.Client
import io.appwrite.services.Storage
import kotlin.system.exitProcess

fun main(args: Array<String>) {
    val client = Client()
        .setEndpoint(System.getenv("APPWRITE_ENDPOINT"))
        .setProject(System.getenv("APPWRITE_FUNCTION_PROJECT_ID"))
        .setKey(System.getenv("APPWRITE_API_KEY"))
    val storage = Storage(client)

    val daysToExpire = System.getenv("DAYS_TO_EXPIRE").toFloatOrNull()
    if (daysToExpire == null) {
        println("Unable to parse DAYS_TO_EXPIRE.")
        exitProcess(1)
    }
}
Before the next step, we need to create a few model classes to parse our JSON response. Create a new Kotlin file
Models.kt under src/main/kotlin and add the following code.data class Permissions(val read: List<String>, val write: List<String>)
data class File(
val `$id`: String,
val name: String,
val `$permissions`: Permissions,
val dateCreated: Int,
val signature: String,
val mimeType: String,
val sizeOriginal: Int
)
data class FileList(val sum: Int, val files: List<File>?)Next, let's fetch the last 100 files that were uploaded to storage. Add the following lines to
StorageCleaner.kt.+import com.google.gson.Gson
import io.appwrite.Client
import io.appwrite.services.Storage
import kotlin.system.exitProcess
+suspend fun main(args: Array<String>) {
val client = Client()
.setEndpoint(System.getenv("APPWRITE_ENDPOINT"))
.setProject(System.getenv("APPWRITE_FUNCTION_PROJECT_ID"))
.setKey(System.getenv("APPWRITE_API_KEY"))
val storage = Storage(client)
val daysToExpire = System.getenv("DAYS_TO_EXPIRE").toFloatOrNull()
if (daysToExpire == null) {
println("Unable to parse DAYS_TO_EXPIRE.")
exitProcess(1)
}
+ val fileList = storage.listFiles("",100, 0, "DESC").body?.string() ?: ""
+ val files: FileList = Gson().fromJson(fileList, FileList::class.java)
}Now, let's write the logic to delete files older than
daysToExpire.import com.google.gson.Gson
import io.appwrite.Client
import io.appwrite.services.Storage
+ import java.util.*
import kotlin.system.exitProcess
suspend fun main(args: Array<String>) {
val client = Client()
.setEndpoint(System.getenv("APPWRITE_ENDPOINT"))
.setProject(System.getenv("APPWRITE_FUNCTION_PROJECT_ID"))
.setKey(System.getenv("APPWRITE_API_KEY"))
val storage = Storage(client)
val daysToExpire = System.getenv("DAYS_TO_EXPIRE").toFloatOrNull()
if (daysToExpire == null) {
println("Unable to parse DAYS_TO_EXPIRE.")
exitProcess(1)
}
val fileList = storage.listFiles("",100, 0, "DESC").body?.string() ?: ""
val files: FileList = Gson().fromJson(fileList, FileList::class.java)
+ var deletedFiles = 0
+ for( file in files.files!!) {
+ val diff: Long = Date().time/1000 - file.dateCreated
+ if (diff > daysToExpire * 24 * 60 * 60) {
+ storage.deleteFile(file.`$id`)
+ println("Deleted ${file.`$id`}")
+ deletedFiles++
+ }
+ }
+ println("Total files deleted: $deletedFiles")
}Now that we've written all the required code, we need to package our function as a
.jar. Fortunately, this can be done really easily using IntelliJ, so let's see how.In this step, we will create the
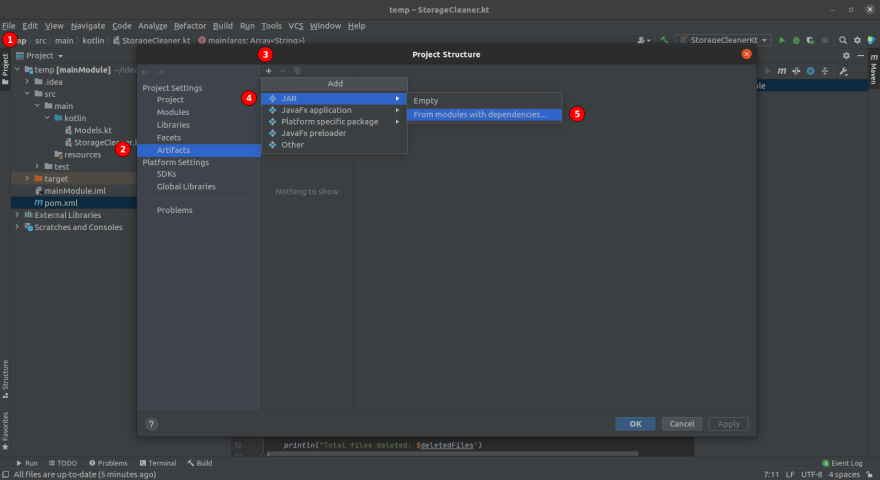
.jar artifacts required to deploy our cloud function. In the following dialog, enter the name of your main class. In our case it is

StorageCleanerKt. Don't worry if it doesn't show up in the list. Just click OK. Note: If you don't see the main class, try to follow the steps in this answer https://stackoverflow.com/questions/10654120/error-could-not-find-or-load-main-class-in-intellij-ide
In the next dialog, click Apply and then OK.
Confirm that a new file was created at
src/main/kotlin/META-INF/MANIFEST.MF with the following contents.Manifest-Version: 1.0
Main-Class: StorageCleanerKtNow build your artifacts using
Build > Build Artifacts > Select your artifact from the list > Build. You will find the output of this step in out/artifacts/mainModule_jar/mainModule.jarGreat! Let's test if your function is working fine and doesn't have any compilation issues. Run the following command from the root directory of your Kotlin project. Make sure you replace the values of the required environment variables with those of your own setup.
docker run --rm --volume $(pwd):/usr/local/src:rw \
    --env APPWRITE_ENDPOINT="http://192.168.1.35/v1"  \
    --env APPWRITE_FUNCTION_PROJECT_ID="60d31170f368f" \
    --env DAYS_TO_EXPIRE="0.00001" \
    --env APPWRITE_API_KEY="7e....879f" \
    appwrite/runtime-for-java:11 \
    java -jar out/artifacts/mainModule_jar/mainModule.jar
The APPWRITE_ENDPOINT is NOT localhost in this case since localhost is not accessible from the cloud functions runtime. You will need to set this to a publicly accessible IP of your Appwrite Server. You can find this by running hostname -I in UNIX systems.
If everything goes well, you should see the following output
Total files deleted: 0Head over to the Appwrite Dashboard and navigate to the Functions Tab on the sidebar and click on Add Function . Give your function a Name, select an appropriate Java runtime and click
Create.Next, head over to the Settings tab in your cloud function and add the required environment variables and a suitable CRON schedule. In our case, we want to run it every hour (
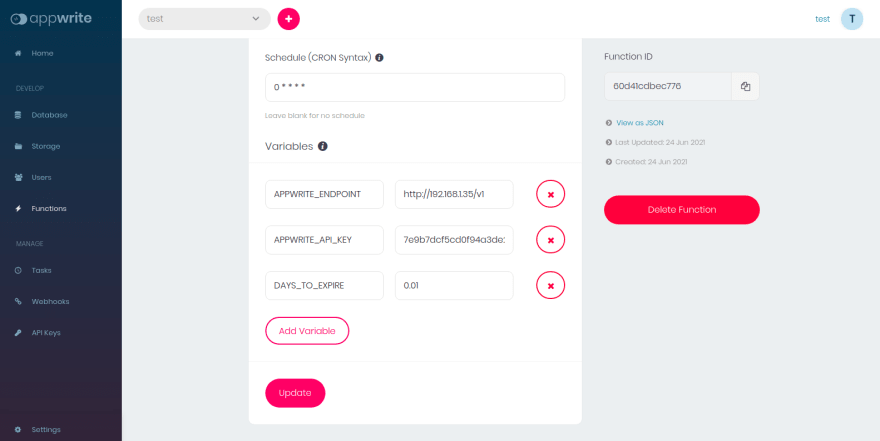
0 * * * *).Don't forget to click Update to save your settings.
We're now ready to deploy our function. This step can be done either with the Appwrite CLI or manually.
Head over to the root directory of your Kotlin project and run the following commands to create a tarfile.
$ cd out/artifacts

$ tar -zcvf code.tar.gz mainModule_jar

mainModule_jar/
mainModule_jar/mainModule.jar

$ ls
code.tar.gz  mainModule_jar
This will create a new archive called
code.tar.gz.With this created, head over to your
Appwrite Dashboard > Functions > Overview > Deploy Tag. In the dialog that pops up, upload the tarfile we just created and java -jar mainModule.jar for the entry point command. Once your function is successfully uploaded you need to activate your tag by clicking the Activate Button You can now go ahead and click Execute and leave the data field empty.
If everything goes well, you should be able to see the execution logs under the

Logs tab.If using the Appwrite CLI, run the following commands from the root directory of your Kotlin project. Be sure to replace the IDs with your own values.
$ cd out/artifacts/

$ appwrite functions createTag --functionId=60d41cdbec776 --command="java -jar mainModule.jar" --code=mainModule_jar

$id : 60d46ee4506d4
functionId : 60d41cdbec776
dateCreated : 1624534756
command : java -jar mainModule.jar
size : 4381381

$ appwrite functions updateTag --functionId=60d41cdbec776 --tag=60d46ee4506d4

$id : 60d41cdbec776
$permissions :
name : Storage Test
dateCreated : 1624513755
dateUpdated : 1624534608
status : disabled
runtime : java-11
tag : 60d46ee4506d4
vars :
events : {}
schedule : 0 * * * *
scheduleNext :
schedulePrevious : 1624532406
timeout : 15
Your Cloud Function is now active and will be triggered every 30 minutes based on our CRON schedule.
Great! You've successfully deployed and executed your first Koltin Cloud Function! This is just the tip of the iceberg and the possibilities with Cloud Functions are endless! Stay tuned for more Cloud Function ideas from the Appwrite Team. If you'd like to learn more about Appwrite or how Appwrite works under the hood, we've just curated all the resources for you during 30 Days of Appwrite.
Hope you enjoyed this article! You can find the complete code for this tutorial over at the Cloud Functions Demo repository where we have a lot more examples for various runtimes. We love contributions and encourage you to take a look at our open isuses and ongoing RFCs.
If you get stuck anywhere, feel free to reach out to us on our friendly support channels run by humans.
Here are some handy links for more information:
39