
12
Create a video app with JaaS, React and Vercel
Over the past couple of months, I've had the opportunity to work with the Jitsi team at 8x8 on improving the developer experience of their Jitsi-as-a-Service (JaaS) product. One of the most enjoyable parts of my work was building sample apps using the JaaS APIs. I decided to turn one of these apps into a tutorial to share what I've learned and to show off JaaS :)
This tutorial will show you how easy it is to get up and running with Jitsi-as-a-Service (JaaS). This tutorial will build a serverless video meeting application using React, Vercel, and JaaS. Our simple application will provide users with a form to enter their email. That form will request a serverless function to see if the user is allowed to join. If the user can join, the function will generate a JSON Web Token (JWT), and the frontend will add the user to the video call.
For the complete code, see this GitHub repo.
Before we get started, there are a few prerequisites we need to sort out.
We’re going to start by using the Create React App utility to initialize a new React App. You’ll need to have Node.js installed on your development machine if you don’t already.
This file contains hidden or bidirectional Unicode text that may be interpreted or compiled differently than what appears below. To review, open the file in an editor that reveals hidden Unicode characters.
Learn more about bidirectional Unicode characters
| npx create-react-app jaas-hands | |
| cd jaas-hands | |
| npm start |
After running
npm start, you should load the template application by going to http://localhost:3000.The Create React App utility creates some scaffolding that we won’t be using. To simplify our project, we can just remove some of that scaffolding now.
This file contains hidden or bidirectional Unicode text that may be interpreted or compiled differently than what appears below. To review, open the file in an editor that reveals hidden Unicode characters.
Learn more about bidirectional Unicode characters
| rm ./src/App.css ./src/index.css ./src/logo.svg |
We also need to clean up a few references to these files in
App.js and index.js. In index.js, remove the following line: import './index.css'; In App.js, be sure to remove the line import './App.css';For our project, we’re going to need a few different libraries. We will need bootstrap for styling, UUID for generating user IDs, and jsonwebtoken to generate JSON Web Tokens (JWTs). To install these dependencies, simply run this command from inside your project directory.
This file contains hidden or bidirectional Unicode text that may be interpreted or compiled differently than what appears below. To review, open the file in an editor that reveals hidden Unicode characters.
Learn more about bidirectional Unicode characters
| npm install bootstrap bootstrap-react uuid jsonwebtoken |
Once you’ve installed the dependencies, we need to make a small change to
index.js to load bootstrap. Simply add this line to your existing import statements.
This file contains hidden or bidirectional Unicode text that may be interpreted or compiled differently than what appears below. To review, open the file in an editor that reveals hidden Unicode characters.
Learn more about bidirectional Unicode characters
| import 'bootstrap/dist/css/bootstrap.min.css'; |
Now we’re ready to start building out our UI. We’re going to keep things simple for this application. We’ll present users with a form to enter their email addresses. We’ll use the provided email address to make a request to a serverless function which will determine if the user can join the meeting. If they can, then the serverless function will return a JWT, and we’ll load the JaaS embed.
The first thing we’ll do is create the layout of our application. It will be a single React component in the
App.js file. Our layout will have two parts: an email address form and a video call.
This file contains hidden or bidirectional Unicode text that may be interpreted or compiled differently than what appears below. To review, open the file in an editor that reveals hidden Unicode characters.
Learn more about bidirectional Unicode characters
| import { Container, Form, Button } from "react-bootstrap"; | |
| function App() { | |
| return ( | |
| <div className="App"> | |
| <Container> | |
| <h2>Lets JaaS It Up</h2> | |
| <Form | |
| style={{ display: allowed ? "none" : "block" }}> | |
| <Form.Group> | |
| <Form.Label htmlFor="email"> | |
| Email Address | |
| </Form.Label> | |
| <Form.Control | |
| value={email} | |
| onChange={(e) => setEmail(e.target.value)} /> | |
| </Form.Group> | |
| <Button variant="primary" type="submit">Join</Button> | |
| </Form> | |
| <div style={{ display: allowed ? "block" : "none" }}> | |
| <div id="jaas-container" style={{height: "700px"}}></div> | |
| </div> | |
| </Container> | |
| </div> | |
| ); | |
| } |
In our layout, we have a couple of essential pieces of state that we need to manage. We rely on a variable called ‘allowed’ to control which part of our layout to display. We also need to store the value of the email field to send to our serverless function.
To do this, we’ll be using React Hooks. We just need to add a couple of lines to our
App component. You’ll want to insert these lines inside the App definition before the return statement.
This file contains hidden or bidirectional Unicode text that may be interpreted or compiled differently than what appears below. To review, open the file in an editor that reveals hidden Unicode characters.
Learn more about bidirectional Unicode characters
| import React, { useState, useEffect } from "react"; | |
| import { Container, Form, Button } from "react-bootstrap"; | |
| function App() { | |
| // Setup our Hooks to manage state | |
| const [email, setEmail] = useState(""); | |
| const [allowed, setAllowed] = useState(false); | |
| return ( | |
| <div className="App"> | |
| <Container> | |
| <h2>Lets JaaS It Up</h2> | |
| <Form | |
| style={{ display: allowed ? "none" : "block" }}> | |
| <Form.Group> | |
| <Form.Label htmlFor="email"> | |
| Email Address | |
| </Form.Label> | |
| <Form.Control | |
| value={email} | |
| onChange={(e) => setEmail(e.target.value)} /> | |
| </Form.Group> | |
| <Button variant="primary" type="submit">Join</Button> | |
| </Form> | |
| <div style={{ display: allowed ? "block" : "none" }}> | |
| <div id="jaas-container" style={{height: "700px"}}></div> | |
| </div> | |
| </Container> | |
| </div> | |
| ); | |
| } |
We’ll be using Vercel as our serverless function environment. Vercel makes it easy to develop a serverless function locally and then seamlessly deploy it to the cloud. To get started, we’ll first need to install the Vercel CLI. If you haven’t already. You can install the Vercel CLI by running the following command:
This file contains hidden or bidirectional Unicode text that may be interpreted or compiled differently than what appears below. To review, open the file in an editor that reveals hidden Unicode characters.
Learn more about bidirectional Unicode characters
| npm install --global vercel |
Once you have the CLI installed, we just need to initialize our project to run with Vercel by running the following command at the root of our project.
This file contains hidden or bidirectional Unicode text that may be interpreted or compiled differently than what appears below. To review, open the file in an editor that reveals hidden Unicode characters.
Learn more about bidirectional Unicode characters
| vercel |
With our project initialized now, we’re ready to have Vercel run our project locally. First, make sure to close any other instance of the React dev server; once you’ve done that, you can run the following command.
This file contains hidden or bidirectional Unicode text that may be interpreted or compiled differently than what appears below. To review, open the file in an editor that reveals hidden Unicode characters.
Learn more about bidirectional Unicode characters
| vercel dev |
Just like running
npm start, the Vercel CLI will start a development server that is available by going to http://localhost:3000.Creating a serverless function for Vercel to run is easy. First, we need to create a new directory at the root of our project. Vercel relies on convention to discover your serverless functions. So, it’s essential you make this in the root directory of your project and not
./src.
This file contains hidden or bidirectional Unicode text that may be interpreted or compiled differently than what appears below. To review, open the file in an editor that reveals hidden Unicode characters.
Learn more about bidirectional Unicode characters
| mkdir ./api |
Vercel will treat any source file you create in
./api as a serverless function. For our project, we want to create a new file called join.js. This will create a new API endpoint at /api/join. We’ll use this endpoint to determine if the user can join the meeting and generate the required JWT.
This file contains hidden or bidirectional Unicode text that may be interpreted or compiled differently than what appears below. To review, open the file in an editor that reveals hidden Unicode characters.
Learn more about bidirectional Unicode characters
| touch ./api/join.js |
Our serverless function will be relatively straightforward. It just needs to parse the request from the front end, check if the provided email address is allowed to join the meeting, and then generate a JWT. Let’s start with the request handler that will orchestrate this process and generate our response.
This file contains hidden or bidirectional Unicode text that may be interpreted or compiled differently than what appears below. To review, open the file in an editor that reveals hidden Unicode characters.
Learn more about bidirectional Unicode characters
| // Request Handler | |
| export default async (req, res) => { | |
| // Parse the JSON request | |
| const { body } = req; | |
| const email = body.email.trim().toLowerCase(); | |
| const roomName = generateRoomName(); | |
| // Construct our default response payload | |
| res.statusCode = 403; | |
| const payload = { | |
| email: body.email, | |
| success: false | |
| }; | |
| // Check to see if the user is allowed, if so make them a JWT. | |
| if (isAllowed(body.email)) { | |
| payload.key = generateJWT(email, email, roomName); | |
| payload.room = roomName; | |
| payload.success = true; | |
| res.statusCode = 200; | |
| } | |
| // Construct Response | |
| res.setHeader("Content-Type", "application/json"); | |
| res.send(JSON.stringify(payload)); | |
| } |
As you’ve probably noticed, the request handler is relatively simple and relies on few other functions to check for authorization and generate a JWT. Let’s first start with
isAllowed(). This function consults a comma delineated list of email addresses to determine if the user can join the meeting. To make it easy to update, we’re storing the list of email addresses in an environment variable.
This file contains hidden or bidirectional Unicode text that may be interpreted or compiled differently than what appears below. To review, open the file in an editor that reveals hidden Unicode characters.
Learn more about bidirectional Unicode characters
| const isAllowed = (email) => { | |
| const friendsList = process.env.ALLOW_LIST.split(','); | |
| return (friendsList.indexOf(email) >= 0); | |
| } |
If the user is allowed to join the meeting, we need to generate a JWT that will enable them to enter. For that, we’re using the
generateJWT() function. This does the bulk of the work in our serverless function. The generateJWT(0 will create the payload of our JWT, decode our public key, and finally sign the JWT.
This file contains hidden or bidirectional Unicode text that may be interpreted or compiled differently than what appears below. To review, open the file in an editor that reveals hidden Unicode characters.
Learn more about bidirectional Unicode characters
| // JWT Generator -- Takes user's name and email address | |
| const generateJWT = (name, email, roomName) => { | |
| // Configure the JWT Header | |
| const key = process.env.JAAS_KEY_ID; | |
| const header = { algorithm: 'RS256', keyid: key }; | |
| // Get the current time and set the time boundaries of the JWT | |
| const now = new Date(); | |
| const expiration = Math.round(now.setHours(now.getHours() + 3) / 1000); | |
| const notBefore = (Math.round((new Date).getTime() / 1000) - 10); | |
| // Build the JWT Payload | |
| const avatar = generateAvatar(email); | |
| const id = uuid(); | |
| const payload = { | |
| aud: 'jitsi', | |
| context: { | |
| user: { | |
| id, | |
| name, | |
| avatar, | |
| email: email, | |
| moderator: 'true' | |
| }, | |
| features: { | |
| livestreaming: 'true', | |
| recording: 'true', | |
| transcription: 'true', | |
| "outbound-call": 'true' | |
| } | |
| }, | |
| iss: 'chat', | |
| room: '*', | |
| sub: process.env.JAAS_APP_ID, | |
| exp: expiration, | |
| nbf: notBefore | |
| }; | |
| // Load and decode the Private Key from the ENV | |
| let buff = Buffer.from(process.env.JAAS_PRIVATE_KEY, 'base64'); | |
| const privateKey = buff.toString('ascii') | |
| // Finally, sign the JWT | |
| return jsonwebtoken.sign( | |
| payload, | |
| privateKey, | |
| header | |
| ); | |
| } |
Inside of
generateJWT(), we’re calling out to yet another helper function to generate avatars for our users automatically. The generateAvatar() function generates a Gravatar URL from the provided email address to populate avatars automatically.
This file contains hidden or bidirectional Unicode text that may be interpreted or compiled differently than what appears below. To review, open the file in an editor that reveals hidden Unicode characters.
Learn more about bidirectional Unicode characters
| const generateAvatar = (email) => { | |
| const hash = crypto.createHash('md5').update(email).digest("hex"); | |
| return 'https://www.gravatar.com/avatar/' + hash; | |
| } |
When we put it all together, our
join.js should look something like this:
This file contains hidden or bidirectional Unicode text that may be interpreted or compiled differently than what appears below. To review, open the file in an editor that reveals hidden Unicode characters.
Learn more about bidirectional Unicode characters
| var jsonwebtoken = require('jsonwebtoken'); | |
| var uuid = require('uuid-random'); | |
| var crypto = require('crypto'); | |
| // Helper function to generate an avatar with the help of Gravatar | |
| const generateAvatar = (email) => { | |
| const hash = crypto.createHash('md5').update(email).digest("hex"); | |
| return 'https://www.gravatar.com/avatar/' + hash; | |
| } | |
| // Our super secure Access Management System :) | |
| const isAllowed = (email) => { | |
| const friendsList = process.env.ALLOW_LIST.split(','); | |
| return (friendsList.indexOf(email) >= 0); | |
| } | |
| // Generate a Room Name | |
| const generateRoomName = () => { | |
| return process.env.JAAS_APP_ID + '/' + process.env.JAAS_ROOM_NAME; | |
| } | |
| // JWT Generator -- Takes user's name and email address | |
| const generateJWT = (name, email, roomName) => { | |
| // Configure the JWT Header | |
| const key = process.env.JAAS_KEY_ID; | |
| const header = { algorithm: 'RS256', keyid: key }; | |
| // Get the current time and set the time boundaries of the JWT | |
| const now = new Date(); | |
| const expiration = Math.round(now.setHours(now.getHours() + 3) / 1000); | |
| const notBefore = (Math.round((new Date).getTime() / 1000) - 10); | |
| // Build the JWT Payload | |
| const avatar = generateAvatar(email); | |
| const id = uuid(); | |
| const payload = { | |
| aud: 'jitsi', | |
| context: { | |
| user: { | |
| id, | |
| name, | |
| avatar, | |
| email: email, | |
| moderator: 'true' | |
| }, | |
| features: { | |
| livestreaming: 'true', | |
| recording: 'true', | |
| transcription: 'true', | |
| "outbound-call": 'true' | |
| } | |
| }, | |
| iss: 'chat', | |
| room: '*', | |
| sub: process.env.JAAS_APP_ID, | |
| exp: expiration, | |
| nbf: notBefore | |
| }; | |
| // Load and decode the Private Key from the ENV | |
| let buff = Buffer.from(process.env.JAAS_PRIVATE_KEY, 'base64'); | |
| const privateKey = buff.toString('ascii') | |
| // Finally, sign the JWT | |
| return jsonwebtoken.sign( | |
| payload, | |
| privateKey, | |
| header | |
| ); | |
| } | |
| // Request Handler | |
| export default async (req, res) => { | |
| // Parse the JSON request | |
| const { body } = req; | |
| const email = body.email.trim().toLowerCase(); | |
| const roomName = generateRoomName(); | |
| // Construct our default response payload | |
| res.statusCode = 403; | |
| const payload = { | |
| email: body.email, | |
| success: false | |
| }; | |
| // Check to see if the user is allowed, if so make them a JWT. | |
| if (isAllowed(body.email)) { | |
| payload.key = generateJWT(email, email, roomName); | |
| payload.room = roomName; | |
| payload.success = true; | |
| res.statusCode = 200; | |
| } | |
| // Construct Response | |
| res.setHeader("Content-Type", "application/json"); | |
| res.send(JSON.stringify(payload)); | |
| } |
Now that we have our React frontend and serverless function up and running, we need to integrate with JaaS. To do this, we need to configure our JaaS account, populate our environment variables and then make a few changes to our application.
For our application to work, we’ll need to create a couple of different environment variables. You can do this by creating a
.env file at the root of your project. Inside the .env file create the following variables. You’ll be able to access them from inside your application by using the process.ENV.{Variable Name} variables.
This file contains hidden or bidirectional Unicode text that may be interpreted or compiled differently than what appears below. To review, open the file in an editor that reveals hidden Unicode characters.
Learn more about bidirectional Unicode characters
| ALLOW_LIST= | |
| JAAS_ROOM_NAME= | |
| JAAS_APP_ID= | |
| JAAS_KEY_ID= | |
| JAAS_PRIVATE_KEY= |
You can populate
ALLOW_LIST with a comma delineated list of email addresses that you want to allow access to the meeting. For example:
This file contains hidden or bidirectional Unicode text that may be interpreted or compiled differently than what appears below. To review, open the file in an editor that reveals hidden Unicode characters.
Learn more about bidirectional Unicode characters
| ALLOW_LIST='walter@gooddogs.com,scout@gooddogs.com' |
You can also select
JAAS_ROOM_NAME that fits your use case. For example:
This file contains hidden or bidirectional Unicode text that may be interpreted or compiled differently than what appears below. To review, open the file in an editor that reveals hidden Unicode characters.
Learn more about bidirectional Unicode characters
| JAAS_ROOM_NAME=AllAboutThatJAAS |
For the remaining values, we’ll be consulting the JaaS web console to get the required values.
Start by heading over to the API Keys section of the JaaS console. The first bit of information we’ll need to make a note of is your AppID. You can store that in the
JAAS_APP_ID environment variables.
Next, you’ll want to create a new API Key by clicking the 'Add API Key' button.

You will then be presented with a dialogue that asks if you want to generate a new key pair or add your own. For this tutorial, we want to generate a new key pair.
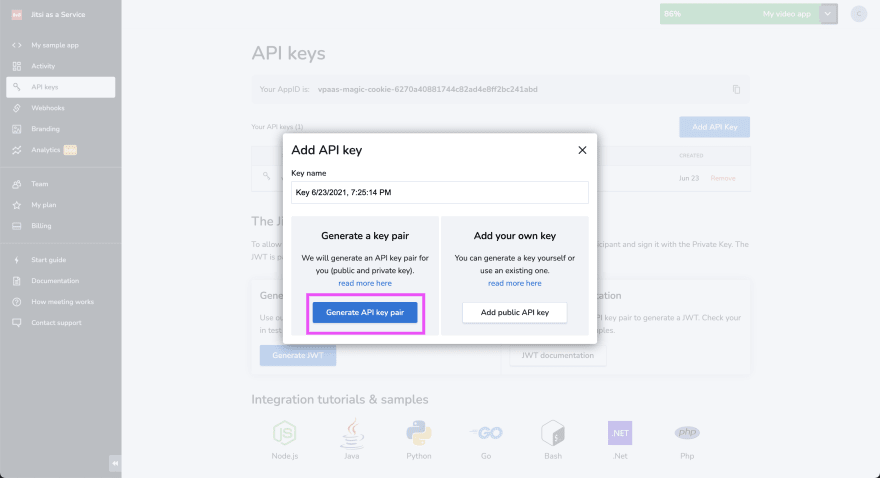
Once the key pair has been generated, you’ll be presented with another dialogue that asks if you want to download the new key pair. For our purposes, we’ll need to download the Private Key.

Once you’ve downloaded the public key, we need to base64 encode it to store it in the
JAAS_PRIVATE_KEY environment variable. To do this, run the following command:
This file contains hidden or bidirectional Unicode text that may be interpreted or compiled differently than what appears below. To review, open the file in an editor that reveals hidden Unicode characters.
Learn more about bidirectional Unicode characters
| cat {Key Name}.pk | base64 |
Now that we have a working frontend and serverless function, it’s time to tie it all together. To that, we’ll need to update our React front end to talk to our serverless function. We’ll do this by updating our App component to catch the
onSubmit and send a request to our serverless function. The first thing we need to do is load the JaaS iFrame API into our React app. To do this, we’ll turn to our good friend React Hooks. We should make sure to group this new hook with our other state management hooks.
This file contains hidden or bidirectional Unicode text that may be interpreted or compiled differently than what appears below. To review, open the file in an editor that reveals hidden Unicode characters.
Learn more about bidirectional Unicode characters
| useEffect(() => { | |
| const script = document.createElement('script'); | |
| script.src = "https://8x8.vc/external_api.js"; | |
| script.async = true; | |
| document.body.appendChild(script); | |
| return () => { | |
| document.body.removeChild(script); | |
| } | |
| }, []); |
Next, we’ll need a function to make a request to our serverless function for the authorization check and JWT generation. To do that, we’ll create a function to catch the submit function on our form that looks like this:
This file contains hidden or bidirectional Unicode text that may be interpreted or compiled differently than what appears below. To review, open the file in an editor that reveals hidden Unicode characters.
Learn more about bidirectional Unicode characters
| // Handle the user submission | |
| const onSubmit = async (e) => { | |
| await e.preventDefault(); | |
| const res = await fetch("/api/join", { | |
| method: "POST", | |
| headers: { | |
| "Content-Type": "application/json", | |
| }, | |
| body: JSON.stringify({email: email}) | |
| }); | |
| const data = await res.json(); | |
| if(data.success) { | |
| setAllowed(data.success); | |
| setTimeout(() => { initJaas(data); }, 500 ); | |
| } | |
| } |
Now we just need to connect this new onSubmit function to our form. To do that, we just add the onSubmit event handler to our layout, like this:
This file contains hidden or bidirectional Unicode text that may be interpreted or compiled differently than what appears below. To review, open the file in an editor that reveals hidden Unicode characters.
Learn more about bidirectional Unicode characters
| <Form onSubmit={onSubmit} style={{ display: allowed ? "none" : "block" }}> |
Finally, we just need to make our call to initialize the video meeting. For that, we’ll add one last function called
initJaas(). When our request to the serverless function is successful, the front end will call initJaas() to start the call.You did it! You’ve successfully set up a serverless video meeting application using React, Vercel, and JaaS. Now it’s time to ship it! When you’re ready to take it to the next level, run the following command to deploy to the cloud!
This file contains hidden or bidirectional Unicode text that may be interpreted or compiled differently than what appears below. To review, open the file in an editor that reveals hidden Unicode characters.
Learn more about bidirectional Unicode characters
| vercel deploy |
12