
38
How to Connect Strapi to PostgreSQL
In this article, we will learn how to connect Strapi to PostgreSQL. By default Strapi uses the SQLite for content storage and Strapi is not only limited to using SQLite as the database, it can be configured to use other databases like MongoDB, MySQL, MariaDB, PostgreSQL, etc.
It is often confusing on how to connect a Strapi instance to a Postgres database, a lot of back and forth have always been associated with it, but in this article I will demystify the mystery behind all that. I will show with examples and images, how we can configure a Strapi instance to use a Postgres database.
We will also learn how to:
Strapi helps us scaffold our backend very fast, build APIs and consume the APIs from the client-side. The client can be mobile, web, desktop, cURL, etc.
The APIs are created from the Strapi UI admin panel. We create collections as single-types. A collection in Strapi maps to the endpoints:
/YOUR_COLLECTION_s: Creates new content./YOUR_COLLECTION_s: Gets all the contents./YOUR_COLLECTION_s/:ID: Gets a single content based on its ID./YOUR_COLLECTION_s/:ID: Edits a content/YOUR_COLLECTION_s/:ID: Deletes a content.By default, Strapi gives us RESTful APIs, but also we can create GraphQL APIs in Strapi. We can then use the GraphQL Playground in the browser to run the queries and mutations.
Setting up Strapi is very easy. We just run the below command:
Setting up Strapi is very easy. We just run the below command:
npx create-strapi-app strapi-api
    # OR
    yarn create strapi-api strapi-api
And we run the
yarn develop command to start the server at localhost:1337. The API endpoints are consumed from the localhost:1337 URL. Also, we can load the admin UI from the same URL at localhost:1337/admin.Strapi contains both a server and a database all baked into it. The server hosts the APIs, and the database is used to store the application's content. Strapi uses the Koajs framework for its server.
To verify this, go to
strapi-API/config/ folder.We will see the following:
config/
            functions/
                responses/
                    404.js
                bootstrap.js
                cron.js
            database.js
            server.js
This is where Strapi configurations are kept. The
404.js file is used to return a custom 404 message."use strict";
module.exports = async (/* ctx */) => {
// return ctx.notFound('My custom message 404');
};The
cron.js file is where we can set our cron jobs on Strapi. These jobs are scheduled to run periodically based on the format we input: [SECOND (optional)] [MINUTE] [HOUR] [DAY OF MONTH] [MONTH OF YEAR] [DAY OF WEEK]."use strict";
module.exports = {};The
server.js is where we configure the Strapi server. We can set our host, port, and authentication. Strapi, by default, serves at 0.0.0.0 at port 1337. We can change them in this file.module.exports = ({ env }) => ({
host: env("HOST", "0.0.0.0"),
port: env.int("PORT", 1337),
admin: {
auth: {
secret: env("ADMIN_JWT_SECRET", "9c8eb554ab87ab3e95d1e32ca140e304"),
},
},
});The
database.js is where is the database to use is configured. The database's client, hostname, port, etc., are set here.module.exports = ({ env }) => ({
defaultConnection: "default",
connections: {
default: {
connector: "bookshelf",
settings: {
client: "sqlite",
filename: env("DATABASE_FILENAME", ".tmp/data.db"),
},
options: {
useNullAsDefault: true,
},
},
},
});You see here that these are the default database settings for Strapi. It is using the SQLite database, as we said earlier.
defaultConnection is the default connection for models to use in querying the database. The default value is the default. You can set it to any property keys in the connections object.connections set the type of connections we can use to access a database. We have a default connection that connects to an SQLite database.client is the database client to create the connection.filename is the path to the database file.file allows us to set our Strapi app to use PostgreSQL, MySQL, SQLServer, or MongoDB.In the below section we will install the PostgreSQL binary.
We need to set up and install PostgreSQL. If you don't have PostgresSQL installed in your machine, go to PostgresSQL downloads and download the binaries for your machine.
After installation, start the Postgres server. Make sure you remember the Postgres port, username, password because we will use them in connecting Strapi to the Postgres.
Create a database in PostgreSQL, name it
bank because we will be building a bank app to demonstrate further how to use PostgreSQL DB with Strapi.Also, if you want to build the PostgreSQL from the source, download the source code from here and compile it.
To configure our Strapi to use our PostgreSQL, we will add some configurations in our
strapi-api/config/database.js file.Open the
strapi-api/config/database.js and paste the below code in the file:// strapi-api/config/database.js
module.exports = ({ env }) => ({
defaultConnection: "default",
connections: {
default: {
connector: "bookshelf",
settings: {
client: "postgres",
host: env("DATABASE_HOST", "localhost"),
port: env.int("DATABASE_PORT", 5432),
database: env("DATABASE_NAME", "bank"),
username: env("DATABASE_USERNAME", "postgres"),
password: env("DATABASE_PASSWORD", "0000"),
schema: env("DATABASE_SCHEMA", "public"),
},
options: {},
},
},
});connections object, we have only a default connection.default connection, we set the connector to the bookshelf.settings, we set the client to Postgres. This client is the PostgresSQL database client to create the connection to the DB.host is the hostname of the PostgreSQL server we set it to localhost.port is set to 5432, and this is the default port of the PostgreSQL server.name is set to the bank, and this is the name of the database we created in the PostgreSQL server.password is the password of our PostgreSQL server.username is the username of our PostgreSQL. It is set to Postgres because it is the username of our PostgreSQL server.schema is the database schema, and it is set to the public here. This schema is used to expose databases to the public.With this, our Strapi is using PostgreSQL to persist our API content. Now start Strapi.
yarn developStrapi will load
localhost:1337/admin on our browser. Now register and click on the LET'S START button, this will take you to the admin panel.Everything is ready to roll. We have connected our Strapi app to PostgreSQL. Now, we start building our collections. We are building a bank app, this is a bank admin app that bankers will use to manage accounts in Strapi, and the DB persistence will be PostgreSQL.
Let's write out the core functions of our bank app.
So we will have two models: Account and Transact.
The Account holds the accounts in the bank, and the Transact holds the transactions carried out.
The Account model:
Account {
        name
        balance
    }
The
The
name field will hold the name of the account holder.The
balance will hold the balance of the account holder in Dollars.The Transact model:
Transact {
        sender
        receiver
        amount
    }
The
The
The
sender field holds the name of the account holder that transfers the money.The
receiver is the beneficiary.The
amount is the amount the sender sends to the receiver.So we begin creating the collections in our Strapi admin. We will start with the
Account model.Click on the
Create First Content Type button and type in "account" for a collection name.Now we add the fields for the
account collection:+ Add another field button and select Text and type in name, and then click on the + Add another field button to add another field.Number and on the Number format select float (ex. 3.3333333), then type in balance and click on the Finish button.Account page that appears click on the Save button that is on the top-right corner of the page.We generate the
Transact collection:+ Create new collection type link, a modal will show up, type in transact. Click on the + Add another field button.sender, receiver, and amount. The fields sender and receiver will be Text fields while amount will be a Number field with float (ex. 3.333333) Number format.Finish button and the Save button.Now we have created our collections.
We need to implement our business logic. This business logic will be an API endpoint to transfer money from a sender to the recipient.
The logic will be this:
I want this to be done in the
/transfer API, a POST method. A transfer HTTP request will look like this:http://localhost:1337/transfer
Method: POST
Body:
{
sender: nnamdi
receiver: chidme
amount: 10
}So we see that collections can't handle this. This is a single endpoint. The single-type does not do the job for me. I usually find it hard to create a single API endpoint from the Strapi admin panel, so I go to the project source code to add it.
APIs in a Strapi project are kept in the
api folder. So we go to our api folder, we will see folders created for our APIs: transact and account.strapi-api
api/
account/
config/
routes.json
controllers/
account.js
models/
services/
transact/
...The
routes.json file contains the endpoints contained in an API.The
controllers folder contains files that the user can use to customize the endpoints in an API. The user can apply his logic for an endpoint.These two things are what we need in other to create our
So we create a
transfer API.So we create a
transfer folder in our api folder:mkdir transferNext, we create
config and controllers folders inside the transfer folder.mkdir transfer/config transfer/controllersCreate a
routes.json file inside the config folder:touch transfer/config/routes.jsonInside it, we define an
/transfer endpoint and to be on POST HTTP method. Then, we will make the handler point to an index function that will export from controllers.{
"routes": [
{
"method": "POST",
"path": "/transfer",
"handler": "Transfer.index",
"config": {
"policies": []
}
}
]
}Create a
transfer file in the controllers folder.touch transfer/controllers/transfer.jsHere, we will export an
index function. This function will be called when the localhost:1337/transfer HTTP request is made. The function will handle that request. This is where we will apply our business logic of sending money from an account to another beneficiary account.See the code below:
// strapi-api/api/transfer/controllers/transfer.js

    const { sanitizeEntity } = require("strapi-utils");

    module.exports = {
      async index(ctx) {
        const { sender, receiver, amount } = ctx.request.body;

        let entity;

        // deduct amount from sender
        // add amount to reciver
        // add the transaction to transact

        const senderAcc = await strapi.services.account.findOne({
          name: sender,
        });
        const receiverAcc = await strapi.services.account.findOne({
          name: receiver,
        });

        senderAcc.balance = parseFloat(senderAcc.balance) - parseFloat(amount);
        receiverAcc.balance = parseFloat(receiverAcc.balance) + parseFloat(amount);

        await strapi.services.account.update({ name: sender }, senderAcc);
        await strapi.services.account.update({ name: receiver }, receiverAcc);
        entity = await strapi.services.transact.create({
          sender,
          receiver,
          amount,
        });
        return sanitizeEntity(entity, { model: strapi.models.transact });
      },
    };
The
ctx holds the res and req just like in Expressjs or Koajs. The ctx is an object that contains properties and methods for accessing the incoming message and for responding to the client.See, we retrieved the
Notice we have a strapi object. Yes, it is a Strapi object that is global in a Strapi project. We use the object to access different properties and methods.
sender, receiver, and amount from the ctx.request.body.Notice we have a strapi object. Yes, it is a Strapi object that is global in a Strapi project. We use the object to access different properties and methods.
Here we are using it to access the
.services object, which contains methods to access the database. See the functions in it: create, update, find, findOne, etc. They are used to create data in the database, update the database, retrieve values from the database.So, we retrieved the sender's account details and also the receiver's account details. We then made the transaction, subtracted the
amount from the sender's balance, and added the receiver's balance.Next, we updated the sender's and receiver's balances in the database with their new values.
Then, we created a new transaction in the
transact table, and finally, we returned the result of the new transaction.The
Save the file and this will restart our Strapi server. You won't see the
sanitizeEntity function removes all private fields from the model and its relations.Save the file and this will restart our Strapi server. You won't see the
transfer API appear on the admin panel, and it is a standalone API, not a collection type.Now, we will allow access to all our APIs.
Click on the
You will see all the APIs with their handlers. Click on the
Settings item on the sidebar menu, then on the Roles item on the second sidebar menu that appears. On the right section, click on the Public item and scroll down.You will see all the APIs with their handlers. Click on the
Select all checkbox and click on the Save button at the top. This will allow public access to all the APIs in our Strapi project:Now, we seed our data.
Click on the
Accounts in the sidebar. Click on the + Add New Accounts button.Add the data:
name -> nnamdi
balance -> 2000000
Click on the
Save button and the Publish button.Add another data:
name -> chidume
balance -> 1000000
Click on the
Save button and the Publish button.See our PostgreSQL UI, the contents were persisted on PostgreSQL:

Our front end will be a bank admin app. We will use Nextjs to build the app. So we scaffold our project.
yarn create next-app strapi-bankOur app will have two page routes:
//account/[id]The index
/ route will display all the accounts on the system.The
/account/[id] route will display a particular account details. This is a dynamic route, the id can hold any value, its dynamic, and it will be the unique id of an account.We will have components:
Header: This will render the Header.AccountCard: This component will display a few of the account details in the / route.AddAccountDialog: This is a dialog that renders the UI we will use to add new accounts to the system.TransactionDialog: This dialog renders UI where transactions will be made, sending money from one Account to another.TransactionCard: This component will render the transactions of a user.Accounts: This is the page component for the / page. It displays all the accounts in the bank.Account: This is the page component for the /account/[id] page.Our final app will look like this:


OK, so we start creating the components.
mkdir components

mkdir components/TransactionCard
touch components/TransactionCard/index.js
touch components/TransactionCard/TransactionCard.module.css

mkdir components/TransactionDialog
touch components/TransactionDialog/index.js

mkdir components/AddAccountDialog
touch components/AddAccountDialog/index.js

mkdir components/AccountCard
touch components/AccountCard/index.js
touch components/AccountCard/AccountCard.module.css

mkdir components/Header
touch components/Header/index.js
touch components/Header/Header.module.css

touch styles/AccountView.module.css
mkdir pages/account
touch pages/account/[id].js
Header
This will be a simple UI, it will display the text
Bank Admin. Paste the below code on components/Header/index.js:import { header, headerName } from "./Header.module.css";
export default function Header() {
return (
<section className={header}>
<div className={headerName}>Bank Admin</div>
</section>
);
}AccountCard
This component will be rendered by the
This component will be rendered by the
Accounts component. It will display a mini detail of an account.Paste the below code in
components/AccountCard/index.js:import styles from "./AccountCard.module.css";
import Link from "next/link";
export default function AccountCard({ account }) {
const { id, name, balance, created_at } = account;
return (
<Link href={`account/${id}`}>
<div className={styles.account}>
<div className={styles.accountdetails}>
<div className={styles.accountname}>
<h3>
<span style={{ fontWeight: "100" }}>Account: </span>
{name}
</h3>
</div>
<div className={styles.accountbalance}>
<span>
<span style={{ fontWeight: "100" }}>Balance($): </span>
{balance}
</span>
</div>
<div className={styles.accountcreated_at}>
<span>Created: {created_at}</span>
</div>
</div>
</div>
</Link>
);
}It receives the
Yes,
account object in its props argument. Next, we destructure id, name, balance, created_at from the account object.Yes,
id and created_at are fields set by Strapi in each model content.So, the
AccountCard component renders the details.TransactionCard
This component will render a specific transaction passed to it. It will display the
This component will render a specific transaction passed to it. It will display the
sender, receiver, and the amount sent. The Account page component renders this component to show the transactions done by an account user—the debits and credits.Paste the code below in
components/TransactionCard/index.js:import styles from "./TransactionCard.module.css";
export default function TransactionCard({ transaction }) {
const { sender, receiver, amount, created_at } = transaction;
return (
<div className={styles.transactionCard}>
<div className={styles.transactionCardDetails}>
<div className={styles.transactionCardName}>
<h4>
<span>Sender: </span>
<span style={{ fontWeight: "bold" }}>{sender}</span>
</h4>
</div>
<div className={styles.transactionCardName}>
<h4>
<span>Receiver: </span>
<span style={{ fontWeight: "bold" }}>{receiver}</span>
</h4>
</div>
<div className={styles.transactionCardName}>
<h4>
<span>Amount($): </span>
<span style={{ fontWeight: "bold" }}>{amount}</span>
</h4>
</div>
<div className={styles.transactionCardName}>
<h4>
<span>Created At: </span>
<span style={{ fontWeight: "bold" }}>{created_at}</span>
</h4>
</div>
</div>
</div>
);
}It receives a
transaction object in its props. The fields sender, receiver, amount, created_at are destructured from the transaction object. These are then rendered by the component.Accounts
This component is rendered when the index page
This component is rendered when the index page
/ route is navigated. This component will make an HTTP request to the Strapi backend to retrieve the list of accounts and render them.Paste the below code on
pages/index.js:import Head from "next/head";
import styles from "../styles/Home.module.css";
import Header from "../components/Header";
import AccountCard from "../components/AccountCard";
import { useEffect, useState } from "react";
import axios from "axios";
import TransactDialog from "../components/TransactDialog";
import AddAccountDialog from "../components/AddAccountDialog";
export default function Home() {
const [accounts, setAccounts] = useState([]);
const [showTransactModal, setShowTransactModal] = useState(false);
const [showAddAccountModal, setShowAddAccountModal] = useState(false);
useEffect(async () => {
const data = await axios.get("http://localhost:1337/accounts");
setAccounts(data?.data);
}, []);
return (
<div className={styles.container}>
<Head>
<title>Bank Admin</title>
<link rel="icon" href="/favicon.ico" />
</Head>
<main className={styles.main}>
<div className={styles.breadcrumb}>
<div>
<span style={{ margin: "1px" }}>
<button onClick={() => setShowTransactModal(true)}>
Transact
</button>
</span>
<span style={{ margin: "1px" }}>
<button onClick={() => setShowAddAccountModal(true)}>
Add Account
</button>
</span>
</div>
</div>
<div className={styles.accountcontainer}>
<div className={styles.youraccounts}>
<h3>Accounts</h3>
</div>
<div>
{accounts.map((account, i) => (
<AccountCard key={i} account={account} />
))}
</div>
</div>
{showAddAccountModal ? (
<AddAccountDialog
closeModal={() => setShowAddAccountModal((pV) => !pV)}
/>
) : null}
{showTransactModal ? (
<TransactDialog
closeModal={() => setShowTransactModal((pV) => !pV)}
/>
) : null}
</main>
</div>
);
}We have three states:
accounts: is a state that holds the accounts retrieved from the /accounts endpoint. showTransactModal: This is a boolean state that toggles the visibility of the TransactionModal.showAddAccountModal: this is also a boolean state used to display and remove the AddAccountModal.The
useEffect callback calls the /accounts endpoint, and the result is set in the accounts state.The
accounts array is rendered and each account is rendered by the AccountCard component, each account is passed to the AccountCard via its account props. See that we are conditionally rendering the
AddAccountDialog and TransactDialog dialog components. The Transact button toggles the TransactDialog and the Add Account button toggles the AddAccountDialog.See that we pass a function to each dialog via
closeModal props. The function will enable the dialogs to close themselves from their components.Account
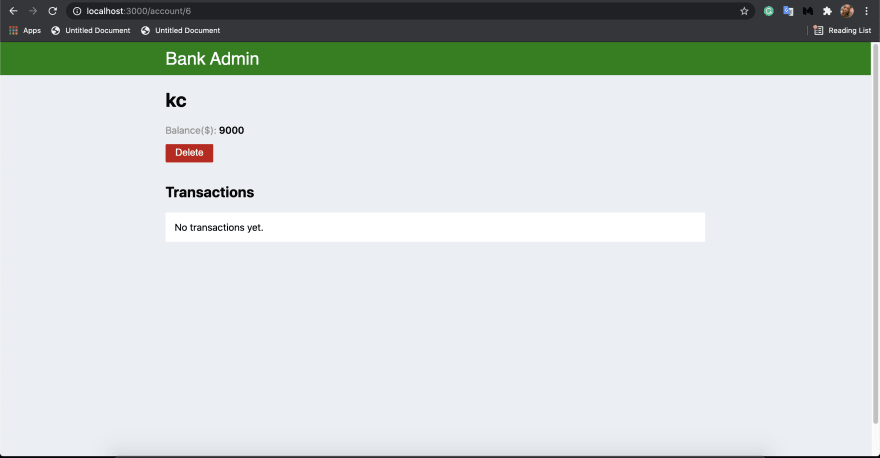
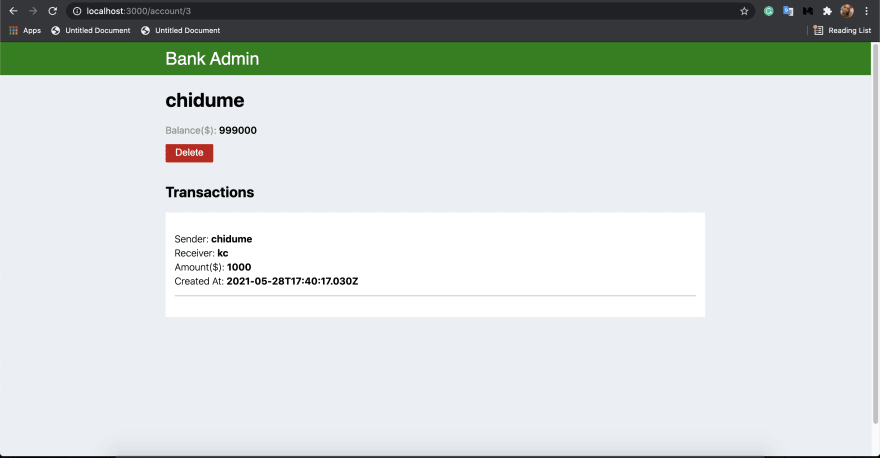
This is a page component that is rendered when the
This component displays the account details and its transactions. We can delete an account from there also.
This is a page component that is rendered when the
/account/[id] route is navigated.This component displays the account details and its transactions. We can delete an account from there also.
Paste the below code in
pages/account/[id].js:import styles from "../../styles/AccountView.module.css";
import { useRouter } from "next/router";
import TransactionCard from "../../components/TransactionCard";
import axios from "axios";
import { useEffect, useState } from "react";
export default function Account() {
const router = useRouter();
const {
query: { id },
} = router;
const [account, setAccount] = useState();
const [transactions, setTransactions] = useState([]);
useEffect(async () => {
const AccountData = await axios.get("http://localhost:1337/accounts/" + id);
var transactsData = await axios.get("http://localhost:1337/transacts");
transactsData = transactsData?.data?.filter(
(tD) =>
tD.sender == AccountData?.data?.name ||
tD.receiver == AccountData?.data?.name
);
console.log(transactsData);
setAccount(AccountData?.data);
setTransactions(transactsData);
}, [id]);
async function deleteAccount() {
if (confirm("Do you really want to delete this account?")) {
await axios.delete("http://localhost:1337/accounts/" + id);
router.push("/");
}
}
return (
<div className={styles.accountviewcontainer}>
<div className={styles.accountviewmain}>
<div style={{ width: "100%" }}>
<div className={styles.accountviewname}>
<h1>{account?.name}</h1>
</div>
<div className={styles.accountviewminidet}>
<div>
<span style={{ marginRight: "4px", color: "rgb(142 142 142)" }}>
Balance($):
</span>
<span style={{ fontWeight: "600" }}>{account?.balance}</span>
</div>
<div style={{ padding: "14px 0" }}>
<span>
<button onClick={deleteAccount} className="btn-danger">
Delete
</button>
</span>
</div>
</div>
<div className={styles.accountviewtransactionscont}>
<div className={styles.accountviewtransactions}>
<h2>Transactions</h2>
</div>
<div className={styles.accountviewtransactionslist}>
{!transactions || transactions?.length <= 0
? "No transactions yet."
: transactions?.map((transaction, i) => (
<TransactionCard key={i} transaction={transaction} />
))}
</div>
</div>
</div>
</div>
</div>
);
}The component retrieves the
id from the URL. We have states account and transactions, that hold the account and its transactions respectively.The
useEffect hook callback calls the /accounts/" + id endpoint with the id value to get the account via its id. Next, it calls the /transacts endpoint to retrieve the transactions and filter out the transaction made or received by the current account user. The result is set in the transactions state while the account details are set in the account state.The UI then displays the account details and their transactions.
There is a
Delete button that when clicked deletes the current account user. It does this by calling the endpoint /accounts/" + id over the DELETE HTTP method with the account's id. This makes Strapi delete the account.AddAccountDialog
This component is a dialog that we use to add a new account.
This component is a dialog that we use to add a new account.
Paste the below code in
components/AddAccountDialog/index.js:import { useState } from "react";
import EpisodeCard from "../TransactionCard";
import axios from "axios";
export default function AddAccountDialog({ closeModal }) {
const [disable, setDisable] = useState(false);
async function addAccount() {
setDisable(true);
const accountName = window.accountName.value;
const accountBalance = window.accountBalance.value;
// add account
await axios.post("http://localhost:1337/accounts", {
name: accountName,
balance: parseFloat(accountBalance),
});
setDisable(false);
closeModal();
location.reload();
}
return (
<div className="modal">
<div className="modal-backdrop" onClick={closeModal}></div>
<div className="modal-content">
<div className="modal-header">
<h3>Add New Account</h3>
<span
style={{ padding: "10px", cursor: "pointer" }}
onClick={closeModal}
>
X
</span>
</div>
<div className="modal-body content">
<div style={{ display: "flex", flexWrap: "wrap" }}>
<div className="inputField">
<div className="label">
<label>Name</label>
</div>
<div>
<input id="accountName" type="text" />
</div>
</div>
<div className="inputField">
<div className="label">
<label>Balance($):</label>
</div>
<div>
<input id="accountBalance" type="text" />
</div>
</div>
</div>
</div>
<div className="modal-footer">
<button
disabled={disable}
className="btn-danger"
onClick={closeModal}
>
Cancel
</button>
<button disabled={disable} className="btn" onClick={addAccount}>
Add Account
</button>
</div>
</div>
</div>
);
}We have input boxes to type in the account name and its initial balance deposited. The
Add Account button when clicked calls the addAccount function. This function retrieves the account name and balance and calls the /accounts endpoint via the POST HTTP with the payload: account name and balance. This creates a new account with this payload.TransactionDialog
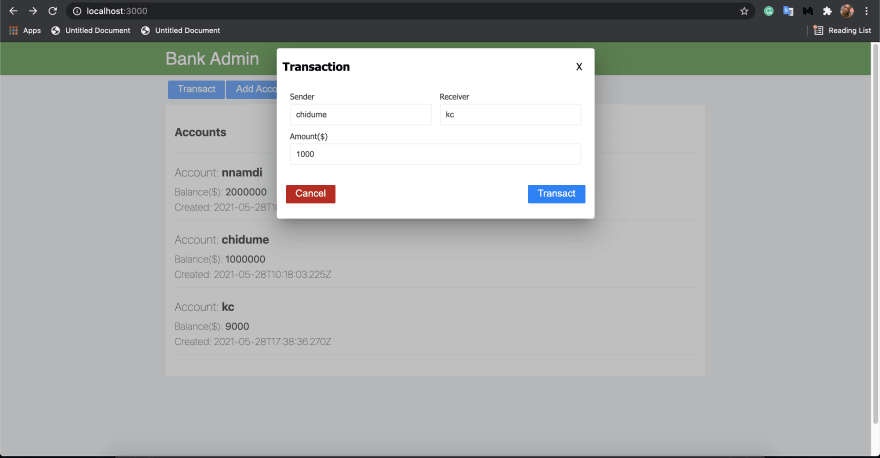
This component is where we send money from an account to another.
This component is where we send money from an account to another.
Paste the below code to
components/TransactionDialog/index.js:import { useState } from "react";
import TransactionCard from "../TransactionCard";
import axios from "axios";
export default function TransactDialog({ closeModal }) {
const [disable, setDisable] = useState(false);
async function transact() {
setDisable(true);
const sender = window.sender.value;
const receiver = window.receiver.value;
const amount = window.amount.value;
await axios.post("http://localhost:1337/transfer", {
sender,
receiver,
amount,
});
setDisable(false);
closeModal();
location.reload();
}
return (
<div className="modal">
<div className="modal-backdrop" onClick={closeModal}></div>
<div className="modal-content">
<div className="modal-header">
<h3>Transaction</h3>
<span
style={{ padding: "10px", cursor: "pointer" }}
onClick={closeModal}
>
X
</span>
</div>
<div className="modal-body content">
<div style={{ display: "flex", flexWrap: "wrap" }}>
<div className="inputField">
<div className="label">
<label>Sender</label>
</div>
<div>
<input id="sender" type="text" />
</div>
</div>
<div className="inputField">
<div className="label">
<label>Receiver</label>
</div>
<div>
<input id="receiver" type="text" />
</div>
</div>
<div className="inputField">
<div className="label">
<label>Amount($)</label>
</div>
<div>
<input id="number" id="amount" type="text" />
</div>
</div>
</div>
</div>
<div className="modal-footer">
<button
disabled={disable}
className="btn-danger"
onClick={closeModal}
>
Cancel
</button>
<button disabled={disable} className="btn" onClick={transact}>
Transact
</button>
</div>
</div>
</div>
);
}The input boxes collect the sender and receiver names and the amount to transfer.
The
transact function does the job. It retrieves the sender, receiver, and amount values from the input boxes, and then calls the endpoint /transfer via HTTP POST passing in the sender, receiver, and amount as payload. The /transfer endpoint will then transfer the amount from the sender to the receiver.We are done building our components, let's test it.
Add new account


Do some transaction


Delete an account


Strapi is great! It's freaking awesome! You see how we were able to integrate PostgreSQL into our Strapi project seamlessly.
We started by introducing Strapi and the goodies it brings to software development. Later on, we learned about the default DB it uses for data persistence.
Next, we introduced PostgreSQL and showed where to download and install it. We learned how to configure a Strapi project to use PostgreSQL as the database to store its application content.
We went further to build a bank app to demonstrate how to use PostgreSQL in Strapi to the fullest.
Always consider using Strapi in your projects. It is straightforward and highly configurable.
38