
20
Part I: Make a Discord Bot with Eris - The Basics
In this tutorial, I will be using the following format for the code:
+ // This line should be added to your code
- // This line should be removed from your codeSo, what is Eris exactly?
A lightweight NodeJS Discord Library.
What is Yuuko, then?
A Discord command framework for Javascript and Typescript.
I assume that if you've ever wanted to make a Discord Bot, you would have at least googled it up. The first and most common answer you'd see is probably "How to build a Discord Bot with Discord.js". What exactly is the difference between Eris and Discord.js?
D.js covers 100% of the Discord API while Eris does not. However, covering 100% of the Discord API has its disadvantages.
D.js has a larger memory footprint, and when the bot is in many servers, it starts having performance issues. That is why many large bots, like Dank Memer (The 4th largest Discord Bot), are made using Eris.
D.js has a larger memory footprint, and when the bot is in many servers, it starts having performance issues. That is why many large bots, like Dank Memer (The 4th largest Discord Bot), are made using Eris.
However, there are some packages on NPM that can help with the functions that Eris lacks, for example, Eris Additions. There are even command handlers for Eris on NPM, like Yuuko and Eris Boiler. For developers moving from D.js to Eris, there is Chariot.js.
Now, without further delay, let us dive into the magical world of Discord Bots.
Now, the first thing you need to do is to create a Discord Bot account.
New Application button on the top right corner.Create.Bot and click on Add Bot, and then click Click on Yes, do it!.TOKEN section, click Copy.Last but not least, do remember to invite your bot into your server in order to "talk" to it.
package.json.
mkdir <your-project-name>
cd <your-project-name>
npm init
Ensure that the
main in your package.json is set to index.js.npm i eris yuuko dotenvShould you be using a version of NPM below 4.5 (you shouldn't), run the following instead:
npm i eris yuuko dotenv --saveInstall
nodemon as well.npm i -g nodemon.env and index.js file, and a commands and events folder.bufferutil, zlib-sync or abalabahaha/erlpack
npm i eslint -D
 # -D is short for --save-dev
 npx eslint --init
 # Just answer the prompts
That's about the end of setting up your project!
Your project tree should look something like this now:
Your project tree should look something like this now:
|   .env
│   index.js
│   package-lock.json
│   package.json
│
├───commands
├───events
└───node_modules
│ ...Note: The final code will be included at the end :)
First, open the project in you favourite text editor, and fill in the
.env file with the following:TOKEN=<your-token-here>
PREFIX=<your-bot-prefix>Of course, replace
If you do not understand
Now that we are no longer concerned with the bot configurations, let us write our basic bot code!
Head over to your
<your-token-here> with the Bot token you obtained earlier, and <your-bot-prefix> with your bot prefix.If you do not understand
dotenv and .env files,Now that we are no longer concerned with the bot configurations, let us write our basic bot code!
Head over to your
index.js file, and insert the following at the top to require the packages.const { Client } = require('yuuko'); // Imports the Client constructor
const path = require('path'); // For joining paths
require('dotenv').config(); // Imports the variables in the `.env` fileAs you can see, we have imported the
Client constructor from Yuuko but not the Command constructor. Why? We will be putting the commands in js files in the command folder, so our index.js file will not be crowded with commands. Neat!We can create a client with the following:
const bot = new Client({
    token: process.env.TOKEN,
    prefix: process.env.PREFIX,
    ignoreBots: true,
});
The
If you want to allow commands to be used in only servers, you can set it using the following:
ignoreBots: true in the code tells our bot to ignore all messages sent by other bots.If you want to allow commands to be used in only servers, you can set it using the following:
bot.globalCommandRequirements = {
    guildOnly: true,
};
However, if you want to allow commands to be used in only DMs, you can set it using the following:
bot.globalCommandRequirements = {
    dmOnly: true,
};
To pass context/variables to the commands in other files, you can set in
index.js by doingbot.extendContext({
variableOne: 'Variable number 1!',
});The variables set here will be passed to commands and event listeners under
context.<variable-name>.Now get you bot to scan the directories and import any event listeners and commands, and lastly, connect to Discord:
bot
.addDir(path.join(__dirname, 'commands'))
.addDir(path.join(__dirname, 'events'))
.connect();Your
index.js file should now look something like this:const { Client } = require('yuuko');
const path = require('path');
const dotenv = require('dotenv');
var env = dotenv.config();
env = process.env;
const bot = new Client({
token: env.TOKEN,
prefix: env.PREFIX,
ignoreBots: true,
});
bot.extendContext({
  variableOne: 'Variable number 1!',
});
bot.editStatus('dnd'); // edits bot status
bot.on('error', (err) => {
console.error(err);
});
bot.globalCommandRequirements = {
guildOnly: true,
};
bot
    .addDir(path.join(__dirname, 'commands'))
    .addDir(path.join(__dirname, 'events'))
.connect();Create a file in
Require the EventListener:
./events and name it ready.js.Require the EventListener:
const { EventListener } = require('yuuko');and create an event listener:
module.exports = new EventListener('ready', (context) => {
  // context.client = bot
  console.log(`Logged in as ${context.client.user.usename}`);
});
Alternatively, you may also do:
module.exports = new EventListener('ready', ({client}) => {
  // client = bot
  console.log(`Logged in as ${client.user.usename}`);
});
instead of importing the whole
'Hey, I didn't define the
Well, Yuuko automatically sets the
context. You may be thinking:'Hey, I didn't define the
client variable in bot.extendContext({})! Why can it be used here?'Well, Yuuko automatically sets the
client as the bot, so you do not need to worry about it!Now, start your project:
nodemon .Your final
ready.js code:const { EventListener } = require('yuuko');
module.exports = new EventListener('ready', ({client}) => {
// client = bot
console.log(`Logged in as ${client.user.usename}`);
});Now, create a file in
What command should we create, then?
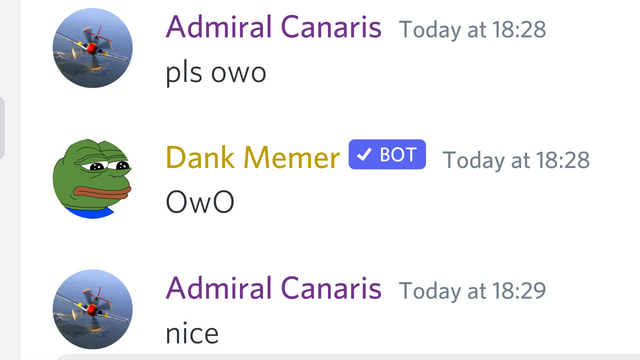
Let's look to our dear friend Dank Memer for some inspiration:
./commands.What command should we create, then?
Let's look to our dear friend Dank Memer for some inspiration:
There! Let's make this command then. Name the file you created
owo.js.Open it, and put the following code inside:
const { Command } = require('yuuko');
module.exports = new Command('owo', (message, args, context) => {
  message.channel.createMessage('OwO');
});
and you're done! Your bot should now respond with 'OwO' when you type in the command. It's that easy!
Eris is a great library to build Discord Bots, as it is lightweight and fast! I will be teaching you how to make a
(PS You might have to wait quite a while as I have a lot of homework, and have upcoming National Exams to take.)
meme command in my following post. Stay tuned!(PS You might have to wait quite a while as I have a lot of homework, and have upcoming National Exams to take.)
Oops. I nearly forgot. The tree of your project folder should now be something like
│   .env
│   index.js
│   package-lock.json
│   package.json
│
├───commands
│       owo.js
│
├───events
│       ready.js
│
└───node_modules
    │   ...
Take care and goodbye for now!
I will be putting the final code for all the files in my next post.
I will be putting the final code for all the files in my next post.
20