
41
Webhooks Tutorial: The Beginner’s Guide to Working with Webhooks
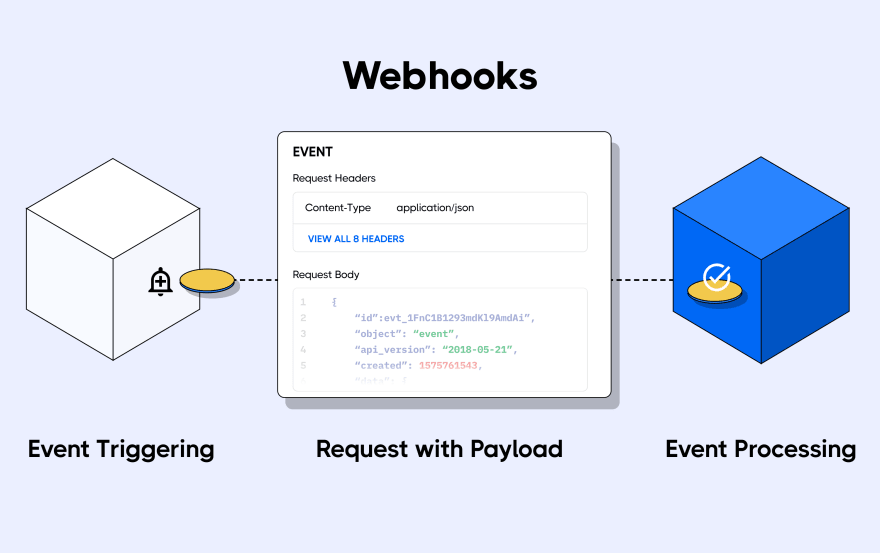
There are three important questions that stand out when learning a new technology: the what, the why and the how. In a previous article, we took a thorough look at what webhooks are and why you need them. Webhooks are user-defined HTTP callbacks that can be used to set up communication between two independent online applications. When an event takes place in one application, that application can send notifications about the event together with event data to another application using a webhook.
Webhook communication is achieved by sending an HTTP request from a source application to a destination application. When an event takes place in the source application, an HTTP request which might contain data relating to you the event is triggered. This HTTP request is sent to the destination application's endpoint. This is the endpoint, submitted by the destination application to the source application, for webhook requests to be sent to. The endpoint is often referred to as the webhook URL.
Webhook requests can be sent using the POST or GET request methods. This depends on the webhook provider's preferences — the information on how to consume the requests is always available on the provider's documentation. The next section provides more details on how to find the right information about webhooks from the provider's documentation.
Going through technical documentation is not perceived to be a fun-filled exercise for most developers, and documentation from webhook providers is not an exception. I have had my fair share of frustration trying to find the appropriate information from webhook documentation from different providers, so let me share some helpful tips I have discovered over the years working with webhooks.
Now that we have a good amount of webhook knowledge, let's put that knowledge into action with an exercise using Stripe webhooks. Stripe is an easy-to-set-up e-payment gateway that provides payment infrastructure for web applications. The first step is to sign up for a Stripe account and register for Stripe webhooks in order to receive webhook requests on a demo Node.js server.
To begin, we need a solid knowledge base of Stripe webhooks, which we can gain using the Stripe documentation. Information about webhooks can be found on the docs at Developer Tools → Webhooks.
Here, you can find information on working with different programming languages, checking Stripe verification signatures for authentication, Stripe webhook integration best practices, and even sample integrations.
Signing up for a Stripe account requires just an email address at this time. Head over to the Stripe registration page to set up a new account. You will be required to verify your email address after you register.
Once you have your Stripe account set up, the next step is to clone the demo Node.js API. The API we will be using is available on Hookdeck's GitHub repo. Clone this repository by running the following command:
git clone https://github.com/hookdeck/nodejs-webhook-server-example.gitThis will make the project available at the location on your file system where you ran the command.
Navigate to the root of the project and install the required dependencies by running the following commands:
cd nodejs-webhook-server-example
npm install
When the installation completes, you can then run the Node.js server with the following command:
npm startThis will boot up the API application and print a message to the screen indicating that the API is now running and listening for connections on port
1337.The endpoint to be used for the webhook requests is
/stripe-webhooks-endpoint and can be found in the routes.js file as shown below:router.post("/stripe-webhooks-endpoint", bodyParser.raw({type: 'application/json'}), function(req, res) {
console.log(req.body);
res.send("Stripe Successfully received Webhook request");
});This endpoint receives the webhook requests, prints the request body to the console, and returns a message.
For the source application to send a webhook request, the destination app needs to register a webhook URL with the source. It is also a requirement by most webhook providers that this endpoint uses the HTTPS protocol for security reasons. Thus, we need a publicly accessible URL that uses HTTPS.
Fortunately, the Hookdeck CLI is built just for that. With the Hookdeck CLI, you can receive webhooks locally and debug them seamlessly. Visit the CLI documentation to install and set up the tool on your operating system.
Once the setup process is complete, the next step is to use the CLI to generate a webhook URL that points to the running API application. To do this, run the following command:
hookdeck listen 1337This command starts an interactive session where the CLI collects information about the endpoint you're about to create. Below are the questions and answers you should supply to each question. Ensure to hit the
Enter key after each answer.With this information, the CLI will begin the process of generating the URL and once it's done, you will see the URL printed to the screen and the CLI indicating that it is ready to receive requests.
Copy the webhook URL, as it will be required in the next section.
Now that we have completed the setup on the destination application, it's time to subscribe for a webhook on Stripe.
On your Stripe dashboard, go to Developers → Webhooks. On the "Webhooks" page, click on the
+ Add endpoint ****button at the top right-hand side of the screen. This action will pop up a dialog similar to the one below: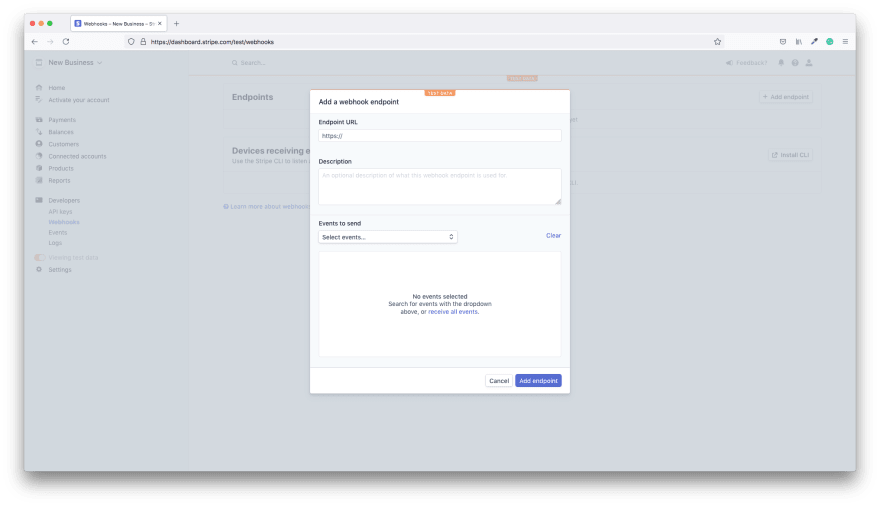
On the dialog, add the webhook URL copied from the CLI into the
Endpoint URL field. Next, click the Events to send dropdown and select the account.updated event which will be triggered each time your Stripe account is updated. Click the Add endpoint button to complete this process.This will create the connection between your Stripe account and the API application running on your local machine for the
account.updated event. After the webhook has been successfully added, you will see a screen like the one below:
With our webhook connection set up, it's now time to test it. Stripe provides a way to send a test webhook that simulates the event you have registered for. This is very handy for testing and debugging purposes.
On the top right-hand corner of the webhook screen shown above, click on the
Send test webhook button. This will pop open a dialog for you to select the event for which you want to send the test. See dialog below:
Make sure you select the
account.updated event and click the Send test webhook button. This will trigger a webhook request to your webhook URL, which will be received at the endpoint you specified when creating the URL (i.e. /stripe-webhooks-endpoint). Observe the terminal window where you ran the
hookdeck listen 1337 command. You will see the webhook request printed to the terminal as shown below:
The last item in the information printed is an endpoint for you to view details about the webhook request just received. Copy this URL and load it in your browser, and you will see an event details screen like the one below.

This screen contains details about the webhook request and also the request body sent in the payload, if any.
This will enable you to inspect the request data and write code to respond to it.
Webhooks are a simple communication setup and because of this, one might be tempted to trivialize the process. However, there are some very important things to consider when working with webhooks, and some of them are explained below.
Webhooks provide a seamless, real-time communication system for online applications. Applications can notify and share information between one another about events taking place and form a chain of automated workflows bringing more value to themselves and their users. In this article, we have demonstrated how to work with webhooks using Stripe webhooks as a case study. Most webhook providers follow a very similar process with differences only appearing in the shape of the request. Thus, you can transfer the knowledge you have gained in this article to your work with other webhook providers. Happy coding!
41