
29
Sending Emails From Your Firebase App with Nodemailer using Gmail as SMTP
I was recently working on a Firebase side project where I needed to implement a feature that sends emails to users upon sign up, and I was astonished by how difficult it was to find the needed resources to aid the implementation. I then decided to document the steps I took for posterity's sake. If you're seeking to integrate Nodemailer into your Firebase application, this might just be for you.
If you've been following the world of software development for a while now, you will no doubt, have heard of Firebase.
Nodemailer is a module for Node.js applications to allow easy as cake email sending.
It is very easy to settle and integrate into an existing project.
In this article, I'll be showing you how to integrate Nodemailer into your Firebase project with Gmail as your SMTP. We will be setting up a 3-Legged authentication with Oauth and Gmail to obtain the access tokens needed by Nodemailer, and then set those tokens as environment variables for use in our Firebase app and emulator.
I am working on an already created React app, so I already have a package.json in my directory. But if you don't have one already, you can create one by running the following code in your terminal while in the root directory of your project:
npm initThe next step is to install the firebase NPM package:
npm install --save firebaseLastly, you will need to import the required firebase modules into your app and then initialise the project:
// Firebase App (the core Firebase SDK) is always required and must be listed first
import firebase from "firebase/app";


// Add the Firebase products that you want to use
import "firebase/auth";
import "firebase/firestore";


const firebaseConfig = {
  // ... the values would be given to you when you create the project on the firebase console.
};

// Initialize Firebase
firebase.initializeApp(firebaseConfig);
For this article, we will be requiring the Firebase CLI for our functions and emulators setup. You can read more about that on the Firebase documentation.
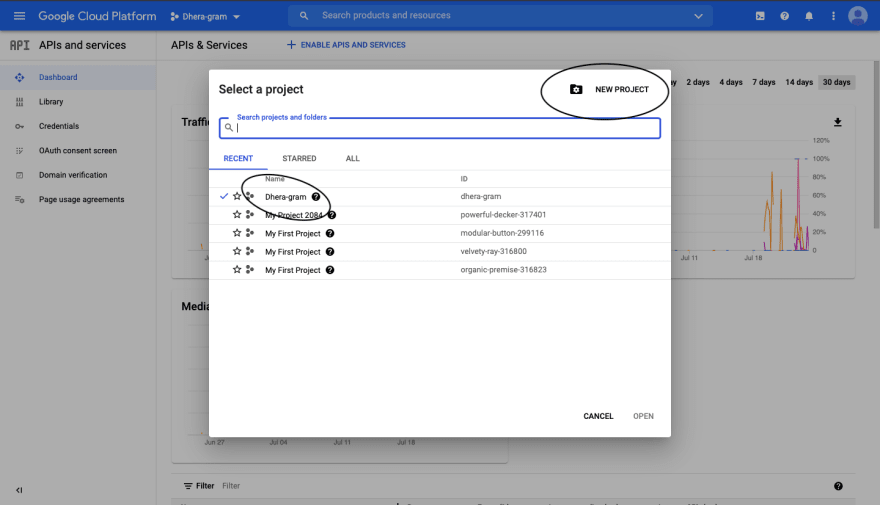
Go to your Google Developer Console. On your dashboard, click on the dropdown icon on the menu.

A pop-up window would be displayed. At this point, you can either use an existing project or create a new one. Since we already created a project on our Firebase console, we can access it by typing the name given to the project on the search bar.


The easiest way to get the required Oauth tokens is to use the Oauth 2.0 playground.
On the Oauth 2.0 playground, click on the cog icon at the top right corner of the screen. A window should come up after this, scroll down and check the Use your OAuth credentials select-box. Paste the client secret and client ID copied from the Google Cloud credentials page.

On the left side of the screen, on the select and authorise APIs section, you'll need to set the scope for the project. All we need for our project is Gmail you can set it pasting by https://mail.google.com

Then click on the Authorize APIs button. A Google prompt would come up.

Select the google account required. You'll then need to authorise your app to access your Google account.
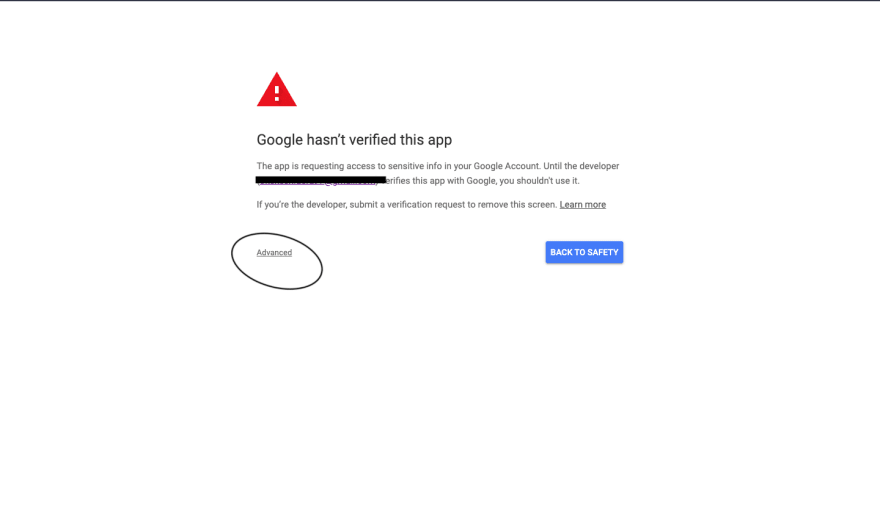
Click on the advanced button at the bottom.

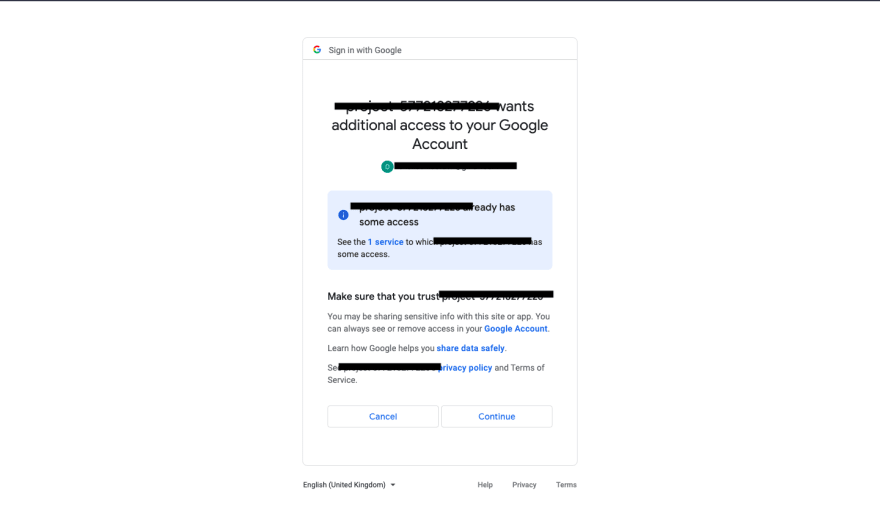
Click on the continue to project button at the bottom and grant the app access to your Google account.
Click on the advanced button at the bottom.
Click on the continue to project button at the bottom and grant the app access to your Google account.
Upon completion of the above steps, you will be redirected back to the Oauth playground. On the left-hand side of the screen, click on the Exchange authorization code for tokens button
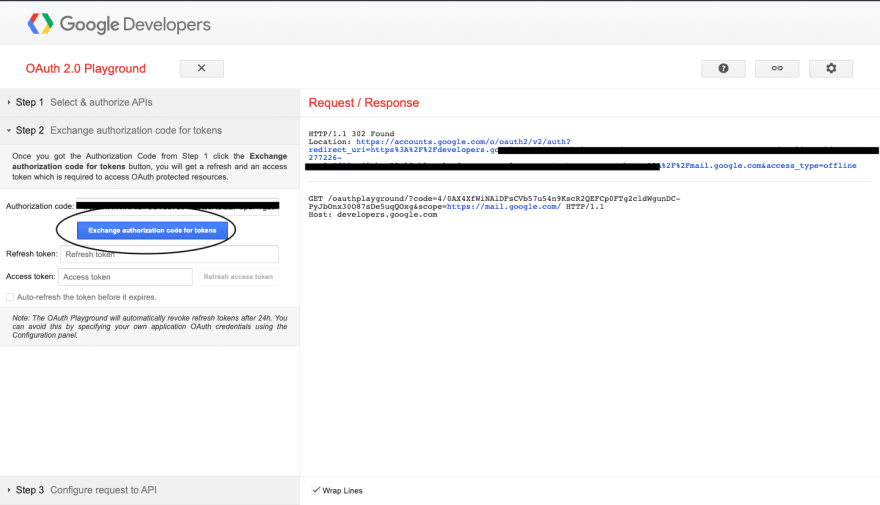
On the Response/Request side of the screen, an object containing your access token and refresh token should come up upon completion of the request.

These values, alongside our client secret and client ID, got from the credentials page would make up our Oauth credentials needed for Nodemailer.
Often you'll need additional environment configuration for your Firebase functions, such as third-party API keys, or in our case, our Oauth credentials. The Firebase SDK for Cloud Functions offers built-in environment configuration to make it easy to store and retrieve this type of data for your project.
Setting of environment variables in Firebase is done with the command
firebase functions:config:set x.key="THE API KEY" x.id="THE CLIENT ID"For our project, we will need to set environment variables to contain our access and refresh tokens, as well as our client secret and client ID.
We can do this by running the command in out terminal:
firebase functions:config:set gmail.useremail="yourgoogleemail@gmail.com" gmail.clientid="yourclientid.apps.googleusercontent.com" gmail.refreshtoken="1//04zKnDTh1mXdLCgYI-yourrefreshtoken" gmail.clientsecret="mbFQnYOurCLienTSecREt"Keep in mind that only lowercase characters are accepted as keys.
If testing with a Firebase emulator, you will need to retrieve your production custom configuration variables when emulating functions. To use config variables, run the following command in the functions directory before running firebase serve.
For MacOS
firebase functions:config:get > .runtimeconfig.jsonAnd for Windows
firebase functions:config:get | ac .runtimeconfig.jsonIn Firebase, environment variables are made available to functions via
functions.config(). To access these environment variables previously set, we can do something like: functions.config().envkey.envvalueWe can also destructure our environment variable keys in our index.js file to look like this:
let { useremail, refreshtoken, clientid, clientsecret } =

functions.config().gmail;For this part of the tutorial, you will need to install Nodemailer if you hadn't already. Run the code below on your terminal within your project directory to install Nodemailer:
npm install nodemailerIn our index.js file within our functions folder:
const functions = require("firebase-functions");
const admin = require("firebase-admin");
const nodemailer = require("nodemailer");

admin.initializeApp();

/** defining and destructuring environments config for firebase functions */
let { useremail, refreshtoken, clientid, clientsecret } =
    functions.config().gmail;

/**create reusable transporter object using the gmail SMTP transport */
let transporter = nodemailer.createTransport({
    host: "smtp.gmail.com",
    port: 465,
    secure: true,
    auth: {
        type: "OAuth2",
        user: useremail,
        clientId: clientid,
        clientSecret: clientsecret,
        refreshToken: refreshtoken,
    },
});


//our firebase cloud function
exports.userCreate = functions.auth.user().onDelete((user) => {
    //Defining our transport object
    const mailOptions = {
        from: "okekechidera97@gmail.com",
        to: user.email,
        subject: "Thanks for Signing up",
        html: `<div
        Hey, I am an HTML template
    </div>`,

    };

// send mail with defined transport object
return transporter.sendMail(mailOptions).catch((err)=>{
        console.log(err);
    });
});We just went through a step-by-step integration of Nodemailer to a Firebase project. Hope it was helpful to you.
This is my first go at technical writing. If you enjoyed it or have any suggestions, please leave a comment below.
If you're interested in the project which prompted this article, it is available here.
29