Protect Your SignalR Service Based Real-time Application with Application Gateway

By using the Azure Private Endpoint for your Azure SignalR, it allows clients on a virtual network (VNet) to securely access data over a Private Link. As next step, let’s learn how to use the Azure Application Gateway for your Azure SignalR to manage the real-time traffic.

Azure Application Gateway is a web traffic load balancer that enables you to manage traffic to your web applications. Using the Azure Application Gateway with Azure SignalR Service enables you to:

  • Protect your applications from common web vulnerabilities.
  • Get application-level load-balancing for your scalable and highly available applications.
  • Setup end to end secure.
  • Customize the domain name.

Let’s go through the key steps together and learn how to implement this reference solution:

  1. The Application Gateway helps you protect your applications and setup end to end secure.
  2. The client cannot access the Azure SignalR Service instance through public network, and all the traffic is managed through Application Gateway.
  3. The traffic between App Service and SignalR Service is also protected by Virtual Network. High level digram

Setup the Virtual Network

  1. Create the Virtual Network VN1.
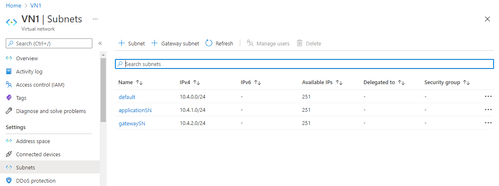
  2. There is a default subnet already created, and add 2 new subnets:

Setup SignalR Service

  1. Create the resource of Azure SignalR Service ASRS1.
  2. Go to the ASRS1 in the portal.
  3. Go to the Private endpoint connections blade, and create a new private endpoint PE1 with the VN1 and its default subnet. Learn more details about use private endpoint for Azure SignalR Service.
    • Resource
    • Resource Type: Microsoft.SignalRService/SignalR
    • Resource: ASRS1 SignalR Service Resource
    • Configuration
    • Integration with private DNS zone: Yes
    • Subnet: default subnet in VN1 SignalR Service Configuration
  4. Go to the network access control blade of ASRS1 and disable the all connections in public network.

Setup the Application Gateway

  1. Create the Application Gateway AG1
  2. In the Basic, use the VN1 and gatewaySN to configure the virtual network. Application Gateway - Basic
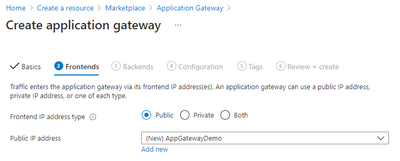
  3. In the Frontends, create a new public address. Application Gateway - Frontends
  4. In the Backends, create a new backend pool signalr for the SignalR Service resource. You need to use the host name of the SignalR Service resource as the Target. Application Gateway - Backends
  5. In the Configuration, add a new routing rule signalrrule to route the traffic to SignalR Service. You need to create a new HTTP setting.
    • Listener
    • Protocol: HTTP (We use the HTTP frontend protocol on Application Gateway in this blog to simplify the demo and help you get started easier. But in reality, you may need to enable HTTPs and Customer Domain on it with production scenario.) Application Gateway - Listener
    • Backend targets
    • Target type: Backend pool
    • Add new HTTP setting
      • Backend protocol: HTTPs
      • Use well known CA certificate: Yes
      • Override with new host name: Yes
      • Host name override: Pick host name from backend target. Application Gateway - Backend
  6. Review and create the AG1 Application Gateway - Create

Now, we already setup the Virtual Network, SignalR Service and Application Gateway. Let’s quick test whether the configuration is correct.

  • Go to the network access control blade of ASRS1 and set public network to allow server connection only. Configuration Test
  • Go to AG1, open health probe, change the health probe path to /api/v1/health Configuration Test
  • Go to the Overview blade of AG1, and find out the Frontend public IP address
  • Open http://frontend-public-IP-address, and it should return 403.
  • Open http://frontend-public-IP-address/api/v1/health, and it should return 200.
  • Go back to the network access control blade of ASRS1 and disable the server connection in public network.

Run a Chat Application Locally

Now, the traffic to Azure SignalR is already managed by the Application gateway. The customer could only use the public IP address or custom domain name to access the resource. In this blog, let’s use the chat application as an example, and start from running it locally.

  1. Clone the github repo https://github.com/aspnet/AzureSignalR-samples
  2. Go to the Keys blade of ASRS1 and get the connection string
  3. Go to samples/Chatroom and open the shell
  4. Set the connection string and run the application locally
dotnet restore 
dotnet user-secrets set Azure:SignalR:ConnectionString "<connection-string-of-ASR1>;ClientEndpoint=http://< frontend-public-IP-address-of-AG1>" 
dotnet run
  1. Open http://localhost:5000 and view network traces via explorer to see WebSocket connection is established through AG1  Run Test

Deploy the Chat Application to Azure

  1. Create a Web App WA1.
    • Publish: Code
    • Runtime stack: .NET Core 3.1
    • Operation System: Windows
  2. Go to Networking blade and configure the VNET integration.
  3. Select VN1 and webapp subnet applicationSN
  4. Publish the Web App with CLI
    • Publishe the application and its dependencies to a folder for deployment
dotnet publish -c Release
  • Package the bin\Release\netcoreapp3.1\publish folder as app.zip.
  • Perform deployment using the kudu zip push deployment.
az login  
az account set –subscription <your-subscription-name-used-to-create-WA1> 
az webapp deployment source config-zip -n WA1 -g <resource-group-of-WA1> --src app.zip
  1. Go to the Configuration blade of WA1, and add following application setting to set connection string and enable private DNS zone.
Azure__SignalR__ConnectionString=<connection-string-of-ASR1>;ClientEndpoint=http://< frontend-public-IP-address-of-AG1> 
WEBSITE_DNS_SERVER=168.63.129.16 
WEBSITE_VNET_ROUTE_ALL=1
  1. Go to the TLS/SSL settings blade of WA1, and turn off the HTTPS Only. To Simplify the demo, we used the HTTP frontend protocol on Application Gateway. Therefore, we need to turn off this option to avoid changing the HTTP URL to HTTPs automatically.
  2. Go to the Overview blade and get the URL of WA1.
  3. Open the URL by replacing the https with http, and open network traces to see WebSocket connection is established through AG1.

Next Steps

Now, you are successful to build a real-time chatroom application with Azure SignalR Service and use Application Gateway to protect your applications and setup end to end secure.

If you are trying to build your own application with Azure SignalR and Application Gateway, you could also get more helpful resources from the Azure SignalR Service and Azure Application Gateway. We are looking forward your feedback and ideas to help us become better via Azure Feedback Forum! You could also go to Tech Community to learn more blogs about Azure SignalR Service.

31