
24
Hosting Python Packages in Azure DevOps
The blog is about how to build some custom python libraries and store them as private artifacts in the Azure DevOps using Pipelines.
Working as a Data Scientist and Cloud Solutions Architect in my startup CortexBCI, I had the responsibility to host and publish our Wisdom PythonSDK for Brain Controlled Interface application development. This was the first motivation for me to write the blog to simplify the process of hosting python packages in Azure DevOps for other developers. I read through several documentations and blogs for the same but the one which helped me a lot was the blog written by Herald Gjura, App Dev Manager, Microsoft. The blog I have written is heavily inspired from him. I have adopted VSCode as my primary IDE for coding and also new changes in Azure DevOps version.
Azure DevOps provides developer services for support teams to plan work, collaborate on code development, and build and deploy applications. Azure DevOps supports a culture and set of processes that bring developers and project managers and contributors together to complete software development. It allows organizations to create and improve products at a faster pace than they can with traditional software development approaches.


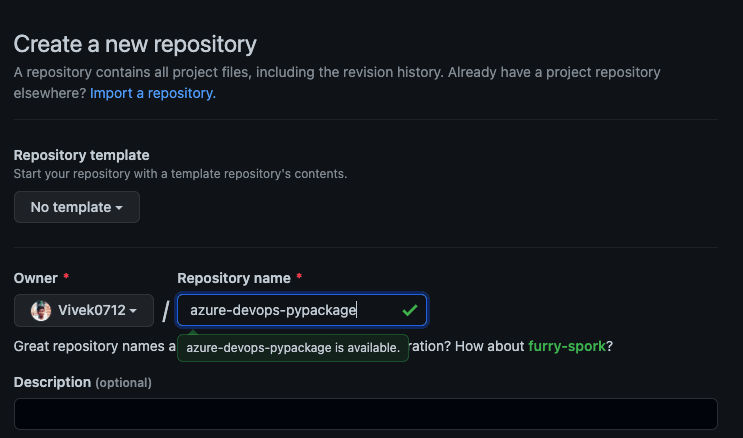
You can use any version control and code-hosting services like GitHub or simply create a repo in Azure Repos in DevOps Project we had created. In my case, I am going to create a repo in GitHub
Open your favourite IDE (I prefer VSCode)
python3 -m devopsenv .
source ./devopsvenv/bin/activategit clone <your git repo.git>- pytest
- wheel
- twine
Packages in Python are any set of folders, and subfolders, that have an init.py file in it (each folder or subfolder needs to have an init.py file, even an empty one).
Select a name for your top python package
Chose a meaningful, but short (best a one-word). I am to create a python package called "animalsounds"
Now we can create subpackages. I am going to create different animals as its subpackages (for example dog, cat etc). Its functionality can be retrieved as animalsounds.dog..
Create init.py file for each subpackage. You can write you functions directly in the init.py file. However, I prefer to write them in separate files and group them by functionality. So create functions.py under each subpackage and write the methods under it.
Inside each __init__.py, write
from .functions import *Under dog/functions.py
def makesound():
    return "Woof! Woof!"
Under cat/functions.py
def makesound():
return "Meow! Meow!"At the package level animalsounds, add a new folder called tests. In that folder add an empty init.py file.
In the tests folder, add a python file called, test_ functions.py. Note: it is very important to prefix all your test files with “test_”, it will be used by the CI framework to identify the unit test files it needs to run.
Inside the test_functions.py file add the following:
import pytest
import animalsounds.dog as d
import animalsounds.cat as c

def test_doghi():
    dogres = d.makesound()
    assert isinstance(dogres, str)


def test_cathi():
    catres = c.makesound()
    assert isinstance(catres, str)
To run the unit tests, use the following command
python3 -m pytest <Path to test folder>There are a few additional files we will need to add. At the root (application level) add the following files:
include README.md LICENSE[metadata]
license_files = LICENSE
[bdist_wheel]
universal=1.pypirc – This is an important file. Leave this file empty for now.
requirements.txt – In this file we will add all the packages that needs to be installed prior to our package, or that our package is dependent on. Add the following:
pip
pytest
wheel
twine
setuptoolsfrom setuptools import setup, find_packages
with open('README.md') as f:
long_description = f.read()
setup(
name = 'animalsounds', # How you named your package folder (TSIClient)
packages = ['animalsounds'], # Chose the same as "name"
version = '1.0.0', # Start with a small number and increase it with every change you make
license='MIT', # Chose a license from here: https://help.github.com/articles/licensing-a-repository
long_description=long_description,
long_description_content_type='text/markdown', # This is important!
author = 'Vivek Raja P S', # Type in your name
author_email = 'vivekraja98@gmail.com', # Type in your E-Mail
url = 'https://github.com/Vivek0712/azure-devops-pypackage', # Provide either the link to your github or to your website
#download_url = 'https://github.com/RaaLabs/TSIClient/archive/v_0.7.tar.gz', # If you create releases through Github, then this is important
keywords = ['Azure', 'DevOps', 'Python'], # Keywords that define your package best
packages = find_packages("src", exclude=["test"]),
classifiers=[
'Development Status :: 3 - Alpha', # Chose either "3 - Alpha", "4 - Beta" or "5 - Production/Stable" as the current state of your package
'Intended Audience :: Developers', # Define that your audience are developers
'Topic :: Software Development :: Build Tools',
'License :: OSI Approved :: MIT License', # Again, pick a license
'Programming Language :: Python :: 3.5',
'Programming Language :: Python :: 3.6',
'Programming Language :: Python :: 3.9',
],
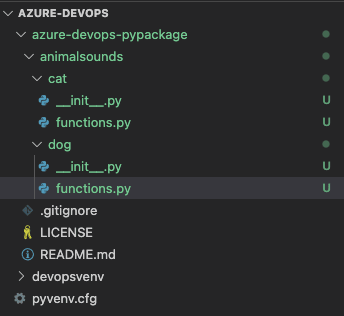
)The final project structure should look like this

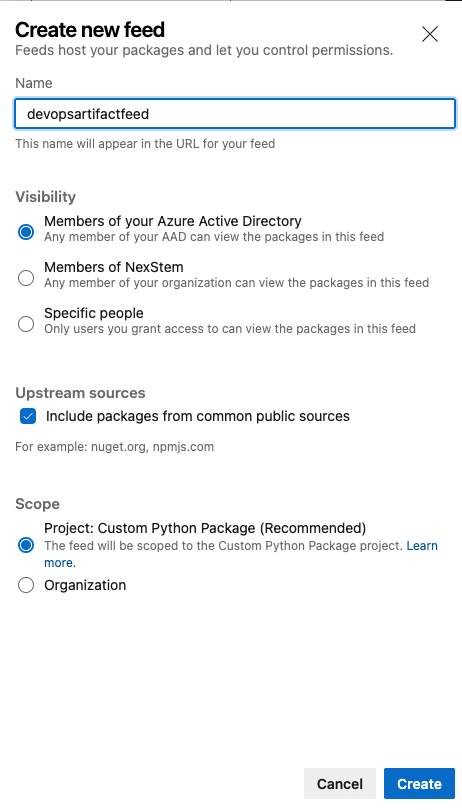
Let's start with creating a new feed for our pipeline. Go to Azure DevOps > Artifacts > Create New feed. Give a suitable name and keep a note of the same as we gonna need it later.
Under Pipelines -> Create a new pipeline. We need to set up for configuration of pipeline which is a 4 step process.
Review - Review if all the configurations are made properly.
And finally Run the pipeline.
Connect
The python package which I am planning to host is in my GitHub. So I am going to connect my GitHub with Azure DevOps and authorise the same.

The required repository is selected.

Under Configure tab, select Starter pipeline and then In the Azure Pipelines, use the yml script given here
Review and Run the pipeline.


Once the pipeline is run, it creates a Dist folder in the code repo which has the artifact.
To set up a release pipeline to release the artifact we had just created, go to Azure DevOps > Pipelines > Release Pipelines > Create New Release Pipeline.
Start with an empty template.
A release pipeline takes an artifact and runs through several stages to publish the artifact as per the pipeline configuration.
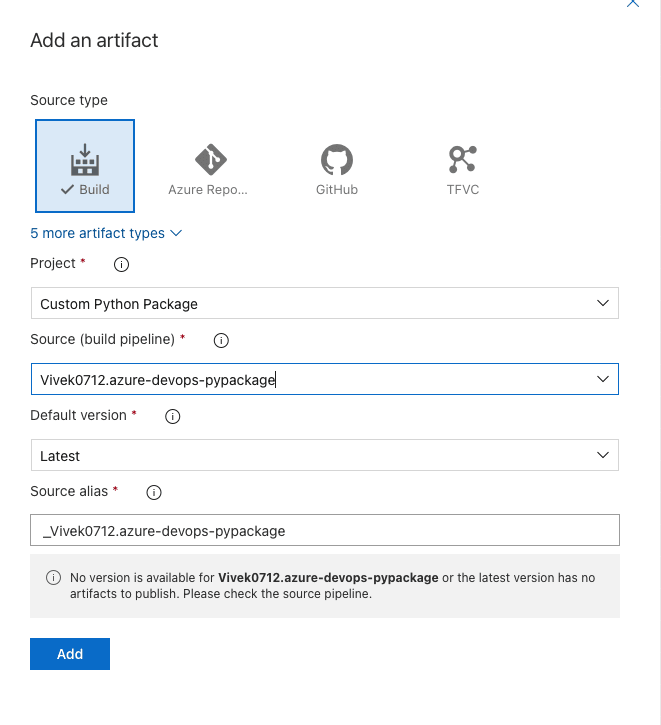
To publish the python package, we are going to select the Build Pipeline artifact and create a stage with one jobs with three tasks.
Select the pipeline which we had created before as the source of artifact.
Click on the stage and give a suitable name for the same. Click on Jobs and then we are going to create three tasks here. Add Agent Job.
Task 1: Twine Authenticate
Search for Twine Authenticate on the right side and add the same.

Task 2: Install Twine
Search for Command line and add it. Name the command script as Install Twine and add the following to the script
pip install twine
Task 3:
Search for Command line and add it. Name the command script as Publish Artifact and add the following to the script. Replace with the name of the artifact feed which we had created first and with the pipeline name
twine upload -r <Artifact Feed Name> --config-file $(PYPIRC_PATH) d:\a\r1\a\<Build Pipeline Name>\dist\dist\*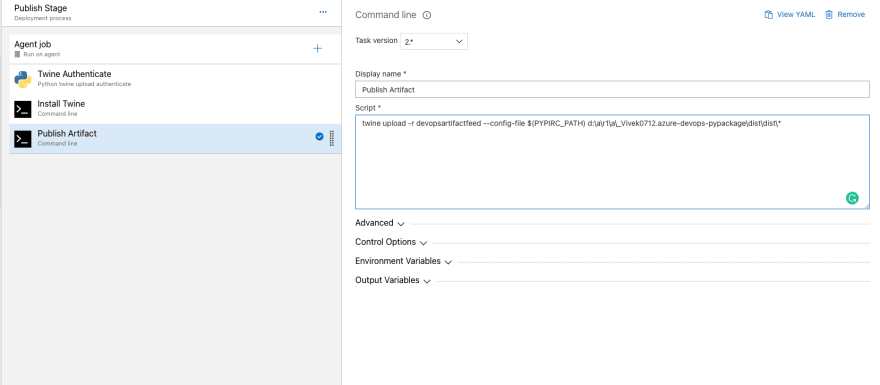
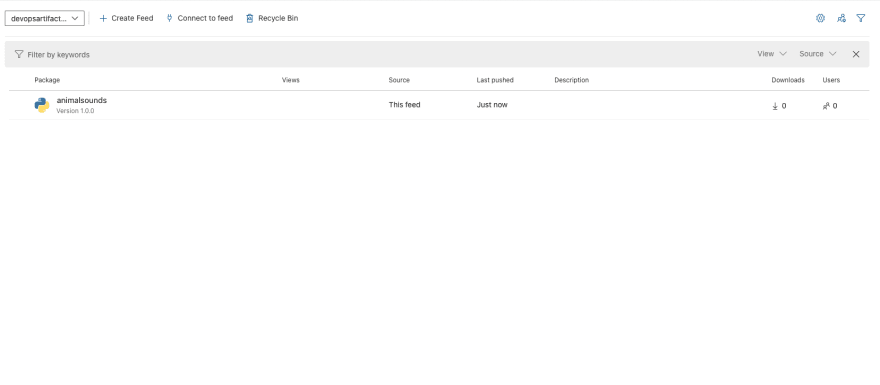
Once your release pipeline is ready, save it and Run the release pipeline. It may take a couple of minutes to run.

Once the release pipeline is successfully run, we can see the published artifact in the Artifact.
Now that our python package is published, we will see how to use it.
On the right top corner, click your account and create a personal token. This token is assured that the package is only accessed by authorised personals since it is private to the organisation.
Once the personal token is generated, go to the Artifact and click on the our python package artifact. Click connect to feed and choose either Twine or PyPI as publisher for the same. Follow the steps given there.
Once the steps are followed, with access token and the feed is connected, you will be able to install and access the python package.

Congratulations, you have hosted your custom Python package in Azure DevOps. If you reached at the end of the article, do follow, share the article.
Also, do check out my session on "Hosting Python packages in Azure DevOps" at Microsoft Reactor
24