
32
Let's Connect&Show MongoDB with Laravel!
NoSQL is popular these days...The processing speed is fast.
So let's operate and display MongoDB from Laravel!
So let's operate and display MongoDB from Laravel!
Fortunately, drivers with abundant functions are prepared in PHP and Laravel, so it's super easy to implement! Let's do it.
I'll distribute the sample project as usual this time as well.
Rename the
.env.example file to .env, enter your Mongo credentials, and use it with php artisan serve!But please read the whole thing and understand how it works, even if you're just "in the mood"...
Laravel is an active project and the specifications can change quite a bit depending on the version!
In this article, I'll use the Laravel 6.x LTS series that I usually use.
In this article, I'll use the Laravel 6.x LTS series that I usually use.
OS -> Ubuntu 20.04.2 LTS (GNU/Linux 5.4.0-74-generic x86_64)
Laravel -> Laravel Framework 6.20.32
PHP -> PHP 7.4.3 (cli) (built: Jul 5 2021 15:13:35) ( NTS )
MongoDB -> 4.4.6First, create the Laravel Project via Composer.
composer create-project laravel/laravel mongodb-sample "6.*"Install the MongoDB driver for PHP using Pecl.
(Pecl comes with PHP when you install it.)
(Pecl comes with PHP when you install it.)
pecl install mongodbAnd introduced a library via Composer that allows query builders etc. to be used in the Laravel project.
Composer require jenssegers/mongodb[Note]
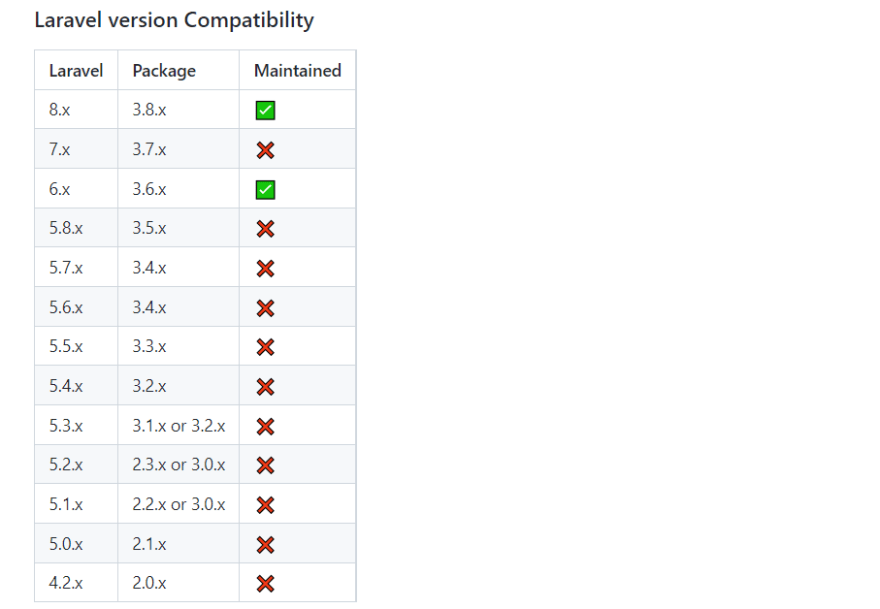
which package version to include depends on your Laravel version!
You can find it on GitHub below. For Laravel 6.x series, use 3.6.x!
Official Documentation
which package version to include depends on your Laravel version!
You can find it on GitHub below. For Laravel 6.x series, use 3.6.x!
Official Documentation
As a preliminary step, We will create a sample collection.
Type the following directly into the mongo shell, and a collection named Post will be created.
Type the following directly into the mongo shell, and a collection named Post will be created.
use <DB Name>
db.post.insertOne({"body": "Orange","date": "2021-08-19"});
db.post.insertOne({"body": "Grape","date": "2021-08-22"});
db.post.insertOne({"body": "Apple","date": "2021-08-17"});
※When using MongoDB Compass (CRUD software for GUI), you can create it just by reading the following JSON.
JSON File
JSON File
Edit/add to the following contents in the Config directory.
/config/app.php(Edit)
/config/app.php(Edit)
<?php
// ~Omitted~
    'providers' => [

// Add the following to End.
        Jenssegers\Mongodb\MongodbServiceProvider::class,
// ~Omitted~
    'aliases' => [
// Add the following to End.
        'Moloquent' => Jenssegers\Mongodb\Eloquent\Model::class,
/config/database.php(Edit)
<?php
//  'default' => env('DB_CONNECTION', 'mysql'),
    'default' => env('DB_CONNECTION', 'mongodb'),

    'connections' => [
// Added immediately after.
        'mongodb' => [
            'driver' => 'mongodb',
            'host' => env('DB_HOST'),
            'port' => env('DB_PORT'),
            'database' => env('DB_DATABASE'),
            // If you have login restrictions, you also need the following.
       'username' => env('DB_USERNAME'),
            'password' => env('DB_PASSWORD'),
],DB_CONNECTION=mysql
DB_HOST=127.0.0.1
DB_PORT=3306
DB_DATABASE=xxxx
DB_USERNAME=xxxx
DB_PASSWORD=secret
# Delete the above and replace with the below, and enter the information as appropriate.
DB_CONNECTION=mongodb
DB_HOST=127.0.0.1
DB_PORT=27017
DB_DATABASE=xxxxNext, we will create the Model, which is "M" in MVC.
That's handy because we can use them separately for each collection!
That's handy because we can use them separately for each collection!
php artisan make:model Models/PostThis will automatically create a Model in
/app/Models, so please copy and paste all of the following and replace it./app/Models/Post.php(New)
<?php
namespace App\Models;
use Jenssegers\Mongodb\Eloquent\Model as Moloquent;

class Post extends Moloquent
{
    protected $collection = 'post';
}routes/web.php(Edit)
<?php
Route::get('/', 'TestController@index');
// ↑ When you access /, it will reference the TestController.
<?php
Route::get('/', 'TestController@index');
// ↑ When you access /, it will reference the TestController.
Well, that's the point. Create a controller with the following artisan command.
php artisan make:controller TestControllerThen copy and paste all of the following.
/app/Http/Controllers/TestController.php(New)
/app/Http/Controllers/TestController.php(New)
<?php
namespace App\Http\Controllers;
use Illuminate\Http\Request;
use App\Models\Post;

class TestController extends Controller
{
    static function index() {
        $posts = Post::orderBy('_id', 'desc')->get();
        return view('Test', ['posts' => $posts]);
    }
}Finally, create a View and you're done!
I used Blade.It's the one that receives the variable from the Controller and displays it in
I used Blade.It's the one that receives the variable from the Controller and displays it in
foreach.<!DOCTYPE html>
<html lang="ja">
<head>
<meta charset="UTF-8">
<meta name="viewport" content="width=device-width, initial-scale=1.0">
<meta http-equiv="X-UA-Compatible" content="ie=edge">
<title>MongoDB Show</title>
</head>
<body>
<div>Data Count:{{ count($posts) }}</div><br>
<!-- You can use the count() function to output the number of data in the collection. -->
<ul>
@foreach ($posts as $post)
<li>{{ 'Date:' . $post['date'] . ' | Value:' . $post['body'] }}</li>
@endforeach
</ul>
</body>
</html>That's All!
Start the build-in server with
php artisan serve, access http://localhost:8000/, and if you can see it without any problems, successful!
I'll also post it on the repo on GitHub. Please try it. (GitHub pushes only laravel diff directories/files)
Please also check the blog and Twitter@ichii731 if you like :D
32