
31
Deploying a Python machine learning app on Kubernetes
Build and deploy simple machine learning data science web app in Python using the streamlit library in Kubernetes, without knowing Kubernetes!
As a Data Scientist or Machine Learning Engineer, it is extremely important to be able to deploy our data science project using microservices and Kubernetes, as this helps to complete the data science life cycle and our infrastructure teams to continue evolving the infrastructure.
Traditional deployment of machine learning models can become a daunting and/or time-consuming task if you are new to microservices and Kubernetes, so the goal of this article is to enable you to quickly deploy an ML application without dealing with the underlying Kubernetes infrastructure complexity.
To follow through this article, you will need:
Today, we will be building a simple machine learning-powered web app for predicting the class label of Iris flowers as being setosa, versicolor and virginica.
This will require the use of three Python libraries namely
streamlit, pandas and scikit-learn.Let’s take a look at the conceptual flow of the app that will include two major components: (1) the front-end and (2) back-end.
In the front-end, the sidebar found on the left will accept input parameters pertaining to features (i.e. petal length, petal width, sepal length and sepal width) of Iris flowers. These features will be relayed to the back-end where the trained model will predict the class labels as a function of the input parameters. Prediction results are sent back to the front-end for display.
In the back-end, the user input parameters will be saved into a dataframe that will be used as test data. In the meantime, a classification model will be built using the random forest algorithm from the
scikit-learn library. Finally, the model will be applied to make predictions on the user input data and return the predicted class labels as being one of three flower type: setosa, versicolor or virginica. Additionally, the prediction probability will also be provided that will allow us to discern the relative confidence in the predicted class labels.You can find the complete application code available on https://github.com/brunoa19/ml-iris-app
Okay, so let’s take a look under the hood and we will see that the app that we are going to be building today:
import streamlit as st
import pandas as pd
from sklearn import datasets
from sklearn.ensemble import RandomForestClassifier

st.write("""
# Simple Iris Flower Prediction App
This app predicts the **Iris flower** type!
""")

st.sidebar.header('User Input Parameters')

def user_input_features():
    sepal_length = st.sidebar.slider('Sepal length', 4.3, 7.9, 5.4)
    sepal_width = st.sidebar.slider('Sepal width', 2.0, 4.4, 3.4)
    petal_length = st.sidebar.slider('Petal length', 1.0, 6.9, 1.3)
    petal_width = st.sidebar.slider('Petal width', 0.1, 2.5, 0.2)
    data = {'sepal_length': sepal_length,
            'sepal_width': sepal_width,
            'petal_length': petal_length,
            'petal_width': petal_width}
    features = pd.DataFrame(data, index=[0])
    return features

df = user_input_features()

st.subheader('User Input parameters')
st.write(df)

iris = datasets.load_iris()
X = iris.data
Y = iris.target

clf = RandomForestClassifier()
clf.fit(X, Y)

prediction = clf.predict(df)
prediction_proba = clf.predict_proba(df)

st.subheader('Class labels and their corresponding index number')
st.write(iris.target_names)

st.subheader('Prediction')
st.write(iris.target_names[prediction])
#st.write(prediction)

st.subheader('Prediction Probability')
st.write(prediction_proba)
Copy and create this code using the name iris-ml-app.py
For our application to run, we will need to ensure that requirements are in place.
Let’s start with the Python libraries we need:
Create a file called requirements.txt in the same directory as the application code above. Here is the content of the file:
streamlit
pandas
scikit-learn
These 3 lines will have Ketch install these libraries when the Docker image is built for our application.
By default, the Python
streamlit library exposes our application through port 8501, so we will need to ensure Kubernetes understands that it should use this port for our application.To do that, create a file called ketch.yaml in the same directory as the previous files. Here is the content of the file:
kubernetes:
  processes:
    web:
      ports:
        - name: iris-app
          protocol: TCP
          port: 8501
          target_port: 8501
The content above will tell Kubernetes to assign port 8501 to our application process. Save the file
Last, we need to define how our application should be started once its deployed. For that, create a file called Procfile in the same directory as the previous files. Here is the content of the file:
web: streamlit run iris-ml-app.pyThe command above will tell Ketch that it should use the
streamlit library to run our Iris app code created before. Save the fileNow that we have:
We can then deploy our application. You can deploy your application using the command below:
ketch app deploy iris . -i shiparepo/iris:latest -k devThis command will:
The deployment process will take a couple of minutes as it will create and store the Docker image in your registry.
Once the deployment is finished, you can see your application status using the command below:
ketch app list
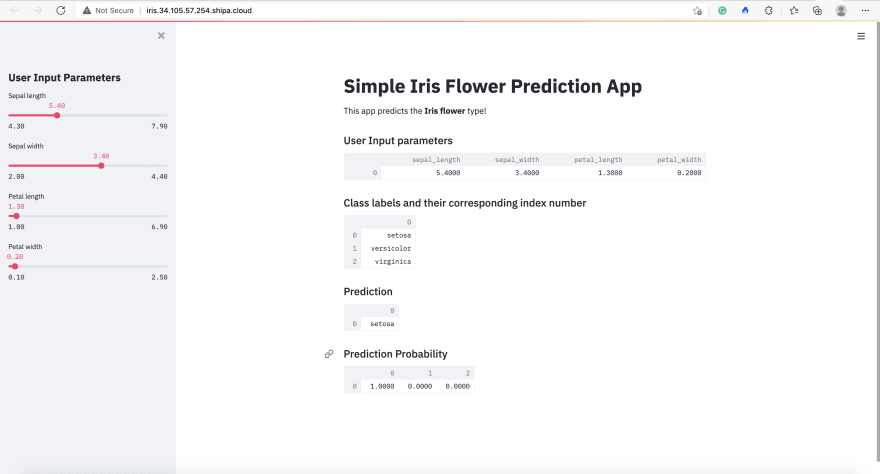
As part of the output of the command, you can see that Ketch also automatically created the endpoint address where you can access your application. Accessing that, we can see our Iris application ready to be used:
That's it!
You have deployed your Python machine learning application on Kubernetes without having to deal with the underlying complexities that Kubernetes might introduce.
By using Ketch, you get your applications and models deployed quickly while allowing your infrastructure team to continue the adoption of microservices and Kubernetes.
31