22
How to Scan QR Code from Desktop Screen in Python
In our life, we usually take out smartphone to scan QR code. But when we are working on a computer, smartphone may not be the best choice for scanning QR codes that appear on web pages. One reason is the pictures taken from a monitor screen have the Moire' patterns which interfere QR code recognition. The other reason is you may want to use the decoded information directly on PC, such as a URL for opening a website. This article will implement a simple tool with Python to facilitate QR code recognition on desktop screen.
python3 -m pip install pillow opencv-python dbr pyside2To unlock the capabilities of Dynamsoft Barcode SDK, you'd better apply for a 30-day free trial license.
Since I have implemented a GUI barcode reader using Qt for Python, OpenCV and Dynamsoft Barcode Reader, the remaining stuff is to add screen snipping functionality. Inspired by https://github.com/harupy/snipping-tool, I learned the steps of implementing the screenshot functionality:
paintEvent() function while moving the mouse.PIL.ImageGrab.grab() to get the image of the selected area.We open the
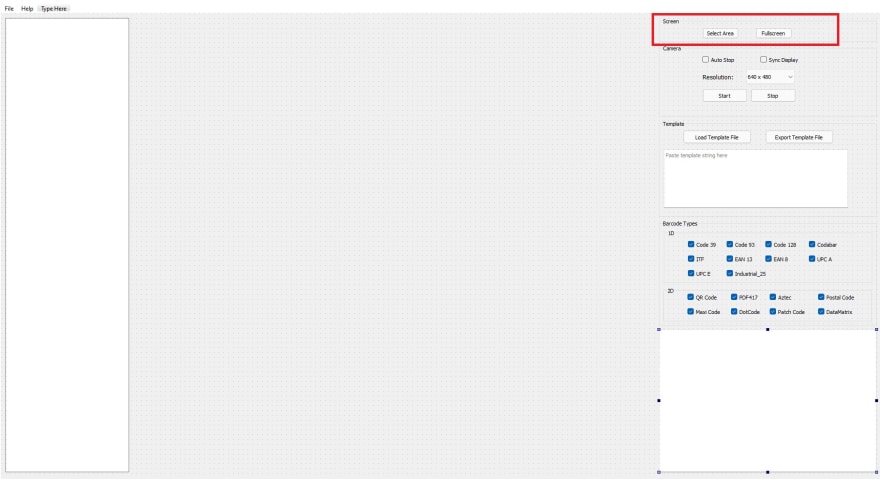
design.ui file in Qt Creator and add two buttons for triggering the snipping events.
Save the file and recompile
design.ui to design.py:pyside2-uic design.ui -o design.pyIn
app_advanced.py, the two new buttons should be recognizable now. Connect them to slot functions:self.ui.pushButton_area.clicked.connect(self.snipArea)
self.ui.pushButton_full.clicked.connect(self.snipFull)Create a
SnippingTool.py file, in which we create a custom Qt widget:import numpy as np
import cv2
from PIL import ImageGrab
from PySide2 import QtWidgets, QtCore, QtGui
from PySide2.QtCore import Qt
class SnippingWidget(QtWidgets.QWidget):
is_snipping = False
def __init__(self, parent=None, app=None):
super(SnippingWidget, self).__init__()
self.parent = parent
self.setWindowFlags(Qt.WindowStaysOnTopHint)
self.screen = app.primaryScreen()
self.setGeometry(0, 0, self.screen.size().width(), self.screen.size().height())
self.begin = QtCore.QPoint()
self.end = QtCore.QPoint()
self.onSnippingCompleted = None
def start(self):
SnippingWidget.is_snipping = True
self.setWindowOpacity(0.3)
QtWidgets.QApplication.setOverrideCursor(QtGui.QCursor(QtCore.Qt.CrossCursor))
self.show()The size of the widget should be the same as the screen resolution, which can be obtained from the
primaryScreen() function. Next, we handle the mouse events:
def mousePressEvent(self, event):
    self.begin = event.pos()
    self.end = self.begin
    self.update()

def mouseMoveEvent(self, event):
    self.end = event.pos()
    self.update()

def mouseReleaseEvent(self, event):
    SnippingWidget.is_snipping = False
    QtWidgets.QApplication.restoreOverrideCursor()
    x1 = min(self.begin.x(), self.end.x())
    y1 = min(self.begin.y(), self.end.y())
    x2 = max(self.begin.x(), self.end.x())
    y2 = max(self.begin.y(), self.end.y())

    self.repaint()
    QtWidgets.QApplication.processEvents()
    self.close()
While the mouse is moving, we draw a rectangle to indicate the selected area in
paintEvent() function:def paintEvent(self, event):
if SnippingWidget.is_snipping:
brush_color = (128, 128, 255, 100)
lw = 3
opacity = 0.3
else:
self.begin = QtCore.QPoint()
self.end = QtCore.QPoint()
brush_color = (0, 0, 0, 0)
lw = 0
opacity = 0
self.setWindowOpacity(opacity)
qp = QtGui.QPainter(self)
qp.setPen(QtGui.QPen(QtGui.QColor('black'), lw))
qp.setBrush(QtGui.QColor(*brush_color))
rect = QtCore.QRectF(self.begin, self.end)
qp.drawRect(rect)PIL is the Python library for capturing images from the screen. After releasing the mouse, we take the screenshot of the selected area based on the coordinates of the rectangle.
img = ImageGrab.grab(bbox=(x1, y1, x2, y2))

try:
    img = cv2.cvtColor(np.array(img), cv2.COLOR_RGB2BGR)
except:
    img = None
Taking full screen image is easy:
img = ImageGrab.grab(bbox=(0, 0, self.screen.size().width(), self.screen.size().height()))Once the snipping widget is ready, we can call it in button click event. Note: to avoid obstructing the screen, the application window should be minimized before launching the snipping widget and restored after the snipping is completed:
def onSnippingCompleted(self, frame):
    self.setWindowState(Qt.WindowMaximized)
    if frame is None:
        return

    frame, self._results = self._barcodeManager.decode_frame(frame)
    self.showResults(frame, self._results)

def snipArea(self):
    self.setWindowState(Qt.WindowMinimized)
    self.snippingWidget.start()

def snipFull(self):
    self.setWindowState(Qt.WindowMinimized)
self.snippingWidget.fullscreen()Run the barcode recognition program:
python3 app_advanced.py
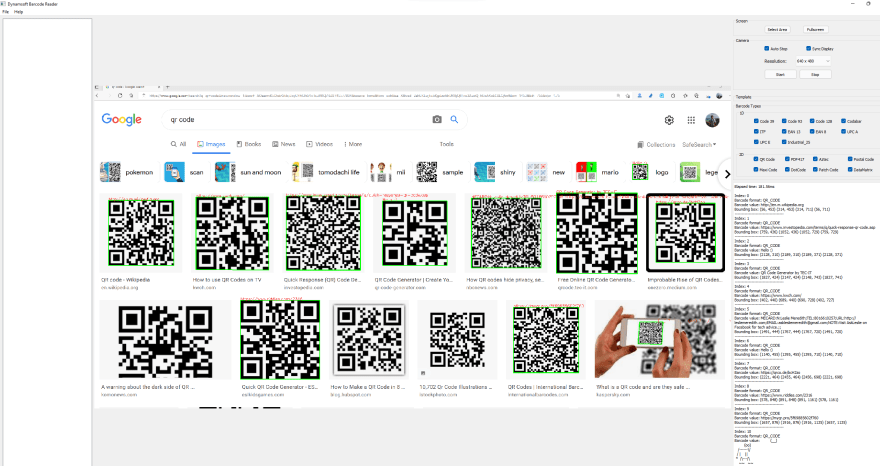
Search Google for QR code.
Click the Select Area button to scan QR code (one or multiple) returned by search engine.
You can also make a full screen barcode recognition by one click.
22

