24
How to Build a Blogging application using Fauna, Next.js, GraphQL and Editor.js
How do you make your blog stand out? You could start with an awesome design and some great content, but if it doesn't run on the latest technology there's not much point. In this tutorial, I'm going to show how easy building a high-quality application can be by using Fauna as our data layer, Next.js for our frontend framework, and Editor.js as our feature-rich visual editor.
Text editors are an essential tool for content creators because they help you to edit the information on your browser. If you ever tried building a text editor yourself, then it's clear how difficult this task can be!
For our project, we're using EditorJS - which is simple and easy-to-use with clean JSON output that supports plugins allowing users to extend its functionality even further.
For our project, we're using EditorJS - which is simple and easy-to-use with clean JSON output that supports plugins allowing users to extend its functionality even further.
Make sure you sign up in Fauna. They have a great free tier you can enroll in for getting started with Fauna. It covers 100k read ops, 50k write ops, 500k compute ops, 5GB storage.
type Post {
   content: String!
   published: Boolean
   slug: String!
}

type Query {
   allPosts: [Post!]
   findPostBySlug(slug: String!): Post
}
Save this schema in a file and when the pop asks to choose a file pick where you saved the schema in it.
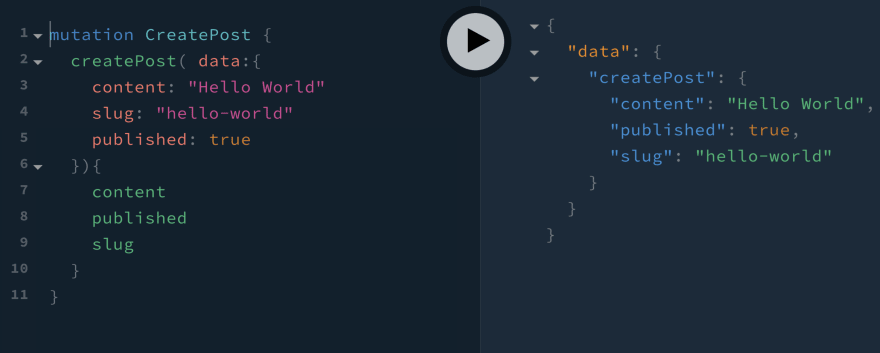
Now go back to the GraphQL section on the left sidebar and run the following in the GraphQL playground.
mutation CreatePost {
  createPost( data:{
    content: "Hello World"
    slug: "hello-world"
    published: true
  }){
    content
    published
    slug
  }
}In the GraphQL section run the following query
query {
  findPostBySlug(slug: "hello-world"){
    content
    slug
    published
  }
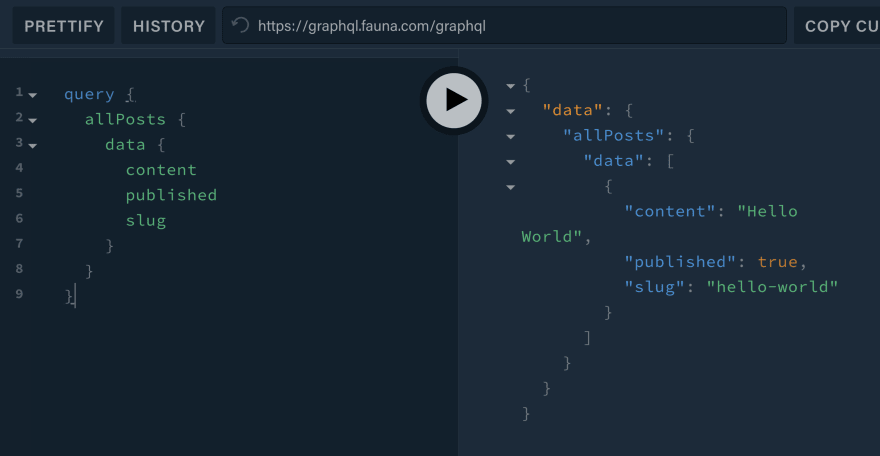
}In the GraphQL section run the following query
query {
      allPosts {
        data {
          content
          published
          slug
        }
      }
}open up your terminal and run:
npx create-next-app fauna-blogNow enter to the project directory and install the dependencies
cd fauna-blog
npm i @apollo/client apollo-cache-inmemory apollo-client apollo-link-http @bomdi/codebox @editorjs/checklist @editorjs/delimiter @editorjs/editorjs @editorjs/header @editorjs/inline-code @editorjs/list @editorjs/marker @editorjs/paragraph @headlessui/react @heroicons/react @tailwindcss/forms editorjs-react-renderer graphql graphql-tagPlease follow the TailwindCSS instructions on how to set it up in your Next.js project.
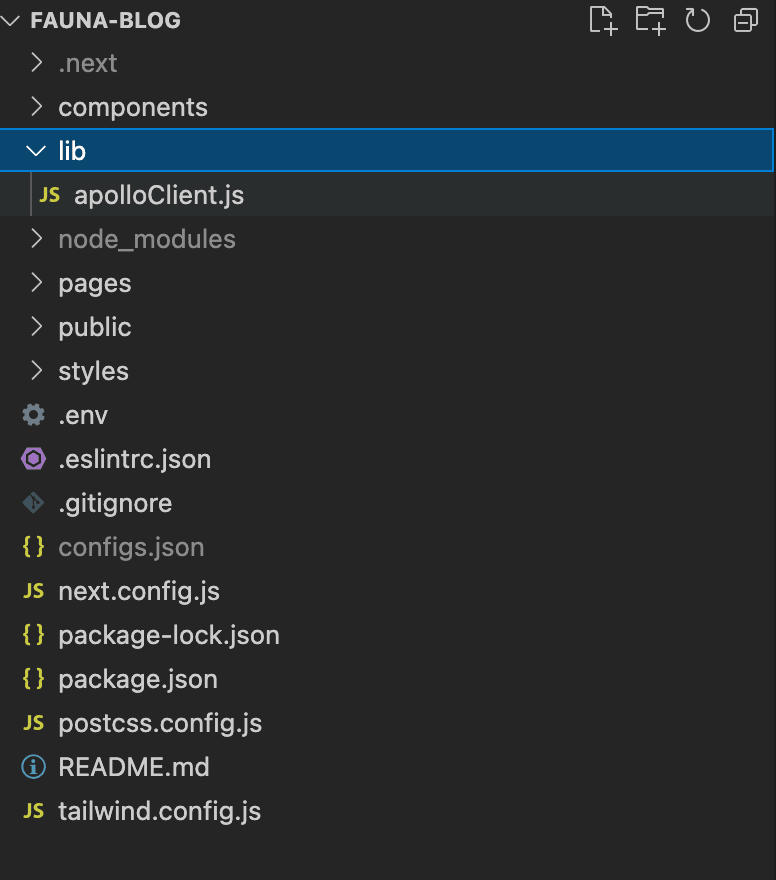
import {
  ApolloClient,
  HttpLink,
  ApolloLink,
  InMemoryCache,
  concat,
} from "@apollo/client";

const httpLink = new HttpLink({ uri: process.env.FAUNA_GRAPHQL_ENDPOINT });

const authMiddleware = new ApolloLink((operation, forward) => {
  // add the authorization to the headers
  operation.setContext(({ headers = {} }) => ({
    headers: {
      ...headers,
      authorization:
        `Basic ${process.env.FAUNA_TOKEN}`,
    },
  }));

  return forward(operation);
});

const apolloClient = new ApolloClient({
  cache: new InMemoryCache(),
  link: concat(authMiddleware, httpLink),
});

export default apolloClient;
At the root of the project create a file called
.env like the followingFAUNA_GRAPHQL_ENDPOINT="https://graphql.fauna.com/graphql"
FAUNA_TOKEN="YOUR-TOKEN"In this project, we only have one component for the
Editor. In this component ready, the user makes some changes, and when the user clicks on the save button.
The last step is an important one for us because when the user clicks on the save button we want to send the result to Fauna Endpoint to save the blog post content.
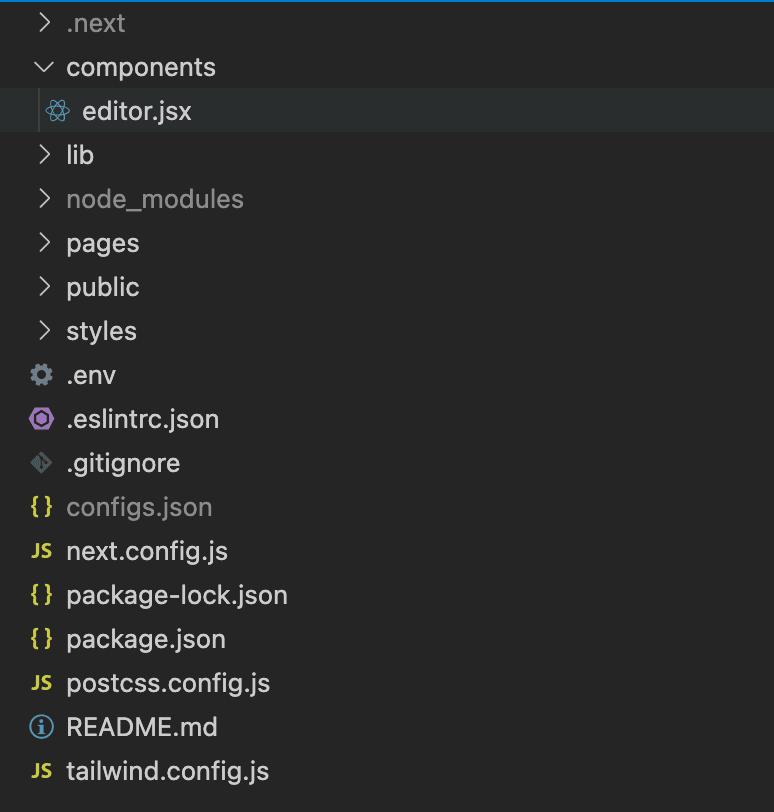
import React from "react";
import { useEffect, useRef, useState } from "react";
import EditorJS from "@editorjs/editorjs";
import Header from "@editorjs/header";
import List from "@editorjs/list";
import Quote from "@editorjs/quote";
import Delimiter from "@editorjs/delimiter";
import InlineCode from "@editorjs/inline-code";
import Marker from "@editorjs/marker";
import Embed from "@editorjs/embed";
import Image from "@editorjs/image";
import Table from "@editorjs/table";
import Warning from "@editorjs/warning";
import Code from "@editorjs/code";
import Checklist from "@editorjs/checklist";
import LinkTool from "@editorjs/link";
import Raw from "@editorjs/raw";
import Paragraph from "@editorjs/paragraph";
import Codebox from "@bomdi/codebox";
import gql from "graphql-tag";
import apolloClient from "../lib/apolloClient";

export default function Editor() {
    const editorRef = useRef(null);
    const [editorData, setEditorData] = useState(null);
    const initEditor = () => {
        const editor = new EditorJS({
          holderId: "editorjs",
          tools: {
            header: {
              class: Header,
              inlineToolbar: ["marker", "link"],
              config: {
                placeholder: 'Enter a header',
                levels: [1, 2, 3, 4, 5, 6],
                defaultLevel: 3
              },
              shortcut: "CMD+SHIFT+H",
            },
            image: Image,
            code: Code,
            paragraph: {
              class: Paragraph,
              inlineToolbar: true,
            },
            raw: Raw,
            inlineCode: InlineCode,
            list: {
              class: List,
              inlineToolbar: true,
              shortcut: "CMD+SHIFT+L",
            },
            checklist: {
              class: Checklist,
              inlineToolbar: true,
            },
            quote: {
              class: Quote,
              inlineToolbar: true,
              config: {
                quotePlaceholder: "Enter a quote",
                captionPlaceholder: "Quote's author",
              },
              shortcut: "CMD+SHIFT+O",
            },
            warning: Warning,
            marker: {
              class: Marker,
              shortcut: "CMD+SHIFT+M",
            },
            delimiter: Delimiter,
            inlineCode: {
              class: InlineCode,
              shortcut: "CMD+SHIFT+C",
            },
            linkTool: LinkTool,
            embed: Embed,
            codebox: Codebox,
            table: {
              class: Table,
              inlineToolbar: true,
              shortcut: "CMD+ALT+T",
            },
          },
          // autofocus: true,
          placeholder: "Write your story...",
          data: {
            blocks: [
              {
                type: "header",
                data: {
                  text: "New blog post title here....",
                  level: 2,
                },
              },
              {
                type: "paragraph",
                data: {
                  text: "Blog post introduction here....",
                },
              },
            ],
          },
          onReady: () => {
            console.log("Editor.js is ready to work!");
            editorRef.current = editor;
          },
          onChange: () => {
            console.log("Content was changed");
          },
          onSave: () => {
            console.log("Content was saved");
          },
        });
    };
    const handleSave = async () => {
      // 1. GQL mutation to create a blog post in Fauna
      const CREATE_POST = gql`
        mutation CreatePost($content: String!, $slug: String!) {
          createPost(data: {published: true, content: $content, slug: $slug}) {
            content
            slug
            published
          }
        }
      `;
      // 2. Get the content from the editor
      const outputData = await editorRef.current.save();
      // 3. Get blog title to create a slug
      for (let i = 0; i < outputData.blocks.length; i++) {
        if (
          outputData.blocks[i].type === "header" &&
          outputData.blocks[i].data.level === 2
        ) {
          var title = outputData.blocks[i].data.text;
          break;
        }
      }
      const slug = title.toLowerCase().replace(/ /g, "-").replace(/[^\w-]+/g, "");
      //3. Pass the content to the mutation and create a new blog post
      const { data } = await apolloClient.mutate({
        mutation: CREATE_POST,
        variables: {
          content: JSON.stringify(outputData),
          slug: slug,
        },
      });
    };
    useEffect(() => {
        if(!editorRef.current) {
            initEditor();
        }
    }, []);


    return (
      <div>
        <div id="editorjs" />
        <div className="flex justify-center -mt-30 mb-20">
          <button
            type="button"
            onClick={handleSave}
            className="inline-flex items-center px-12 py-3 border border-transparent text-base font-medium rounded-md shadow-sm text-white bg-blue-600 hover:bg-blue-700 focus:outline-none focus:ring-2 focus:ring-offset-2 focus:ring-blue-500"
          >
            Save
          </button>
        </div>
      </div>
    );
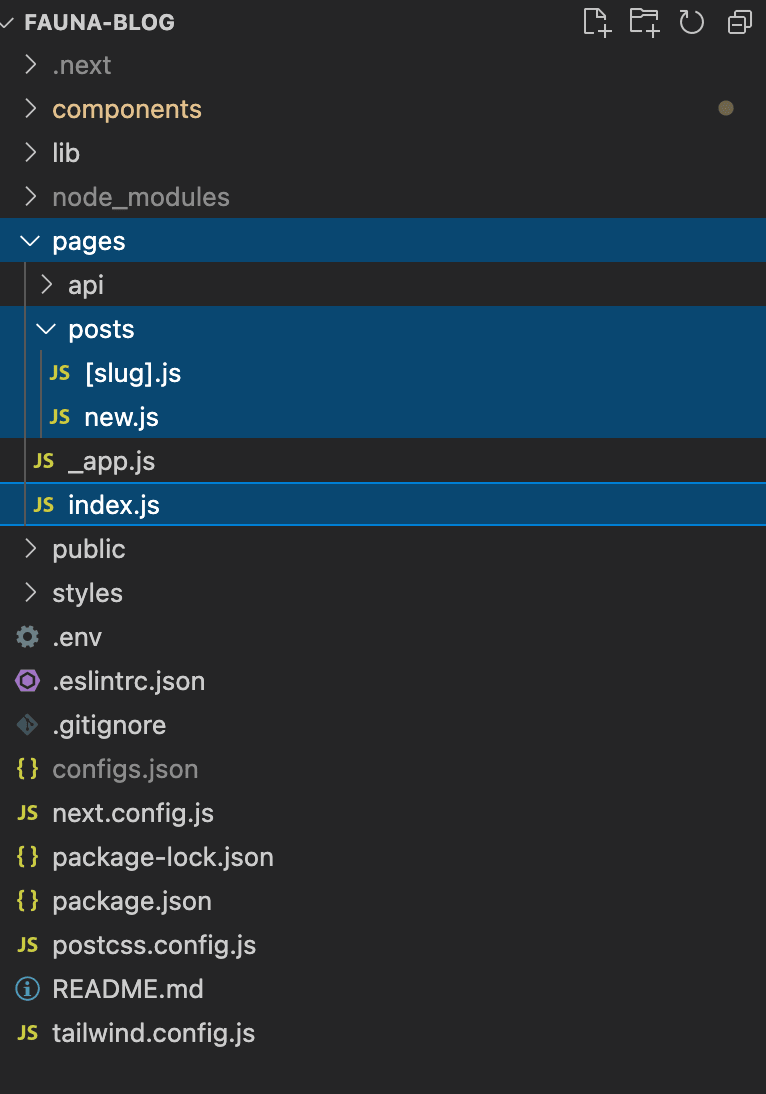
}We are going to have 3 pages
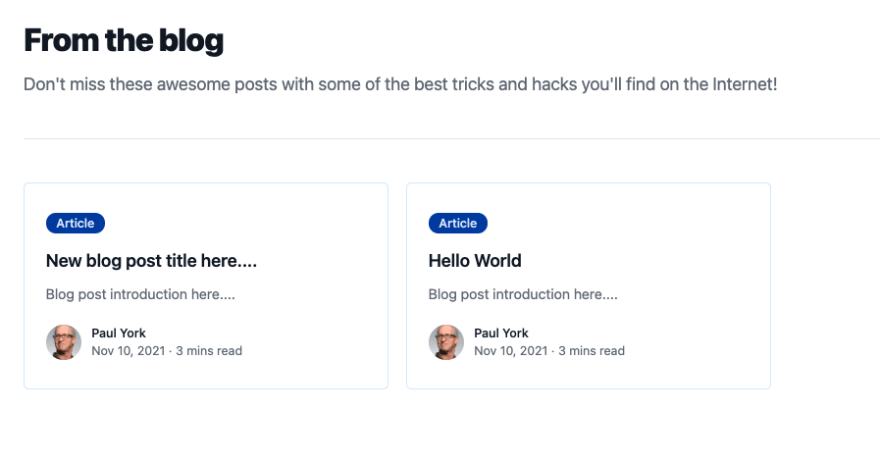
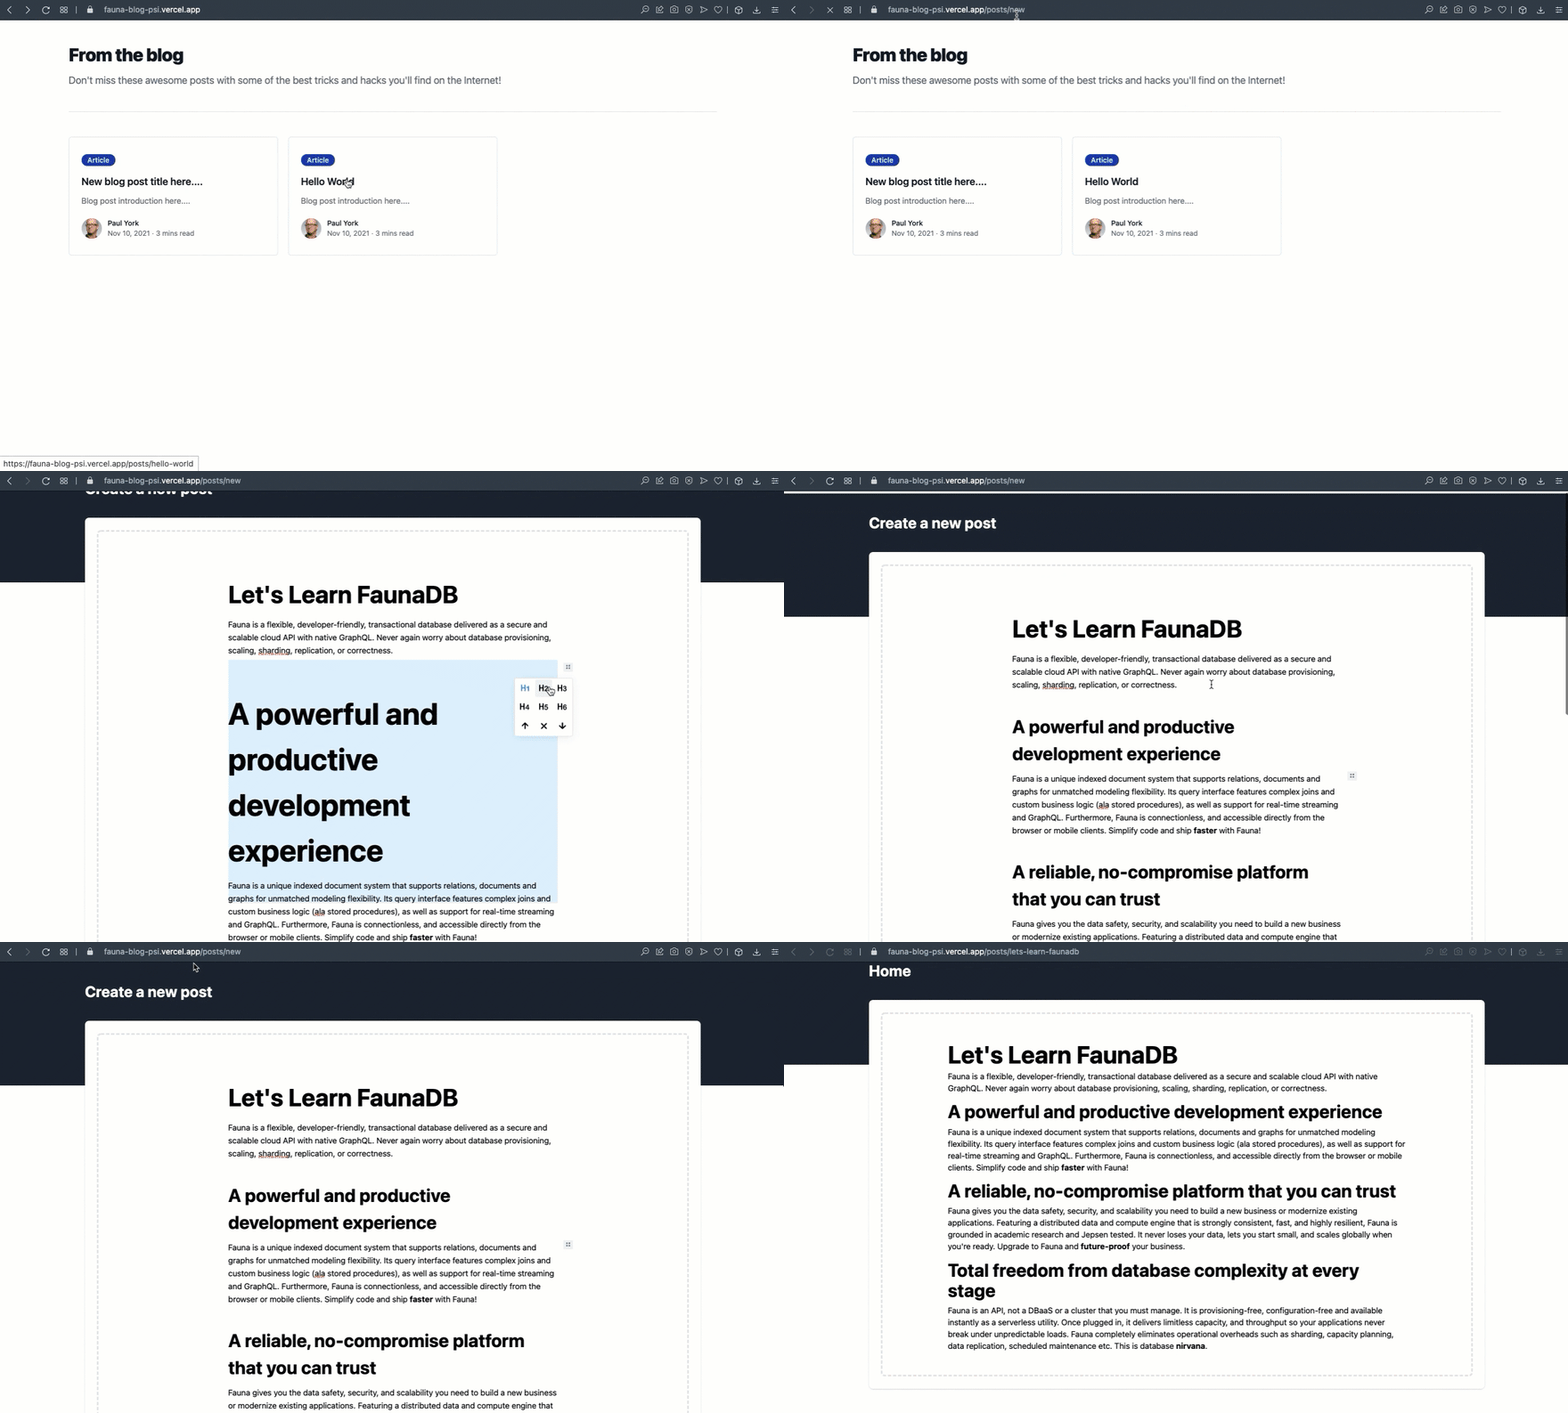
Index.js is where it shows all the blog posts to the user when they land on our project. Like https://fauna-blog-psi.vercel.app
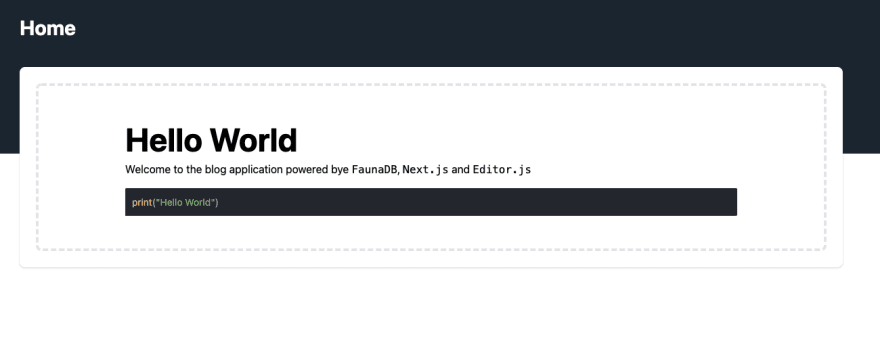
[slug].js is a dynamic page where it shows a specific blog post content. Like https://fauna-blog-psi.vercel.app/posts/hello-world
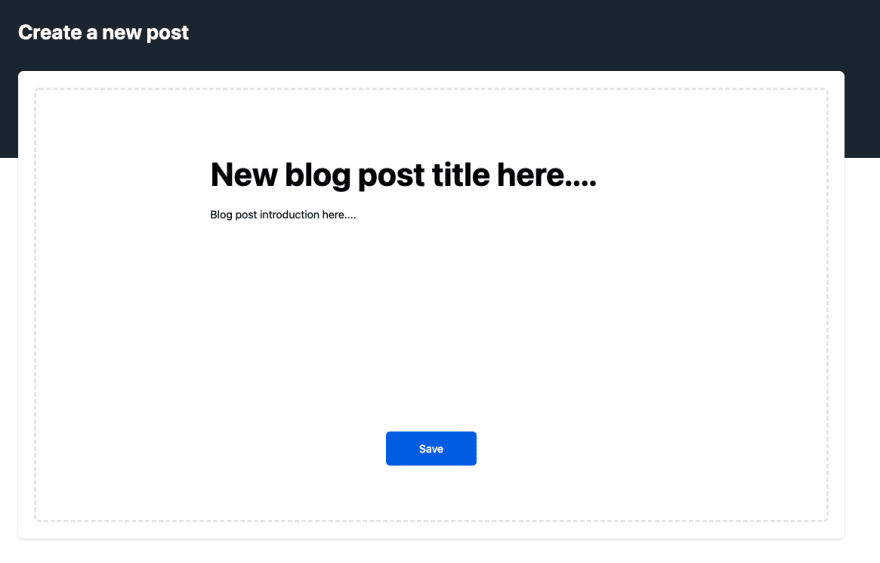
new.js is Where we can create a new blog post by using EditorJS. Like https://fauna-blog-psi.vercel.app/posts/new
On this page, we are fetching all the posts from Fauna API and passing them as server-side props to the page. In the
getServerSideProps function you can find the GraphQL function.import gql from "graphql-tag";
import apolloClient from "../lib/apolloClient";
import Link from "next/link";
export default function Home(posts) {
let allPosts = [];
posts.posts.map((post) => {
const content = JSON.parse(post.content);
const published = post.published;
const slug = post.slug;
for (let i = 0; i < content.blocks.length; i++) {
if (
content.blocks[i].type === "header" &&
content.blocks[i].data.level === 2
) {
var title = content.blocks[i].data.text;
break;
}
}
for (let i = 0; i < content.blocks.length; i++) {
if (content.blocks[i].type === "paragraph") {
var description = content.blocks[i].data.text;
break;
}
}
title === undefined ? (title = "Without Title") : (title = title);
description === undefined ? (description = "Without Description") : (description = description);
allPosts.push({
title,
description,
published,
slug,
});
});
return (
<div className="bg-white pt-12 pb-20 px-4 sm:px-6 lg:pt-12 lg:pb-28 lg:px-8">
<div className="relative max-w-lg mx-auto divide-y-2 divide-gray-200 lg:max-w-7xl">
<div>
<h2 className="text-3xl tracking-tight font-extrabold text-gray-900 sm:text-4xl">
From the blog
</h2>
<p className="mt-3 text-xl text-gray-500 sm:mt-4">
Don't miss these awesome posts with some of the best tricks and
hacks you'll find on the Internet!
</p>
</div>
<div className="mt-12 grid gap-16 pt-12 lg:grid-cols-3 lg:gap-x-5 lg:gap-y-12">
{allPosts.map((post) => (
<div
key={post.title}
className="border border-blue-100 py-8 px-6 rounded-md"
>
<div>
<Link href={`/posts/${post.slug}`}>
<a className="inline-block">
<span className="text-blue-100 bg-blue-800 inline-flex items-center px-3 py-0.5 rounded-full text-sm font-medium">
Article
</span>
</a>
</Link>
</div>
<Link href={`/posts/${post.slug}`}>
<a className="block mt-4">
<p className="text-xl font-semibold text-gray-900">
{post.title}
</p>
<p className="mt-3 text-base text-gray-500">
{post.description}
</p>
</a>
</Link>
<div className="mt-6 flex items-center">
<div className="flex-shrink-0">
<Link href={`/posts/${post.slug}`}>
<a>
<span className="sr-only">Paul York</span>
<img
className="h-10 w-10 rounded-full"
src="https://images.unsplash.com/photo-1472099645785-5658abf4ff4e?ixlib=rb-1.2.1&ixid=eyJhcHBfaWQiOjEyMDd9&auto=format&fit=facearea&facepad=2&w=256&h=256&q=80"
alt=""
/>
</a>
</Link>
</div>
<div className="ml-3">
<p className="text-sm font-medium text-gray-900">
<span>Paul York</span>
</p>
<div className="flex space-x-1 text-sm text-gray-500">
<time dateTime="Nov 10, 2021">Nov 10, 2021</time>
<span aria-hidden="true">·</span>
<span>3 mins read</span>
</div>
</div>
</div>
</div>
))}
</div>
</div>
</div>
);
}
export async function getServerSideProps (context) {
// 1. GQL Queries to get Posts data from Faust
const POSTS_QUERY = gql`
query {
allPosts {
data {
content
published
slug
}
}
}
`;
const { data } = await apolloClient.query({
query: POSTS_QUERY,
});
return {
props: {
posts: data.allPosts.data,
},
};
}On this page, we're importing our instance of the EditorJS and sending the editor's output to the Fauna API to create a post.
We import the EditorJS using NextJS dynamic import because EditJS doesn't work with SSR and it should get imported once the code is running on the client-side.
We import the EditorJS using NextJS dynamic import because EditJS doesn't work with SSR and it should get imported once the code is running on the client-side.
import dynamic from "next/dynamic";


const Editor = dynamic(
    () => import("../../components/editor"),
    { ssr: false }
);

export default function CreatePost() {
  return (
    <>
      <div className="min-h-full">
        <div className="bg-gray-800 pb-32">
          <header className="py-10">
            <div className="max-w-7xl mx-auto px-4 sm:px-6 lg:px-8">
              <h1 className="text-3xl font-bold text-white">
                Create a new post
              </h1>
            </div>
          </header>
        </div>

        <main className="-mt-32">
          <div className="max-w-7xl mx-auto pb-12 px-4 sm:px-6 lg:px-8">
            {/* Replace with your content */}
            <div className="bg-white rounded-lg shadow px-5 py-6 sm:px-6">
              <div className="border-4 border-dashed border-gray-200 rounded-lg pt-10">
                <Editor />
              </div>
            </div>
            {/* /End replace */}
          </div>
        </main>
      </div>
    </>
  );
}On this page, we show the specific blog post. We get the blog slug from the query and find the post by its slug using the Fauna API
findPostBySlug query. Then we pass the blog data as ServerSideProps. On this page, we use editorjs-react-renderer to render the EditorJS output.import { useRouter } from "next/router";
import Output from "editorjs-react-renderer";
import gql from "graphql-tag";
import apolloClient from "../../lib/apolloClient";
import Link from "next/link";
export default function Post({ post }) {
const content = JSON.parse(post.content);
return (
<div className="min-h-full">
<div className="bg-gray-800 pb-32">
<header className="py-10">
<div className="max-w-7xl mx-auto px-4 sm:px-6 lg:px-8">
<Link href="/">
<a className="text-3xl font-bold text-white">
Home
</a>
</Link>
</div>
</header>
</div>
<main className="-mt-32">
<div className="max-w-7xl mx-auto pb-12 px-4 sm:px-6 lg:px-8">
{/* Replace with your content */}
<div className="bg-white rounded-lg shadow px-5 py-6 sm:px-6">
<div className="border-4 border-dashed border-gray-200 rounded-lg py-10 px-32">
<Output data={content} />
</div>
</div>
{/* /End replace */}
</div>
</main>
</div>
);
}
export async function getServerSideProps(context) {
const { slug } = context.query;
const { data } = await apolloClient.query({
query: gql`
query Post($slug: String!) {
findPostBySlug(slug: $slug) {
content
published
slug
}
}
`,
variables: {
slug,
},
});
return {
props: {
post: data.findPostBySlug,
},
};
}
In the past, to implement an application's persistent data layer we used to spin up a new server, install our database there, create a schema, load some data, and in our application, by using a client we could operate CRUD. But as we've seen in this article with Fauna in a couple of minutes we could create our database and an API for our data to use in NextJS without worrying about provisioning a server, configuring the database, and having the operational overhead.
What we built in this article is a great example of how you can reduce your development time by using Fauna and Nextjs for developing complex systems like Blogging Application from scratch.
What we built in this article is a great example of how you can reduce your development time by using Fauna and Nextjs for developing complex systems like Blogging Application from scratch.
24


