
30
Security of environment with Image Processing on a Live camera using Python
Before delving into the codes, the following are the basic steps (pseudocode) involved in this application :

File structure for the application :
Scene_manager folder
|
|-app.py
|-/templates
|-index.html
|-views.html
|-/static
|
|-app.py
|-/templates
|-index.html
|-views.html
|-/static
app.py contains the codes that implement all the steps mentioned above.
from flask import Flask, redirect, request, render_template, Response
import cv2
from threading import Thread
import datetime
import numpy as np
import os
import time
Importing the required python modules. It should be noted that not all the modules are pre-installed with python interpreter during installation. The flask module, cv2 (opencv-python) module and numpy module are not pre-installed with python but they can be installed via the Package Installer for Python (pip) as follows:
pip install flask
pip install numpy
pip install opencv-pythonapp = Flask(__name__)
frm = []
status = False
@app.route('/')
def home():
return render_template("index.html")Initialise the
Flask() object in order to use for rendering web pages. Also initialise the global variables frm and status to be used for storing image and state of the camera.@app.route('/') defines the response that the web browser will give when url to the home page of the application is entered in the browser. In this case, the url returns a template file "index.html" that we had saved inside the templates folder.@app.route('/connect', methods=['POST', 'GET'])
def conn():
pp = request.form['cam']
print(pp)
return Response(loadCam(pp), mimetype='multipart/x-mixed-replace; boundary=frame')
def loadCam(cam):
global frm
if cam == '0': cam = 0
cap=cv2.VideoCapture(cam)
while True:
st, frm = cap.read()
web_frm = cv2.imencode('.jpg',frm)[1].tobytes()
if status:
# do comparison
tr = Thread(target= comp, args=(frm,))
tr.start()
if cv2.waitKey(2) == 27 : break
yield(b'--frame\r\n'b'Content-Type: image/jpeg\r\n\r\n' + web_frm +b'\r\n')When the user hit the connect button on the template page, the
pp variable gets the camera's address that was supplied and use this as an argument to the loadcam() function. Using the capability of opencv (https://docs.opencv.org/4.x/d6/d00/tutorial_py_root.html), the application is able to render the live content of the camera to the webpage. Take note of the condition if status: which if true, the application will implement comp() function that does the comparison of the initial scene with the subsequent frames.@app.route('/cap')
def snap():
cv2.imwrite('static/snap.jpg', frm)
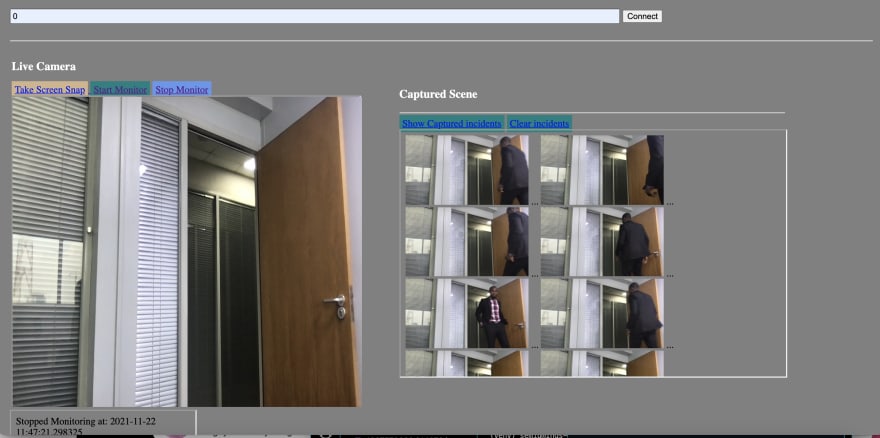
return Response('New snap taken at: '+ str(datetime.datetime.now()))When the user click on the "Take Screen Snap" button on the page, the code saves the current frame as a picture (snap.jpg) inside the static folder
@app.route('/start')
def st():
    global status
    status = True
    return Response('Started Monitoring at: ' + str(datetime.datetime.now()))

def comp(img):
    try:
        img_org = cv2.imread('static/snap.jpg')
        # mse = summation(img_org - img)/(img_org.shape[0] * img_org.shape[1])
        mse =  np.sum((img_org.astype("float") - img.astype('float')) ** 2)
        mse /= (img_org.shape[0] * img_org.shape[1])
        if int(mse) > 300:
            cv2.imwrite('static/' + str(time.time()) +'.jpg', img)
        print (mse)
This code changes the
status value to true. This makes the loadcam() function to call comp() function in parallel thread. The comp() saves the labeled frames with the current time as the file name (in .jpg) format.@app.route('/stop')
def stp():
global status
status = False
return Response('Stopped Monitoring at: ' + str(datetime.datetime.now()))This code sets the value of
status to false and the loadcam() stops calling the comp() function.@app.route('/shows')
def carry():
fs = os.listdir('static/')
fls = [f for f in fs if f !='snap.jpg' and f !='.DS_Store']
return render_template('views.html', pics=fls)This code takes the names of the saved pictures from the static folder (excluding the initial state) and return it as a list to the view.html file which shows all the pictures. The view.html is also displayed via
<iframe> html tag inside the home page.@app.route('/delete')
def rmv():
fs = os.listdir('static/')
for f in fs:
if f != 'snap.jpg':
os.remove('static/'+ f)
return redirect('/shows')Code deletes all the captured images inside the static folder (excluding the snap.jpg). The snap.jpg will always be overwritten anytime the user clicks on the "Take Screen Snap" button on the page.
if __name__=='__main__':
    app.run()
app.run() calls the run method of the flask module which launched the application as a web server.30