
25
Getting started with Remix
Remix is a relatively "new" React framework which was open sourced on 23rd of November 2021. It was originally created by the awesome Ryan Florence and Michael Jackson, and with the recent addition of Kent C. Dodds it allows the framework to sell itself more.
As per their website
Remix is a full stack web framework that let’s you focus on the user interface and work back through web fundamentals to deliver a fast, slick, and resilient user experience.
Let's get started with the actual coding.
npx create-remix@latest
# follow the prompts
cd [whatever you named the project]
NOTE: There will be an option to run npm install to install the dependencies immediately.
This will create a package-lock.json. If you want to use yarn, you can skip this step, but don't forget to run yarn install later.
Based on what you choose in the image below, a custom README.md file is created at the project's root.
Make sure to check the steps on how to run the application locally

You can use yarn for the steps below if you prefer
For Remix App Server
npm run devFor Express Server
# Start the Remix development asset server
$ npm run dev

# In a new tab start your express app:
npm run start:dev
You should see something like this:

If you don't, make sure to check
README.md for specific instructions on how to run the app locally,I will be using TypeScript for this blog; if you prefer to use vanilla JavaScript, remove the type usages and change the extensions from .tsx to .jsx.
Let's start coding with a clean slate.
# Remove demo files
rm -rf app/routes/demos app/styles/demos

# We'll recreate this files later
rm app/routes/index.tsx app/root.tsxLet's proceed with the mandatory
hello world example.// app/root.tsx
export default function App() {
return (
<html lang="en">
<head>
<meta charSet="utf-8" />
</head>
<body>
<h2>Hello World</h2>
</body>
</html>
);
}Hello World, indeed.

Since this file will serve as the global container for the app, let's refactor it to make this more generic.
// app/root.tsx
import {Links,LiveReload,Meta,Outlet,Scripts,ScrollRestoration} from "remix";

export default function App() {
  return (
    <Document>
      <Layout>
        <Outlet />
      </Layout>
    </Document>
  );
}

// Here is the blueprint of our document
// It looks like our typical HTML but with a few extra tags
// I will discuss in another blog post those Components coming from the remix package
function Document({
  children,
  title,
}: {
  children: React.ReactNode;
  title?: string;
}) {
  return (
    <html lang="en">
      <head>
        <meta charSet="utf-8" />
        <meta name="viewport" content="width=device-width,initial-scale=1" />
        {title ? <title>{title}</title> : null}
        <Meta />
        <Links />
      </head>
      <body>
        {children}
        <ScrollRestoration />
        <Scripts />
        {process.env.NODE_ENV === "development" && <LiveReload />}
      </body>
    </html>
  );
}

// Layout is a wrapper component that provides a consistent layout for all pages.
function Layout({ children }: React.PropsWithChildren<{}>) {
  return <main>{children}</main>;
}Now, extract the content of our page
// app/routes/index.jsx

export default function Index() {
  return <div>
    <h2>Hello World</h2>
  </div>
}
The two changes above will still yield the same result:
We'll add the links inside
Layout since it will be reusable across all pages.// app/root.tsx
import {Link /*other import*/} from "remix";
// ...
function Layout({children}: React.PropsWithChildren<{}>) {
return (
<>
<header>
<nav>
<ul>
<li>
<Link to="/vocab">Vocab</Link>
</li>
</ul>
</nav>
</header>
<main>{children}</main>;
</>
);
}
// ...Result:

After clicking the link or navigating to the URL, you should see something like this:
It is expected since we have not created a route handler for the
/pokemons page.Before creating that route, let us use
CatchBoundary and useCatch to create a custom 404 error message as a fallback for all Not Found routes.// app/root.tsx
import { useCatch /*other imports*/ } from "remix";
// ...
export function CatchBoundary() {
let caught = useCatch();
let message;
switch (caught.status) {
case 404:
message = <p>This is a custom error message for 404 pages</p>
break;
// You can customize the behavior for other status codes
default:
throw new Error(caught.data || caught.statusText);
}
return (
<Document title={`${caught.status} ${caught.statusText}`}>
<Layout>
<h1>
{caught.status}: {caught.statusText}
</h1>
{message}
</Layout>
</Document>
);
}
// ...Here is the customized
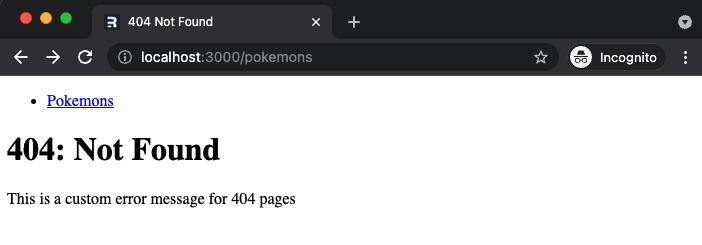
404 error page: This is one of Remix's magics; by simply following a convention, we can simplify common use cases.
In the above case, we exported a function named CatchBoundary where we used useCatch inside to get a context about the error.
Remix will do the heavy lifting; we simply need to adhere to, let's call it, a "contract function".
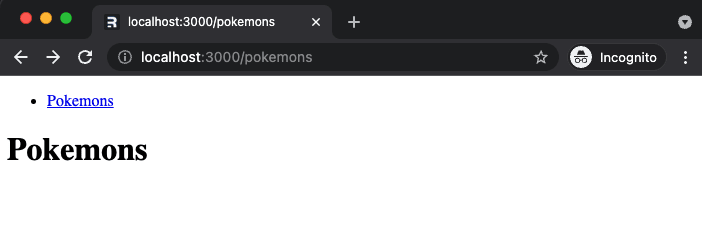
To fix this
404 error, let's create the /pokemons route// app/routes/pokemons/index.tsx
export default function Pokemons() {
return (
<div>
<h2>Pokemons</h2>
</div>
);
}
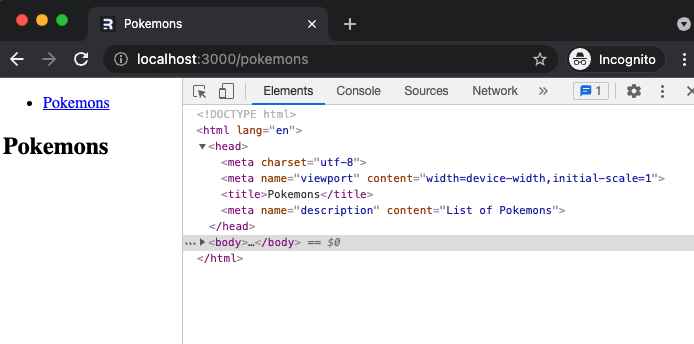
Meta tags are used here to update the title and description of the page. To learn more what meta is used for, check this
// app/routes/pokemons/index.tsx

// This is another "contract function"
export function meta() {
  return {
    title: 'Pokemons',
    description: 'List of Pokemons',
  }
}

// export default function Pokemons...
We should see an updated
headUnlike the vanilla React where usually fetch the data from the client-side, in Remix we can load data from the server using a the concept of a
loader// app/routes/pokemons/index.tsx
import type { LoaderFunction } from "remix"
// This is another "contract function"
export const loader: LoaderFunction = () => {
return fetch("https://pokeapi.co/api/v2/pokemon")
}
// export default function Pokemons...If you are wondering where is the
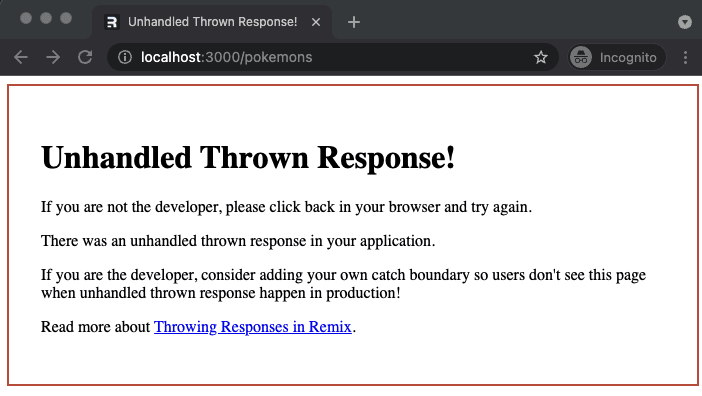
.then(res => res.json()) part, you are not alone. I'm still cheking how they allow this magic to happen.NOTE: At the time of this writing, I don't know why there will be an error going back and forth on the pokemons listing page.
As per reason, I will still append the .then(res => res.json()) to the loader function.
Use the
useLoaderData hook to access the data in React land.// app/routes/pokemons/index.tsx
import { useLoaderData, Link /*other imports*/ } from 'remix'
// export let loader: LoaderFunction...
export default function Pokemons() {
const data = useLoaderData()
// Try to use console.log here
return (
<div>
<h2>Pokemons</h2>
<ul>
{data.results.map(pokemon => (
<li key={pokemon.name}>
<Link to={`/pokemons/${pokemon.name}`}>{pokemon.name}</Link>
</li>
))}
</ul>
</div>
)
}Combining the two previous codes will result to:

For this demo, let's use the file path convention.
Under the
Yes, it's not a typo; add a $ before the file name. We'll see how to use it later.
pokemons folder, create a folder named $pokemonName.tsx.Yes, it's not a typo; add a $ before the file name. We'll see how to use it later.
// app/routes/pokemons/$pokemonName.tsx

export default function Pokemon() {
  return (
    <div>
      <h1>Specific Pokemon Route</h1>
    </div>
  );
}
If we click

bulbasaur in the list, we should see something like this:Now, how do we customize the page to show the details of a Pokemon?
By naming the file
$pokemonName.tsx, inside the file, we can access pokemonName inside the params object.We can use this information to fetch the specific data from the server.
see line #9// app/routes/pokemons/$pokemonName.tsx
import { useLoaderData } from "remix"
import type { LoaderFunction } from "remix"
export let loader: LoaderFunction = async ({ params }) => {
const pokemonName = params.pokemonName;
// OR const { pokemonName } = params;
const details = await fetch(
`https://pokeapi.co/api/v2/pokemon/${pokemonName}`
).then((res) => res.json());
// We'll map the data based on our needs
return {
name: pokemonName,
weight: details.weight,
img: details.sprites.front_default,
id: details.id,
};
};
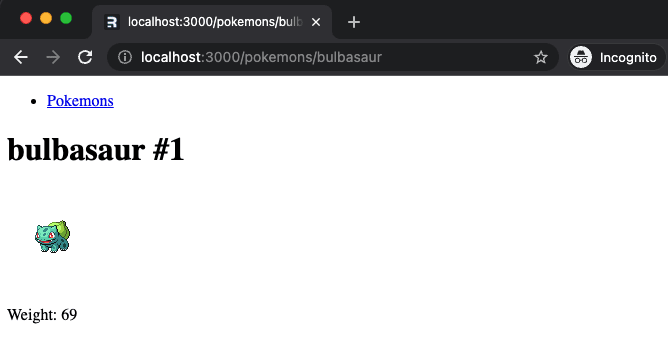
export default function Pokemon() {
const pokemon = useLoaderData();
return (
<div>
<h1>
{pokemon.name} #{pokemon.id}
</h1>
<img src={pokemon.img} alt={pokemon.name} />
<p>Weight: {pokemon.weight}</p>
</div>
);
}With the code above, we can show these details in our page
Before wrapping this up, let's update the meta of the Pokemon details page.
// app/routes/pokemons/$pokemonName.tsx
import type { MetaFunction } from "remix"

// You can access the `loader` data here
export const meta: MetaFunction = ({ data }) => {
  return {
    title: `#${data.id} ${data.name}`,
    description: `Details of ${data.name}`,
  };
}
And here is a page with a better title and description

This is still a pretty small application for me to assess what Remix can do, and I have not even gotten into one of their selling points, the Nested Routes.nBut, so far, I like how easy it is to create an application from scratch, and I find the convention easy to follow. I also like how they provide
about Remix and the ecosystem in the future.
hooks to more conveniently work with the data, errors, etc. Having said that, I definitely will explore more about Remix and the ecosystem in the future.

25