
20
Build a mobile audio chat app in an afternoon with React Native
At Daily, one of our primary focuses has been supporting audio-only apps with our APIs. Lately, we’ve been hearing more and more discussions about how to help app users avoid Zoom fatigue — the feeling of being burnt out from sitting in video calls all day long.
Audio-only apps are a great solution to this issue as they typically require less cognitive resources to participate in. They are also a great option for larger calls or calls on mobile devices as they tend to have lower CPU requirements. (So you and your devices need to think less. 😉)
To help our customers support their audio-only use cases, we launched an audio starter kit (a.k.a. Party Line) earlier this year, which includes demo apps in React (web), iOS, Android, and React Native.
In today's tutorial, we’ll be doing a deeper dive into how the React Native version of Party Line works.
By the end of this tutorial, you’ll know how to build a Clubhouse-esque Daily audio app using our
react-native-daily-js library and Daily’s customizable call object. To get the most out of this tutorial, some basic React Native knowledge is useful. If you’ve never used React Native before but are familiar with React and React hooks, you should be able to follow along.
Note: React and React Native code is fairly similar but does have some differences, so we’ll do our best to explain those differences as they come up!
To run the Party Line app locally, follow the instructions located in the Github repo’s README. Instructions for both iOS and Android are included, depending which OS you prefer to primarily test React Native apps.

Let’s start by describing which audio call features will (and won’t) be included.
Party Line will include two views:
Let's review some of the basic functionality:
We’ll allow for three different types of participants: moderator, speaker, listener.
Participant types are handled as follows:

In terms of constraints, we will not:
We’ll cover how most of this works below or share links to existing resources for anything we don’t have time to go over.
Before we dive into the code, let’s plan the structure we’re going to use for our components.
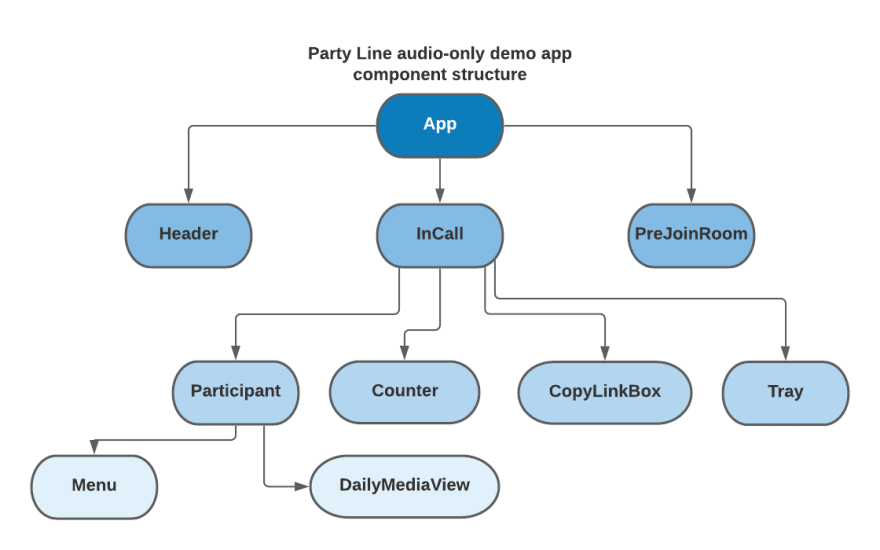
Here, we have our
App component as the top-level parent component. It will render the Header component with the app title and information. It will also conditionally render either the InCall component, which handles the Daily audio call, or the PreJoinRoom, which has a form to join a Daily audio call, depending on our app state.Our
InCall component has the most complexity because it handles our Daily call.InCall contains the following components:Counter component, which displays how much time is left in the callCopyLinkBox to copy and share the room codeTray to control your local microphone, raise your hand, or leave the callParticipant component for each participant. It renders:
- Participant UI, with each participant represented by a box with their initials and a “show more” menu button that renders the
Menucomponent in certain conditions. (More on that below) - The
DailyMenuViewcomponent, which provides the participant’s audio for the call. Note: In a React project, you would just render an<audio>element.
To keep our logic organized and in (mostly) one place, we are using the React Context API, which helps us store global app state. Our
App component wraps its contents in the CallProvider component (our context), which means all of our app’s contents can access the data set in our call context.// App.jsx
function App() {
return (
<CallProvider>
<AppContent />
</CallProvider>
);
}Note: The Context API can be used by any React app (not just React Native). In fact, we did just that in the web version of this app!
Now, let’s spend some time understanding what’s happening in
CallProvider. (We can’t cover every detail here, so let us know if you have questions.) There are several actions (i.e. methods) we define in
CallProvider:createRoom) with the Daily REST API. We’re using a Netlify serverless function for this but you can use the Daily REST API endpoints however works best for your app.createToken) for meeting moderators with the Daily REST API. (Same as above regarding using serverless functions.)joinRoom) leaveCall)handleMute, handleUnmute)raiseHand, lowerHand)Starting with our app state, let’s look at which values we’ll initialize and export to be used throughout our app.
// CallProvider.jsx
export const CallProvider = ({children}) => {
 const [view, setView] = useState(PREJOIN); // pre-join | in-call
 const [callFrame, setCallFrame] = useState(null);
 const [participants, setParticipants] = useState([]);
 const [room, setRoom] = useState(null);
 const [error, setError] = useState(null);
 const [roomExp, setRoomExp] = useState(null);
 const [activeSpeakerId, setActiveSpeakerId] = useState(null);
 const [updateParticipants, setUpdateParticipants] = useState(null);
 …
return (
   <CallContext.Provider
     value={{
       getAccountType,
       changeAccountType,
       handleMute,
       handleUnmute,
       displayName,
       joinRoom,
       leaveCall,
       endCall,
       removeFromCall,
       raiseHand,
       lowerHand,
       activeSpeakerId,
       error,
       participants,
       room,
       roomExp,
       view,
     }}>
     {children}
   </CallContext.Provider>
 );
};In this demo, we manage participant types (moderator, speaker, or listener) by appending a string to the end of each participant’s username, which is not shown in the UI (e.g.
${username}_MOD for moderators).❗Note: For production-level apps, we recommend building a backend for participant type management. This current solution is meant to keep the code client-side for demo purposes.
That said, let’s look at how participant type management works.
Whenever a moderator updates another participant’s account type, that update will be communicated to other participants with the Daily method
sendAppMessage.All participants will receive that app message via the
app-message event listener, which is added in CallProvider: callFrame.on('app-message', handleAppMessage);This will use the callback method
handleAppMessage, which will update the appended string on the username to the new account type (e.g._LISTENER to _SPEAKER).// CallProvider.jsx
const handleAppMessage = async (evt) => {
console.log('[APP MESSAGE]', evt);
try {
switch (evt.data.msg) {
case MSG_MAKE_MODERATOR:
console.log('[LEAVING]');
await callFrame.leave();
console.log('[REJOINING AS MOD]');
let userName = evt?.data?.userName;
// Remove the raised hand emoji
if (userName?.includes('✋')) {
const split = userName.split('✋ ');
userName = split.length === 2 ? split[1] : split[0];
}
joinRoom({
moderator: true,
userName,
name: room?.name,
});
break;
case MSG_MAKE_SPEAKER:
updateUsername(SPEAKER);
break;
case MSG_MAKE_LISTENER:
updateUsername(LISTENER);
break;
case FORCE_EJECT:
//seeya
leaveCall();
break;
}
} catch (e) {
console.error(e);
}
};
Making someone a moderator is slightly more complicated because they need to rejoin the call with a Daily token, which will give them the owner privileges they need to be able to mute other participants. To do this, we kick them out of the call quietly (
callFrame.leave()) and then immediately rejoin them as a moderator with an owner token.Note: To make a participant a meeting owner with a meeting token, the
is_owner token property must be true. See our token configuration docs for more information.As we go through specific components below, we’ll loop back to some of the other specific methods outlined in
CallProvider as they’re used.The
PreJoinRoom component is a form with three inputs (first name, last name, join code), and a button to submit the form. Only the first name is a required field; the last name is optional and if no join code is provided, we take that to mean the user wants to create a new room to join. Let’s focus on what happens when you submit the form:
// PreJoinRoom.jsx
const PreJoinRoom = ({handleLinkPress}) => {
 const {joinRoom, error} = useCallState();
 const [firstName, setFirstName] = useState('');
 const [lastName, setLastName] = useState('');
 const [roomName, setRoomName] = useState('');
 const [submitting, setSubmitting] = useState(false);
 const [required, setRequired] = useState(false);

 const submitForm = useCallback(
   (e) => {
     e.preventDefault();
     if (!firstName?.trim()) {
       setRequired(true);
       return;
     }
     if (submitting) return;
     setSubmitting(true);
     setRequired(false);

     let userName =
       firstName?.trim() + (lastName?.trim() || '');

     let name = '';
     if (roomName?.trim()?.length) {
       name = roomName;
       /**
        * We track the account type by appending it to the username.
        * This is a quick solution for a demo; not a production-worthy solution!
        */
       userName = `${userName}_${LISTENER}`;
     } else {
       userName = `${userName}_${MOD}`;
     }
     joinRoom({userName, name});
   },
   [firstName, lastName, roomName, joinRoom],
 );
In
submitForm, we first make sure the first name is filled out. If not, we update our required state value, which blocks the form from being submitted.Next, we get the local user’s username by joining the first and optional last name values:
let userName = firstName?.trim() + (lastName?.trim() ? ${lastName?.trim()} : '');If there’s a room code (
roomName) provided in the form, we assign that to our name variable and update the username to have _LISTENER appended to it.If there is no room code, we don’t set a room
name and append _MOD to the username. As mentioned, the person creating the room is the moderator by default so we track that in the name.if (roomName?.trim()?.length) {
name = roomName;
userName = `${userName}_${LISTENER}`;
} else {
userName = `${userName}_${MOD}`;
}Once we have our
userName and optional room name, we can then call joinRoom, a method from CallProvider.const joinRoom = async ({userName, name, moderator}) => {
if (callFrame) {
callFrame.leave();
}
let roomInfo = {name};
/**
* The first person to join will need to create the room first
*/
if (!name && !moderator) {
roomInfo = await createRoom();
}
setRoom(roomInfo);
/**
* When a moderator makes someone else a moderator,
* they first leave and then rejoin with a token.
* In that case, we create a token for the new mod here.
*/
let newToken;
if (moderator) {
// create a token for new moderators
newToken = await createToken(room?.name);
}
const call = Daily.createCallObject({videoSource: false});
const options = {
// This can be changed to your Daily domain
url: `https://devrel.daily.co/${roomInfo?.name}`,
userName,
};
if (roomInfo?.token) {
options.token = roomInfo?.token;
}
if (newToken?.token) {
options.token = newToken.token;
}
await call
.join(options)
.then(() => {
setError(false);
setCallFrame(call);
call.setLocalAudio(false);
setView(INCALL);
})
.catch((err) => {
if (err) {
setError(err);
}
});
};joinRoom has the following steps:createRoom method mentioned above if a room name isn’t providedconst call = Daily.createCallObject({videoSource: false});
(We’ll go into more detail about the videoSource property below.)const options = {
url: `https://devrel.daily.co/${roomInfo?.name}`,
userName,
};view value to incall
await call
    .join(options)
    .then(() => {
       setError(false);
       setCallFrame(call);
       /**
        * Now mute, so everyone joining is muted by default.
        */
       call.setLocalAudio(false);
       setView(INCALL);
    })
Once this is complete, we’ll be brought to our
InCall component because of this condition in App.js:{view === INCALL && <InCall handleLinkPress={handleLinkPress} />}Now that we know how to get into a call, let’s focus on how we actually use the
react-native-daily-js library to get our audio working. The
InCall component renders a Participant component for each participant in the call, and displays them in the UI based on who can speak. Moderators and speakers are shown at the top and listeners are at the bottom.
Let’s look at how we render the
Speakers section, which includes moderators and speakers, i.e. anyone who can unmute themselves.// InCall.jsx
const mods = useMemo(() => participants?.filter((p) => p?.owner), [
participants,
getAccountType,
]);
const speakers = useMemo(
(p) =>
participants?.filter((p) => {
return getAccountType(p?.user_name) === SPEAKER;
}),
[participants, getAccountType],
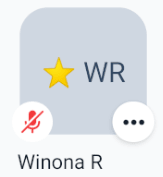
);The individual participant UI includes details like their name, initials, a star emoji if they’re a moderator, and a “more” menu with some actions depending on their participant type.
The most important aspect of the
Participant component is not visible in the UI, though: the DailyMediaView component!// Participant.jsx
import {DailyMediaView} from '@daily-co/react-native-daily-js';
const Participant = ({participant, local, modCount, zIndex}) => {
...
{audioTrack && (
<DailyMediaView
id={`audio-${participant.user_id}`}
videoTrack={null}
audioTrack={audioTrack}
/>
)}
...This is a component imported from
react-native-daily-js and accepts audio and/or video tracks from your participants list, also provided by Daily's call object (recall: callObject.participants()). Since this is an audio-only app, we set videoTrack to null, and audioTrack to each participant’s audio track:// Participant.jsx
const audioTrack = useMemo(
() =>
participant?.tracks?.audio?.state === 'playable'
? participant?.tracks?.audio?.track
: null,
[participant?.tracks?.audio?.state],
);Once the audio track is set, you will be able to hear the participant. 👂
Now that we have the audio playing, let’s take a quick look at how we mute participants.
As mentioned, only participants who joined with an owner meeting token are permitted to mute others. (And, by the way, we don’t recommend ever letting participants unmute other participants. It’s a bit invasive! 😬)
To do this, we can take advantage of Daily’s
updateParticipant method:CallProvider.jsx
const handleMute = useCallback(
(p) => {
if (!callFrame) return;
console.log('[MUTING]');
if (p?.user_id === 'local') {
callFrame.setLocalAudio(false);
} else {
callFrame.updateParticipant(p?.session_id, {
setAudio: false,
});
}
setUpdateParticipants(`unmute-${p?.user_id}-${Date.now()}`);
},
[callFrame],
);Here in
CallProvider, we have one handleMute method for participants to mute themselves or others. If they’re muting themselves, they call setLocalAudio(false). If they’re muting someone else, they call updateParticipant with the to-be-muted participant’s session_id and a properties object with setAudio equal to false.One important aspect of audio-only apps to be aware of is device permissions. Since Daily’s React Native library is compatible with audio and video apps, it will ask for microphone and camera permissions, unless we intervene.

If you don’t address this issue, your app users will see both of these device permission requests, which may be a bit of a red flag 🚩 for them. (Why would you need camera permissions for an audio app? 🤔)
To help your apps seem less — well — creepy, you can simply set
videoSource to false when you create the local call object instance. const call = Daily.createCallObject({videoSource: false});Adding this one detail means your users are only asked for microphone permissions. 💫
We hope this overview of the Party Line app helps you better understand how it works under the hood. We couldn’t cover every detail, so check out these existing tutorials/resources that cover related topics:
daily-js
In our next React Native tutorial, we’ll focus on building a video call app, so stay tuned for that!
As always, if you have any questions, let us know!
20