32
How to build a Ruby on Rails admin panel
It is reliable, efficient, and supported by a massive community of developers. We are not surprised that Ruby on Rails is widely used by well-established companies like Shopify, Github, and Airbnb, and also numerous startups that develop their first MVPs. RoR is commonly praised for its efficiency, security, and scalability, making it particularly suitable for SaaS and e-commerce applications. Admittedly, such products need robust internal tools to manage orders and refunds, process customer claims, keep track of the inventory, and perform lots of other operations.
If you are reading this, chances are you are a Ruby on Rails developer looking for an internal tool solution. The good news is that you have quite a few options:
Build your admin panel in-house. This option allows you to be the most flexible but it also has disadvantages. The most significant one? Well, on average, developers spend as much as 30% of their time building and maintaining internal tools. At Forest Admin, we are certain this is not the most efficient way to provide internal tools for companies.
Pick one of the open-source frameworks and libraries that are widely available. Choosing one of them is an easier option than building internal tools from scratch. However, they have limitations, and such internal tools can't be adjusted by non-technical staff members.
Choose an admin panel template, especially if you need a simple CRM or a dashboard. Templates are quite often well designed and available for free but their biggest disadvantage is that they’re almost non-customizable.
Go for a low-code solution that gives you the best of both worlds: ready-to-use but flexible UI and the ability to code custom features using Smart Views and Smart Actions. On top of that, you get dedicated support and top-class security.
Whatever you choose, there is always some tradeoff, especially between efficiency of a template or another ready-to-use solution, and flexibility and scalability of the one created from scratch. A third-party internal tool software is the only middle ground that gives you the scalability and flexibility you need without hiring developers dedicated to internal tools and defocusing design and product teams.

We have launched the Ruby on Rails agent on Forest Admin because we wanted to give RoR developers a robust and comprehensive admin panel solution they can hook natively into their apps in a matter of minutes.
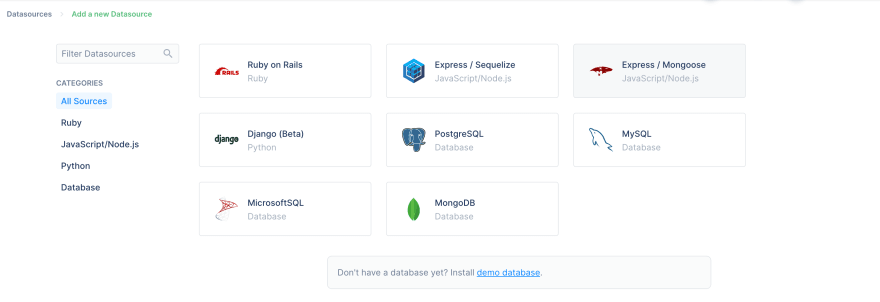
What makes Forest Admin special is the hybrid architecture that consists of four components: the database and admin backend, the Forest Admin API Server, and the Forest Admin UI Server. Once you create an account, and choose the Rails app as a data source, your admin backend will be generated in this app. The frontend, on the other hand, is managed on Forest Admin servers. It also means that Forest Admin API Server is never proxying requests to your database — the data is stored on your own server and never passes through Forest Admin servers. Such an architecture ensures top-level data security and also lets your non-technical staff edit their admin panel according to their needs.

To build your Ruby on Rails admin panel with Forest Admin, you need:


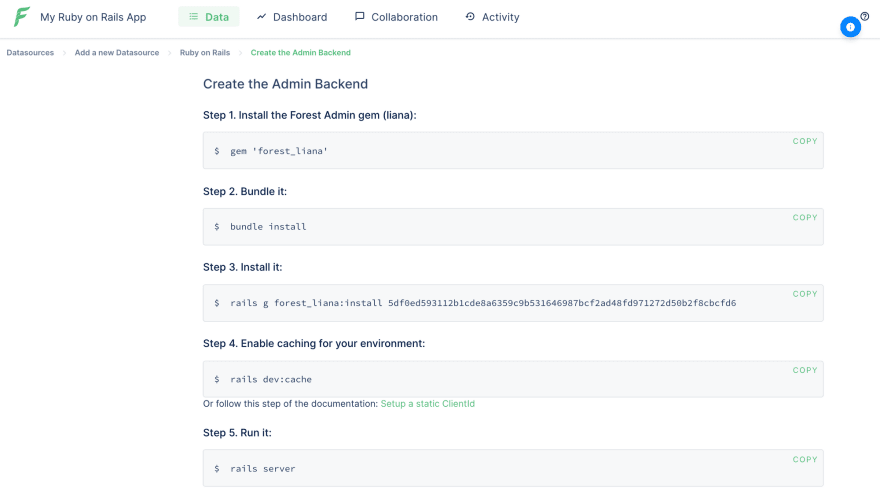
Add our gem to your application's Gemfile using the gem 'forest_liana' command.
Bundle it using the bundle install command.
Install the gem using the rails g forest_liana:install command — you'll need your environment key for this, which is provided in the onboarding experience in the first step of the in-app guide.
Restart your server using the rails s command.
For more details, check Forest Admin Installation Guide for Ruby on Rails.


Adjust your internal tool to suit your business logic. You will be amazed at how powerful the Layout editor is. Once you’re ready, Invite your team members. To facilitate their onboarding, use tags.
Are you looking for more details? These resources will help you get started:
Would you like to try it for free? Sign up now.
32
