
20
Remix Blog Tutorial - Remix, React, Prisma, MongoDB, Vercel (Part 1)
This tutorial takes the remix blog tutorial available on the Remix docs and expands on it to include editing, and MongoDB Storage and some styling. I re-wrote it entirely from my learning experience. I tried to explain most of the pieces used, the Remix docs are wonderful and explain things with examples very well.
You can see a functional version of the app we are making here https://remix-blog-ten.vercel.app
Full Source Code is available on Github here
This is part 1 of the tutorial, please see the end of the post for information on Part 2.
Yay!
Let's create a simple Remix.Run app to get you started on your journey to learning Remix!
I'm going to be using VSCode for this tutorial, you can use your editor of choice.
Open the terminal and run the following command
npx create-remix@latest If this is your first time using remix. It will prompt you that you need to install the following packages:
create-remix@latest. Enter 'y' and press Enter You should get a message - Welcome to remix! Let's get you setup with a new project. Here, we are going to enter the name for our project. I'm going to call mine
remix-blog. Feel free to name yours however you like. 
Remix will now ask you where you want to deploy. For this tutorial, we are going to use Vercel.
If you wish to use something else, you may have a slightly different experience, the Readme.MD file will include helpful information if you change your hosting provider.
Note: A vercel account will be needed when we deploy. It's free and easy to do, visit Vercel to register.
If you wish to use something else, you may have a slightly different experience, the Readme.MD file will include helpful information if you change your hosting provider.
Note: A vercel account will be needed when we deploy. It's free and easy to do, visit Vercel to register.
Using your Arrow keys, press down until Vercel is highlighted and press enter.
Remix will now ask you which JS Language, plain JavaScript or TypeScript. For this tutorial, we are going to choose JavaScript.
Remix will now ask if you want to run
npm install we are going to say yes, so put in y and then press enter to get up and running quickly.Your screen should look like this

If everything worked, you should be presented with this

Let's go into the directory that Remix Created. I'm going to type
cd remix-blog if you called your project something else, be sure to replace remix-blog with your project name. The README.md has some very important information in there about how to get up and running with the hosting setup chosen. Read this carefully and fully, it's worth it.
First you'll need the Vercel CLI:
Run this command to install Vercel CLI
npm i -g vercelOnce this is complete we need to link it to a vercel project.
Run the command
Run the command
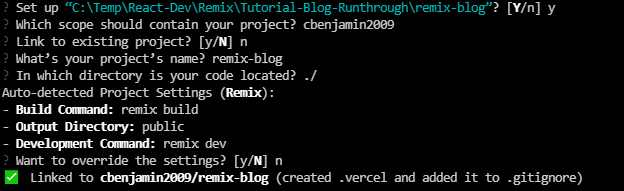
vercel linkn and press enter.
You should get an output like this
We are going to do a test run to make sure you can get Remix up and running in a dev server environment with live reload before we continue.
npm run devNow lets open your demo site to make sure it works! Open a browser and navigate to http://localhost:3000 or click the link below.
Browse to http://localhost:3000
Browse to http://localhost:3000
You should be presented with the Welcome to Remix! page which was created by the
npx create-remix@latest app. If so, fanstastic!!! If not, check your terminal for errors and go back if necessary. Great job so far, let's keep it up!
Take some time to look around at this demo site before moving on. There is a lot of valuable information here along with links to their fantastic documentation. When you are ready, scroll down to continue with our first app, but I don't mind if you get lost reading the docs for a while, just make sure you finish this tutorial 😊
We are going to break this down into 2 sections
We are going to leave all existing files intact so you have reference code to look at. We will simply expand on this default application.
The App folder is the most important folder. This is the basis of your entire site. In this folder, we will place our Routes, Styles, and Utils folders. We will also have three important files, the entry.client, entry.server and root. More information on these is available on the Remix Docs site, there's a link in your project to get there in a jiffy.
These steps will setup our initial project. Since we are going to add to the existing data, we are going to make this quick and easy.
We will be installing the following depdencies throughout this project. If you are familiar with this process, you can knock out all of these installs up front, or you can follow along and install them at each step in the blog.
We need to update the Root.jsx to have nav links to our pages we are going to create.
We are going to add 2 routes
Let's open
root.jsx and make some adjustments. Locate the
function Layout({ children }) within root.jsx and update the return statement to the following code, adding 2 Link tags right below the Home link.// Home Link...
<li>
<Link to="/blogs">Blog</Link>
</li>
<li>
<Link to="/admin">Admin</Link>
</li>
// Remix Docs...For this blog, we will be using Prisma with experimental features for connecting to a MongoDB database to store our blog articles. This is quick, simple, and free to start so it will be great for our small project.
Let's install the dev dependency. Run
Let's invoke the Prisma command line interface (CLI), run
Let's now initialize our Prisma project, let's run
Let's install the dev dependency. Run
npm install prisma --save-devLet's invoke the Prisma command line interface (CLI), run
npx prisma If you get an error, then Prisma did not install correctly, check the terminal output. Let's now initialize our Prisma project, let's run
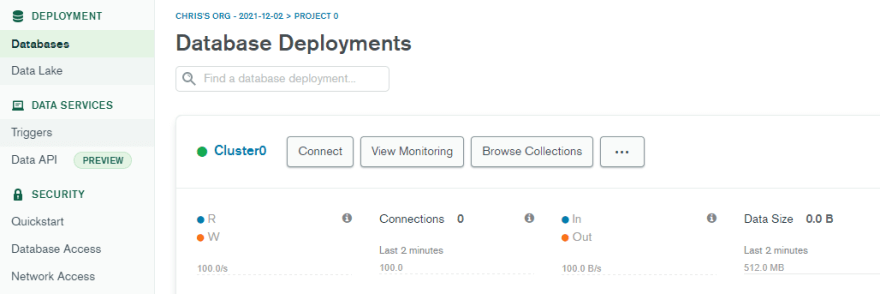
npx prisma init which will create our Prisma folder and We are going to use the Free Shared DB, it's free, no credit card required to start, and you get leverage the power of cloud database. This section assumes you have never used MongoDB before, if you are already familiar with Mongo or have a Cluster setup, you can skip ahead to the next section 😎
.env file in the root folder. This is a local environment file that we will store your mongo URL secret in since it contains username and password to your database. Open this up and you will see that Prisma already put some information in there. DATABASE_URL="mongodb+srv://remix_user:supersecretpassword@cluster0.cvvbu.mongodb.net/MyFirstDatabase"
In your MongoDB Dashboard we need to setup our database structure.
Remix_Blog
posts

slug with a value of my-first-post
markdown with a value of #This is my first post
title with a value of My First Post
Now we need to get our Prisma Schema file ready for MongoDB
mongodb.net/Remix_Blog;
DATABASE_URL="mongodb+srv://remix_user:supersecretpassword@cluster0.cvvbu.mongodb.net/Remix_Blog"
generator client {
  provider        = "prisma-client-js"
  previewFeatures = ["mongoDb"]
}

datasource db {
  provider = "mongodb"
  url      = env("DATABASE_URL")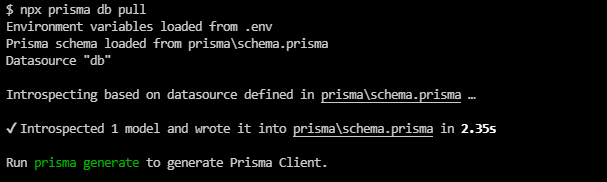
}npx prisma db pull (If this fails, you should check the .env file was setup correct and the username/password are correct and that the database URL was updated to end with your database name)
model posts {
  id       String @id @default(dbgenerated()) @map("_id") @db.ObjectId
  markdown String
  slug     String
  title    String
}
Run npx prisma generate
You should get the following output
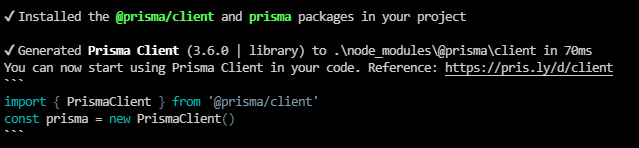
Hooray! We are ready to begin using Prisma in our application! 🎉
Here we will begin laying out the files for our blog. First we need a Blogs route so Remix knows what to load when users navigate to /blogs. Under the app folder, create a folder named blogs (./app/blogs/)
In this folder create a file index.jsx
We will also need a CSS stylesheet so let's throw that in while we are creating files. Under ./app/styles create a file called blogs.css (./app/styles/blogs.css).
Now open up the index.jsx file we just created in blogs.
Let's create a very basic return statement to make sure our route is working.
export default function Blogs() {
    return <h1>Blogs Route</h1>
}
Now on your server, if it's not running make sure you run
npx run dev then click the Blogs link at the top. We should now be presented with Blogs Route at the top which means our routing is working. If you get a 404 error, go back and make sure your file is named correctly. In some instances you may need to stop and restart the server. 
Now let's set up the rest of our Blog.
Before we can load data in our route, we first need to get our data.
We will do this in another file called a module. In the root of your app folder, create a file called
We will do this in another file called a module. In the root of your app folder, create a file called
post.js, (./app/post.js)Open up this post.js file and let's add import Prisma so we can use it in our app, and let's create our getPosts() function.
import { PrismaClient } from '@prisma/client'
// let's create a reference to prisma
const prisma = new PrismaClient();
// async function since we will be loading external data
export async function getPosts(){
// await prisma connection
        await prisma.$connect()
// let's grab all posts using findMany()
// the posts in prisma.posts is the collection we created in Mongo.db
        const allPosts = await prisma.posts.findMany();
// let's cleanup our connection
    prisma.$disconnect();
        // let's see what we are returning
       console.log(allPosts)
        return allPosts;
}
Now we need to tie in this function to our Blogs route. Go back to the index.jsx in you blogs route (./app/route/blog/index.jsx)
We just want to test that we are pulling our first blog from MongoDB. Let's add the following code above the
We just want to test that we are pulling our first blog from MongoDB. Let's add the following code above the
export default function Blogs()import { getPosts } from '~/post';
export let loader = () => {
return getPosts();
}Now Remix should automatically rebuild and you should see in your VSCode terminal, the output we are logging
[
  {
    id: '61a914e90b627f455a212145',
    markdown: '#This is my first post',
    slug: 'my-first-post',
    title: 'My First Post'
  }
]
Here is the terminal output:
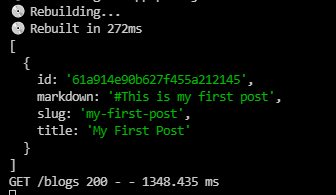
Awesome, so our Remix app is using it's loader function to talk to MongoDB through Prisma. We are ready to load our blog article into our app.
Lets go into the blogs index.jsx file (./app/blogs/index.jsx)
We need to import 2 more pieces from React, the Link tool and the useLoaderData hook.
Lets go into the blogs index.jsx file (./app/blogs/index.jsx)
We need to import 2 more pieces from React, the Link tool and the useLoaderData hook.
import { Link, useLoaderData } from 'remix';Sweet, those are ready to use. Now let's update our Posts() function to use our loader data and render it on the screen. We are going to map through the data and render the posts by Title and using Remix Link so the user can click on our blog post to read it. We will add 2 classes now for styling in a later step. We will use the slug as the Key on the
<li> tag since this should be unique. Update the Posts() function as follows
// our Posts function which will return the rendered component on the page .
export default function Posts() {
let posts = useLoaderData();
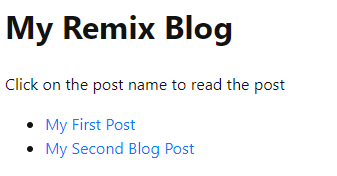
return (
<div>
<h1>My Remix Blog</h1>
<p>Click on the post name to read the post</p>
<ul>
{posts.map(post => (
<li className="postList" key={post.slug}>
<Link className="postTitle" to={post.slug}>{post.title}</Link>
</li>
))}
</ul>
</div>
)
}Perfect, we should see our blog article being rendered as a unordered list. If you click on it right now, you will get a 404, that's because we haven't told Remix what to do yet. Let's set that up now.
First we need a way to pull the information for a single post from our MongoDB database. Lets go to the root
post.js folder and create a function to do that. We will also be using a library called Marked to convert our current markdown content into HTML to render the blog article directly as HTML on our component. Let's install the dependency. Run
In your
npm install marked in your VSCode terminal. In your
post.js file let's import this at the topimport { marked } from "marked";We will also be using a library called Tiny-Invariant which will help us check if we are loading a slug as expected from params.
Let's install this dependency. Run
Let's install this dependency. Run
npm install tiny-invariant in your VSCode terminal Ok now we are ready to update
Add the following code to your
post.js module with the getPost() function. Add the following code to your
post.js file.// this function is used to load a single post from a passed through slug
export async function getPost(slug){
//setup our prisma connection
await prisma.$connect();
// we will find the first database entry that matches the passed slug
const foundSlug = await prisma.blogs.findFirst({
where: {
slug: slug
}
})
//let's extract the title
let title = foundSlug.title;
// using marked, we are going to convert the markdown into HTML so the blog post can render as entered in Markdown.
let html = marked(foundSlug.markdown)
// we need to cleanup our database connection
prisma.$disconnect();
// let's send back the slug, the title, and our markdown converted to html
return { slug, title, html};
}Perfect, now we can query a single post by passing in the slug, see how simple this can be?
We are going to use Remix nested routes to dynamically load our blog posts using a single route. This is accomplished by using a dynamic segment in the URL. To do this, let's create a file in our blogs route folder called
$slug.jsx. This file is going to need to import our a getPost() function from our post module we just created, it will have a loader to extract the dynamic segment from the parameter and then use that to go get our post. Then we will need a default function which will render our child component to the screen.
Update
./app/routes/blogs/$slug.jsx with this codeimport { useLoaderData } from 'remix';
import invariant from 'tiny-invariant';
import { getPost } from "~/post";
export let loader = async({params}) => {
invariant(params.slug, "expected params.slug");
return getPost(params.slug);
}
export default function PostSlug() {
let post = useLoaderData();
return (
<div className="postDisplay" dangerouslySetInnerHTML={{__html: post.html}}/>
)
}Now you are ready to go test this out. Go to your browser where your Remix app is running, and now try to click on the title of your blog post. Your page should now load based on the dynamic segment being passed, and you should see your content returned as HTML.

We will style this page after we setup the admin page.
Awesome progress! So far, we have setup a database, we put our first blog entry directly to the database, and we are now pulling that into our app and the user can read our blogs that are entered as markdown and displayed as HTML. Give yourself a pat on the back!
Let's take this a step further now. We don't want to input our blog posts directly into MongoDB. We want to be able to create them right from our app. For this we are going to create an admin panel which will let us create new posts, and edit existing posts. Head on over to the next section to set this up.
Our blog needs a way to create new blog posts and edit existing blog posts directly from our Remix app. We are going to setup a new route for this to separate it out.
As an expansion to this tutorial, you can setup Authentication on your app and then only render the Admin route if the logged in user should have access
As an expansion to this tutorial, you can setup Authentication on your app and then only render the Admin route if the logged in user should have access
In your project, we are going to create a new route and an admin page.
In your Routes folder, create a new file called
Also in the Routes folder, create a new folder called
In this new admin folder, create an
In your Routes folder, create a new file called
admin.jsx. Also in the Routes folder, create a new folder called
adminIn this new admin folder, create an
index.jsx file. Let's work on these separately.
Our admin page is going to be pretty similar to our blog page, but with some extra features. So let's copy some of that code. Update your
admin.jsx as followsimport { Outlet, Link, useLoaderData } from 'remix';
import { getPosts } from "~/post";
import adminStyles from "~/styles/admin.css";
//create a stylesheet ref for the admin.css file
export let links = () => {
return [{rel: "stylesheet", href: adminStyles}]
}
export let loader = () => {
return getPosts();
}
export default function Admin() {
let posts = useLoaderData();
return (
<div className="admin">
<h1 className="adminTitle">Admin</h1>
<nav>
<p>Click on a post to edit the blog post</p>
<ul>
{posts.map(post => (
<li key={post.slug}>
<Link to={post.slug}>{post.title}</Link>
</li>
))}
</ul>
<main>
       {/* Outlet renders the /admin/index.jsx */}
       <Outlet />
   </main>
</nav>
</div>
)
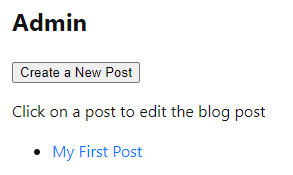
}Now if you check your app, you should be able to click the Admin link at the top nav and see your admin page and your blog posts. If you click on that link, you are going to get an error because we haven't told Remix what to do yet.

Sweet! Keep up the great work, not a lot of work left!
Let's setup the ability to add new blog posts.
In your routes/admin folder, open your
This will be a really simple component to return a button that will redirect our user to the new page we will create.
In your routes/admin folder, open your
index.jsxThis will be a really simple component to return a button that will redirect our user to the new page we will create.
Update
index.jsx (./app/routes/admin/index.jsx) as follows:import { Link } from 'remix';
export default function AdminIndex() {
return (
<div className="adminNewPostLink">
<Link to="new"> <button className="adminNewPostButton">Create a New Post</button></Link>
</div>
)
}To get this button to display inside our Admin component we need to use the Outlet. With Remix, the index.jsx file in the nested routing will automatically render inside of our outlet.
Open
admin.jsx and lets update our import to include Outlet import { Outlet, Link, useLoaderData } from 'remix';Perfect, now let's place that in our
<main> tag we setup earlier in this same file. Update the main tag to include the Outlet
<main>
{/* Outlet renders the /admin/index.jsx */}
<Outlet />
</main>Now you should have a button on your admin page to create a new post. Let's go make that button work now!
In your admin route, create the file
new.jsx. This will be used to create a new blog post. This file is going to use a Remix <Form> instead of a standard HTML <form> and post to the current route. We will use a Remix action to get our formData in the request sent by that post, perform some client side validation, and then call a createPost() function from our post.js module that will add our new blog post to the database on MongoDB.import { redirect, Form, useActionData, useTransition } from "remix";
import { createPost } from "~/post";
export let action = async ({ request }) => {
let formData = await request.formData();
let title = formData.get("title");
let slug = formData.get("slug")
let markdown = formData.get("markdown")
let errors = {};
if (!title) errors.title = true;
if (!slug) errors.slug = true;
if (!markdown) errors.markdown = true;
if (Object.keys(errors).length) {
return errors;
}
await createPost({title, slug, markdown});
return redirect("/admin")
}
export default function NewPost() {
// pull in errors from our action using the useActionData() hook
let errors = useActionData();
// transition will allow us to create a better user experience by updating the text of the submit button while creating the blog post
let transition = useTransition();
// we are going to create the slug for the user
let slug = ''
// as the Title input is updated we will generate the slug automatically.
// My First Post slug would equal 'my-first-post'. We will convert to lower case and we will strip spaces and replace with hyphens
const handleChange = (e) =>{
let text = e.target.value
// using regex and replace, let's convert spaces to dashes
slug = text.replace(/\s/g , '-');
// lets set the value of the slug text box to be our new slug in lowercase
document.getElementById("slugInput").value = slug.toLowerCase();
}
return (
<Form method="post">
<p>
<label htmlFor="">
Post Title: {" "} {errors?.title && <em>Title is required</em>} <input onChange={handleChange} type="text" name="title"/>
</label>
</p>
<p>
<label htmlFor=""> Post Slug: {" "} {errors?.slug && <em>Slug is required</em>}
<input placeholder={slug} id="slugInput" type="text" name="slug"/>
</label>
</p>
<p>
<label htmlFor="markdown">Markdown:</label>{" "} {errors?.markdown && <em>Markdown is required</em>}
<br />
<textarea name="markdown" id="" rows={20} cols={30}/>
</p>
<p>
<button type="submit">{transition.submission ? "Creating..." : "Create Post"}</button>
</p>
</Form>
)
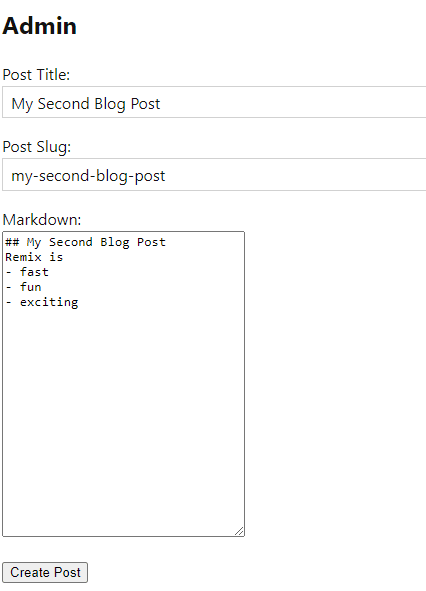
}Awesome! Let's check our app and make sure we are seeing the form we will work on the createPost() function next.
It should look like this:
It should look like this:

Sweet, our app is coming right along, let's setup the
post.js module to allow us to create entries in our MongoDB database.Open your
post.js and add the following createPost() functionexport async function createPost(post){
//Prisma connection
await prisma.$connect()
// prisma create
await prisma.posts.create({
data: {
title: post.title,
slug: post.slug,
markdown: post.markdown
}
})
// cleanup prisma connection
prisma.$disconnect();
// let's send back the slug we created
return getPost(post.slug)
}Alright it's the moment we have been waiting for. Let's create our first blog post from our app!
Check our your app and create a new blog post.
Check our your app and create a new blog post.
Whoa! Check that out, the button switched to 'Creating...' for a few seconds and then your admin component was reloaded to and your new blog post is showing up now, incredible!!
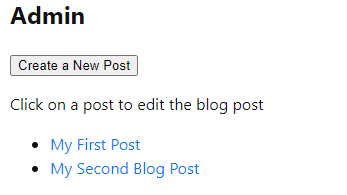
Go take a look at your Blogs route. You will see the new blog is already on that page too!
Go Crazy and add a few more blog articles so we have some sample data to work with, you want at least 5 test blogs. If you go over to your Blogs page, you can click on the links and see your markdown converted to HTML for your blog articles.

Now some day we may need to edit our blog posts. Let's add that functionality. We are going to use another dynamic segment to get the post slug for editing.
Create a new file in your admin route folder titled
This page is going to be pretty similar to our
$edit.jsx. This page is going to be pretty similar to our
new.jsx page with a few slight changes. We need to get the post from the route of the blog post we clicked, then we need to populate the form with that data, perform the same validation, and update that data if needed. Update your
$edit.jsx file (./app/routes/admin/$edit.jsx)import invariant from 'tiny-invariant';
import { getPostEdit } from "~/post";
import { redirect, Form, useActionData, useTransition, useLoaderData } from "remix";
import { updatePost } from "~/post";
export let loader = async({params}) => {
invariant(params.edit, "expected params.edit");
return getPostEdit(params.edit);
}
export let action = async ({ request }) => {
let formData = await request.formData();
let title = formData.get("title");
let slug = formData.get("slug")
let markdown = formData.get("markdown")
let id = formData.get("id");
let errors = {};
if (!title) errors.title = true;
if (!slug) errors.slug = true;
if (!markdown) errors.markdown = true;
if (Object.keys(errors).length) {
return errors;
}
console.log('calling updatePost with id, title, slug, markdown: ', id, title, slug, markdown)
await updatePost({id, title, slug, markdown});
return redirect("/admin")
}
export default function PostSlug() {
let errors = useActionData();
let transition = useTransition();
let post = useLoaderData();
return (
<Form method="post">
<p>
<input className="hiddenBlogID" name="id" value={post.id}>
</input>
</p>
<p>
<label htmlFor="">
Post Title: {" "} {errors?.title && <em>Title is required</em>} <input type="text" name="title" defaultValue={post.title}/>
</label>
</p>
<p>
<label htmlFor=""> Post Slug: {" "} {errors?.slug && <em>Slug is required</em>}
<input defaultValue={post.slug} id="slugInput" type="text" name="slug"/>
</label>
</p>
<p>
<label htmlFor="markdown">Markdown:</label>{" "} {errors?.markdown && <em>Markdown is required</em>}
<br />
<textarea defaultValue={post.markdown} name="markdown" id="" rows={20} cols={30}/>
</p>
<p>
<button type="submit">{transition.submission ? "Updating..." : "Update Post"}</button>
</p>
</Form>
)
}Awesome. Now if you notice, this calls for getPostEdit and updatePost which don't exist in our Post module. Let's go add those.
Open
Open
post.js and the following 2 functions//when we edit the post we want to return different data including the ID field
export async function getPostEdit(slug){
//setup our prisma connection
await prisma.$connect();
// we will find the first database entry that matches the passed slug
const foundSlug = await prisma.posts.findFirst({
where: {
slug: slug
}
})
let id = foundSlug.id
//let's extract the title
let title = foundSlug.title;
// since we are editing and not rendering we want to pull the original markdown value stored in the db
let markdown = foundSlug.markdown
// we need to cleanup our database connection
prisma.$disconnect();
// let's send back the slug, the title, and our markdown
return { id, slug, title, markdown};
}
// When updating we need to reference the ID being updated
export async function updatePost(post){
//Prisma connection
await prisma.$connect()
// prisma create
console.log('updatePost id', post.id)
await prisma.posts.update({
where: {
id: post.id
},
data: {
title: post.title,
slug: post.slug,
markdown: post.markdown
}
})
// cleanup prisma connection
prisma.$disconnect();
// let's send back the slug we created
return getPost(post.slug)
}Let's go test it out. On your Remix app, go to your Admin page and click on a post. The fields should populate with the blog data and you can edit it and then update your blog posts.
You may notice a field showing some strange letters and numbers, this is the post ID from the database, we will hide this in CSS. If we hide it in HTML then it's not sent with our post request.
You may notice a field showing some strange letters and numbers, this is the post ID from the database, we will hide this in CSS. If we hide it in HTML then it's not sent with our post request.
Splendid! We now have a functional blog where we can read blog posts, we can create new blog posts, and we can edit existing blog posts. The only thing left to do is add some styling.
We haven't done any of our own styling yet, just using the default
create-remix styling. Let's expand on those by adding route specific styles that will only be added if the route matches. In your App folder, create 2 CSS files
admin.css and posts.css. We are going to work with the
I am going to define the following styles
admin.css file first. I am going to define the following styles
.admin {
    display: flex;
    flex-direction: row;
}

.admin > h1 {
    padding-right: 2em;
}

.admin > nav {
    flex: 1;
    border-left: solid 2px #555;
    padding-left: 2em;
}

.hiddenBlogID {
    display: none;
}


.adminNewPostButton{
    margin-top: 2em;
    background-color: royalblue;
    color: white;
    border-radius: 10px;
    padding: 1em;
}


.adminTitle {
    font-size: x-large;
    color: crimson;
}

.remix-app__header{
    background-color: rgb(141, 20, 20);
}mix-app__header{
    background-color: crimson;
}
Perfect, our Admin style sheet is ready to go. We are going to add it to our
admin.jsx file using the remix export links method so that the CSS styles are only added when our admin page is rendered and removed when our admin page is not being rendered. We are going to import the stylesheet and then export it as a links.Add the following to the top of your
admin.jsximport adminStyles from "~/styles/admin.css";
//create a stylesheet ref for the admin.css file
export let links = () => {
return [{rel: "stylesheet", href: adminStyles}]
}Go have a look at your Admin page, it should now look like this:
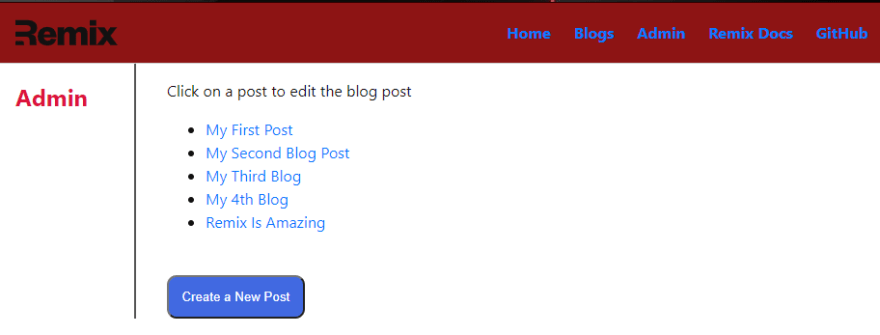
We added a red banner in the top nav to show case we are in an admin route. We also Styled the Admin header and used a bit of flex. Additionally, we hid that blog id input. If you navigate to any other page, the styles are removed. Take a look at the dev tools and the CSS file disappears.
Let's add some CSS to our
posts.css file. I have designed some heading styles, and background just to put some styles on the page. Edit
post.css with the following:.postTitle{
text-decoration: none;
color: rebeccapurple;
}
.postTitle:hover{
text-decoration: underline;
color: red;
}
.postList{
list-style-type:circle;
}
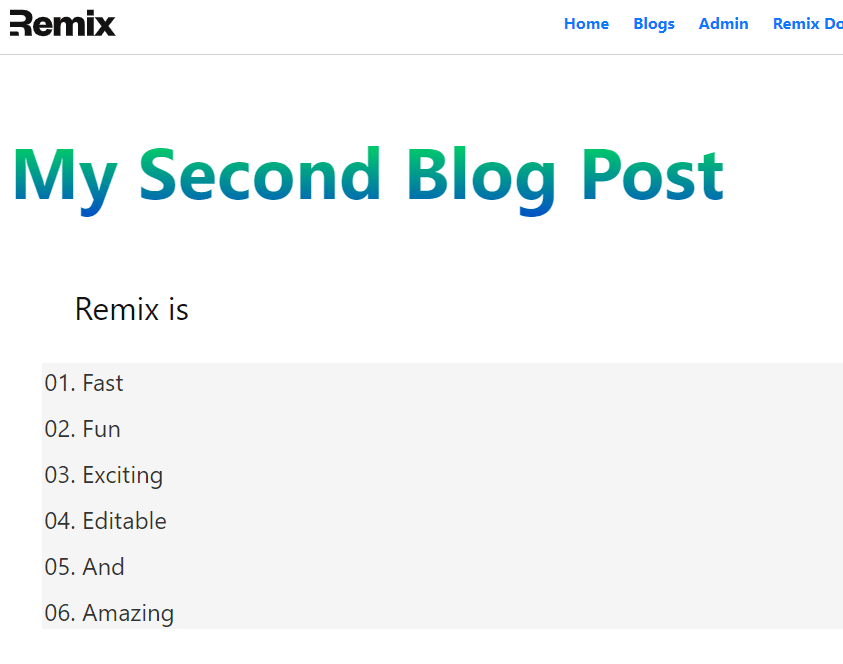
.postDisplay h1, h2, h3 {
font-size: 72px;
background: -webkit-linear-gradient(rgb(0, 255, 64), rgb(0, 71, 204));
-webkit-background-clip: text;
-webkit-text-fill-color: transparent;
}
.postDisplay p {
font-size: 2em;
margin-left: 2em;
}
.postDisplay ul {
display: flex;
flex-direction: column;
text-transform: capitalize;
background-color: whitesmoke;
row-gap: 10px;
margin-left: 2em;
}
.postDisplay > ul > li {
color: #333;
font-size: x-large;
list-style-type: decimal-leading-zero;
}Awesome we have some styling being applied. Let's go import the styles to our blogs route files. At the top of the blogs
index.jsx and the $slug.jsx file. Add the following same two lines.import postStyles from "~/styles/posts.css";
export let links = () => {
return [{rel: "stylesheet", href: postStyles}]
}`
Here is my Second Blog Post page with some styling applied
Awesome, we now have a blog application, with our data being stored in MongoDB. We can add new articles, we can update existing articles, we can add styles and see how Remix applies it's logic to our application.
Here is the Folder Structure at the end.

Remix is an app for creating amazing user experiences, sometimes with React.
Remix is not just a react framework, though you can quickly get it up and running with React.
There is much more to Remix, this is just a quick app to showcase some features.
The back end of your application is added to the module, if you want to change that from MongoDB to SQL for example, you can simply update the post.js file and entirely change the back end to another provider. As I was writing this tutorial, I was initially using local storage, then local SQLLite through Prisma, and then switched to MongoDB because I wanted to showcase how to work with a cloud provider to separate our data storage from our app.
Let's get our application published to our Vercel site.
Close your running dev server.
Let's run a build
npm run buildLet's deploy run
vercel deploy 🚀🚀🚀My site was published to https://remix-blog-ten.vercel.app
Go take a look and play with it.
Go take a look and play with it.
Full Source Code is available on Github here
I do hope that you learned something with this tutorial. This is my first tutorial of this magnitude, and on Remix. I'm a web developer but a junior React dev and still learning so I'm open to feedback if I've made mistakes or can improve this tutorial.
Part 2 for this tutorial is live which covers Authentication, and Deleting posts. This protects the Admin Page from non-authenticated users. Check it out here: Part 2
Support - Your support is 100% optional
You can buy me a Taco to show your support
You can buy me a Taco to show your support
20