
20
Building a Project Case study app using the absolute power of MERN stack 🔥
This blog post focuses on the most important activities and ideas to help you better understand and construct MERN stack applications from the bottom up. It's for people who are truly interested in learning about the MERN stack and want to focus on what you actually need to know.
There is a separate article where you may learn about MERN stack in great detail.
In this blog post, we'll construct a full-stack project case study application that users can use to keep track of and make notes on GitHub projects, as well as search the entire GitHub project using the GitHub API and the MERN stack alone. This blog lesson should help you learn the MERN stack technology's fundamentals as well as advanced concepts and operations.
Here's a look at the final version of our application.


Create a two folder name client and server inside your project directory, then open it inside the Visual Studio Code or any code editor of your choice.


Now, we'll construct a MongoDB database, set up a server with Node and Express, create a database schema to represent our project case study application, and set up API routes to create, read, update, and delete data and information from the database using npm and the appropriate packages. So, open a command prompt and navigate to the directory on your server, then run the code below.
npm init -yExecute the following commands in the terminal to install the dependencies.
npm install cors dotenv express mongoose nodemon body-parser

The "package.json" file should look like this after the dependencies have been installed.

And also, remember to update the scripts as well.

Now go to your server directory and make a index.js file there.
Import express module.
Import and configure dotenv module
Import CORS module
Use express() to start our app.
//index.js
const express = require('express')
const bodyParser = require('body-parser')
const cors = require('cors')

// dotenv config
require('dotenv').config();

// app config
const app = express();
We may now utilize all of the other methods on that app instance. Let's start with the fundamentals and very basic setups. Don't forget to set up the port, too.
const express = require('express')
const bodyParser = require('body-parser')
const cors = require('cors')

// dotenv config
require('dotenv').config();

// app and port config
const app = express();
const port = process.env.PORT || 4000;

// middlewares
app.use(bodyParser.urlencoded({ extended: true }));
app.use(cors());
app.use(bodyParser.json());MongoDB is an open-source, cross-platform document-oriented database. MongoDB is a NoSQL database with optional schemas that stores data as JSON-like documents. Prior to October 16, 2018, all versions were distributed under the AGPL license. The SSPL license v1 applies to all versions issued after October 16, 2018, including bug fixes for older versions.
To set up and start your MongoDB cluster, follow the exact same steps outlined in the article mentioned below.
Now create a separate database folder and inside it create another index.js file. Inside it, import the mongoose library and create a string and simply paste the copied mongo DB connection URL or simply paste the link for the environment variables. Now, inside the link of Mongo DB cloud atlas URL, enter your username and password, making sure to remove all the brackets and enter your own credentials. finally, we will use mongoose to connect to our database, so enter mongoose. connect() which is a function with two different parameters. The first will be the MONGO_DB_URL, and the second will be an object with two different options. The first is useNewUrlParser, which we will set to true, and the second is useUnifiedTopology, which we will also set to true. These objects are not required, but we will see some errors or warnings on our console. Following that, let's chain a.then() and.catch() because this will return a promise, so inside .then() will call the app and invoke listen, which has two parameters, the first of which is PORT and the second of which is the callback function that will be executed if our application is successfully connected and finally, if the connection to the database is not successful we will simply console log our error message and finally export that database.
const mongoose = require('mongoose');
require('dotenv').config();


mongoose.connect(process.env.MONGO_DB_URL, {
    useNewUrlParser: true,
    useUnifiedTopology: true,
}).catch(e => {
    console.error('Error while connecting to the database', e.message)
})

const Database = mongoose.connection

module.exports = Database;
Insert mongodb+srv into the .env file.
PORT=4000
MONGO_DB_URL=mongodb+srv://pramit:<password>@cluster0.yxjll.mongodb.net/TakeNote?retryWrites=true&w=majority
That's all there is to it; we've successfully created our database. so, let’s import it into our main root index.js file and actually connect our database with the server.
const express = require('express')
const bodyParser = require('body-parser')
const cors = require('cors')

// importing database
const database = require('./database')

// dotenv config
require('dotenv').config();

// app and port config
const app = express();
const port = process.env.PORT || 4000;

// middlewares
app.use(bodyParser.urlencoded({ extended: true }));
app.use(cors());
app.use(bodyParser.json());

// DB connection
database.on('error', console.error.bind(console, 'MongoDB failed to connect'))

// listening to port
app.listen(port, () => console.log(`Currently server is running at http://localhost:${port}`))
We now have successfully connected our server to the database.
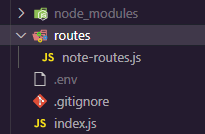
Now that we've successfully connected to our database, let's get started on building our backend application's routes. To do so, we'll need to create a new folder called routes on the server directory. We will create a file called notes-routes.js within the routes folder .
Let's get started by importing the note routes into your index.js file. We can now connect notes to our application using express middleware. Finally, your root index.js file should be like the following.
// index.js
const express = require('express')
const bodyParser = require('body-parser')
const cors = require('cors')

// importing database
const database = require('./database')
// importing routes
const noteRouter = require('./routes/note-routes')

// dotenv config
require('dotenv').config();

// app and port config
const app = express();
const port = process.env.PORT || 4000;

// middlewares
app.use(bodyParser.urlencoded({
    extended: true
}));
app.use(cors());
app.use(bodyParser.json());

// DB connection
database.on('error', console.error.bind(console, 'MongoDB failed to connect'))

app.use('/', noteRouter)

// listening to port
app.listen(port, () => console.log(`Currently server is running at http://localhost:${port}`))
We'll segregate our routes and controllers folder. But first, let's create a note model. Create a folder called models, and inside it, create one files called noteSchema.js and with the following code pasted into each.
The structure of your folders should now look like this.

// models/noteSchema.js
const mongoose = require('mongoose')
const Schema = mongoose.Schema

const Note = new Schema({
    note: {
        type: String,
        required: true
    },
}, {
    timestamps: true
}, )

module.exports = mongoose.model('notes', Note)
Now we can begin adding our routes and controllers.
// routes/note-rotes.js
const express = require('express')

const noteController = require('../controllers/noteControllers')

const router = express.Router()


router.post('/', noteController.createItem)
router.get('/', noteController.getNotes)

module.exports = router;
Now create a controller folder and inside it create a file called noteControllers and inside it create a two controller named as createItem and getNotes
Import note schema
const Note = require('../models/noteSchema')Creating a note
createItem = (req, res) => {

    const body = req.body

    if (!body) {
        return res.status(400).json({
            success: false,
            error: 'Please!! enter a item',
        })
    }
    const note = new Note(body)

    if (!note) {
        return res.status(400).json({
            success: false,
            error: err
        })
    }
    note.save().then(() => {
            return res.status(200).json({
                success: true,
                id: note._id,
                message: 'Cheers!! Note is Created',
            })
        })
        .catch(error => {
            return res.status(400).json({
                error,
                message: 'Error!! while creating note',
            });
        });
};
Fetching all the notes
getNotes = async(req, res) => {
    await Note.find({}, (err, notes) => {
        if (err) {
            return res.status(400).json({
                success: false,
                error: err
            })
        }
        if (!notes.length) {
            return res
                .status(404)
                .json({
                    success: false,
                    error: `Sorry, Item not found`
                })
        }
        return res.status(200).json({
            success: true,
            data: notes
        })
    }).catch(err => console.log(err))
}
Finally, your controllers should resemble something like this
//controllers/noteControllers.js
const Note = require('../models/noteSchema')

createItem = (req, res) => {

    const body = req.body

    if (!body) {
        return res.status(400).json({
            success: false,
            error: 'Please!! enter a item',
        })
    }
    const note = new Note(body)

    if (!note) {
        return res.status(400).json({
            success: false,
            error: err
        })
    }
    note.save().then(() => {
            return res.status(200).json({
                success: true,
                id: note._id,
                message: 'Cheers!! Note is Created',
            })
        })
        .catch(error => {
            return res.status(400).json({
                error,
                message: 'Error!! while creating note',
            });
        });
};


getNotes = async (req, res) => {
    await Note.find({}, (err, notes) => {
        if (err) {
            return res.status(400).json({
                success: false,
                error: err
            })
        }
        if (!notes.length) {
            return res
                .status(404)
                .json({
                    success: false,
                    error: `Sorry, Item not found`
                })
        }
        return res.status(200).json({
            success: true,
            data: notes
        })
    }).catch(err => console.log(err))
}

module.exports = {
    createItem,
    getNotes
}
After restarting the server, you should see something similar to this:

Let's start with the frontend and use react to construct it. If Node.js isn't currently installed on your computer, the first thing you need to do is install it. So, go to the official Node.js website and get the most recent version. In order to use the node package manager, also known as NPM, you'll need Node js. Now open your favourite code editor and navigate to the client folder. I'll be utilizing Visual Studio Code. Next, input npx create-react-app into the integrated terminal. This command will construct a client application with the name client in the current directory.

There is a separate article where you may learn everything there is to know about react.js
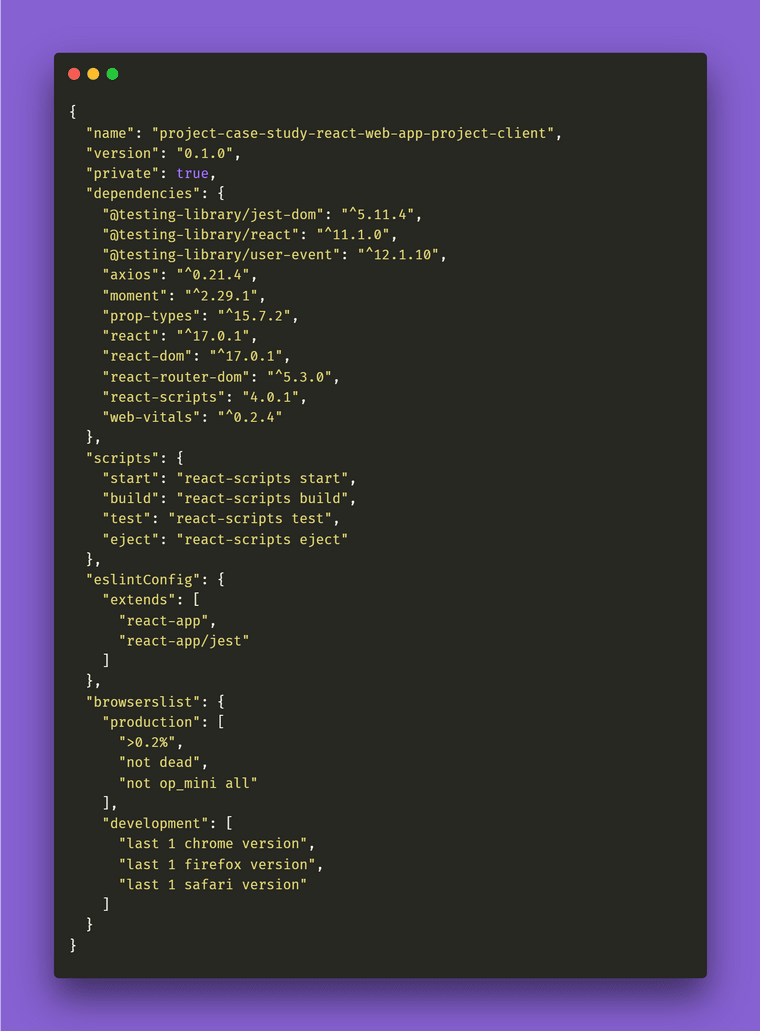
It's time to install some packages within react-boilerplate now that you've installed and cleaned it. so copy and paste the following command into your terminal.
npm i axios moment react-router-dom prop-types
After installing all these packages your packge.json file of the client should look like this:
Let's construct four separate folders/component inside the components folder after we've installed all of our project's dependencies and name it as Card , CardItemList , Navbar and SearchForm and also let’s create one folder called pages and create two older ones inside it and name it as RepoSearch and TakeNote respectively.
Your file and folder structure should look something like this once you've added all of your components and pages .

Now go to your app.js file and import the routers from react-router-dom and styles, also all the components as well and make the necessary changes to the code as follows.
// app.js
import React from "react";
import { BrowserRouter, Route } from "react-router-dom";

import Navigation from "./components/Navbar";
import RepoSearch from "./pages/RepoSearch/RepoSearch";
import TakeNote from "./pages/TakeNote/TakeNote";

const App = () => {
  return (
    <BrowserRouter>
      <Navigation />
      <Route path="/" exact component={RepoSearch} />
      <Route path="/note" exact component={TakeNote} />
    </BrowserRouter>
  );
};

export default App;
then go to the card component and create a card like structure for each fetched GitHub projects.
// components/card
import React from "react";
import "./Card.css";
import moment from "moment";

const Card = (props) => {
  return (
    <div className="container__cardbox">
      <div className="card-body">
        <div className="card-title">
          <a href={props.link} target="_blank" rel="noreferrer">
            {props.title}
          </a>
        </div>
        <div className="card-description">{props.description} 📖</div>
        <div className="card-description">Total Forks: {props.forks} 🍴</div>
        <div className="card-description">Total Stars: {props.stars} ⭐</div>
        <div className="card-description">
          Last Updated: {moment(`${props.updatedAt}`).fromNow()} ⌛
        </div>
        {/* <div className="card-description">License Name: {(props.licenseName === "Other" & null ) ? "Other License" : props.licenseName} 📜</div> */}
        <div className="card-description">
          Total Watchers: {props.watchCount} 👀
        </div>
        <div className="card-description">
          Open Issues: {props.openIssuesCount} 🏷️
        </div>
        <div className="card-description">
          Repo Size: {props.repoSize} KB ⚖️
        </div>
        <img className="card-image" src={props.image} alt={props.title} />
      </div>
    </div>
  );
};

export default Card;
and also don’t forget to create a card.css file inside it and add the following style to it
.container__cardbox {
  flex: 1;
  /* flex-grow: 4; */
  flex-basis: 15%;
  margin: 15px;
  /* border: solid 2px #383636; */
  border-radius: 25px;
  /* display: flex; */
  flex-flow: row wrap;
}

.card-body {
  padding: 10px;
  border-radius: 20px;
  background: white;
}

.card-title {
  font-size: 25px;
  text-align: left;
}

.card-description {
  font-size: 12px;
  margin: 4px;
  text-align: center;
}

.card-image {
  width: 20%;
  margin-top: -130px;
}
Then, under the CardItemList, import the Card component and provide it all of the appropriate props so that it can display all of the elements within the card component itself.
//components/CardItemList
import React from "react";
import Card from "../Card";

const CardItemList = (props) => {
  return (
    <div className="container__carditemlist">
      {props.items.map((item) => (
        <Card
          key={item.id}
          link={item.html_url}
          title={item.full_name}
          description={item.description}
          image={item.owner.avatar_url}
          forks={item.forks_count}
          stars={item.stargazers_count}
          updatedAt={item.updated_at}
          watchCount={item.watchers_count}
          openIssuesCount={item.open_issues_count}
          repoSize={item.size}
        />
      ))}
    </div>
  );
};

export default CardItemList;
and again don’t forget to create a CardItemList.css file inside it and add the following style to it
.container__carditemlist {
  display: flex;
  flex-wrap: wrap;
}
So, before we develop a search form, let's work on the navbar section. Go to the navbar component and paste the code below into it.
// components/Navbar
import React from "react";
import { Link } from "react-router-dom";
import "./Navbar.css";

const Navbar = () => {
  return (
    <div className="container__navbar">
      <div className="navbar-title">Github Search</div>
      <ul className="navbar-menu">
        <li>
          <Link to="/">Search-Projects</Link>
        </li>
        <li>
          <Link to="/note">Take-Note</Link>
        </li>
      </ul>
      <div className="navbar-menu"></div>
    </div>
  );
};

export default Navbar;
Remember to create a Navbar.css file inside it and apply the following style to it.
@import url("https://fonts.googleapis.com/css?family=Raleway:400,400i,800");
 .container__navbar {
     display: flexbox;
     align-items: center;
     background: url("../../assets/gifs/navBack.gif") no-repeat center center fixed;
     -webkit-background-size: cover;
     -moz-background-size: cover;
     -o-background-size: cover;
     background-size: cover;
    /* background-color: transparent;
     */
     padding: 25px;
     width: 100%;
     margin-bottom: 20px;
}
 @media only screen and (max-width: 900px) {
     .container__navbar {
         display: flexbox;
         align-items: center;
         background: url("../../assets/gifs/navBack.gif") no-repeat center center fixed;
         -webkit-background-size: cover;
         -moz-background-size: cover;
         -o-background-size: cover;
         background-size: cover;
        /* background-color: transparent;
         */
         padding: 25px;
         width: 100rem;
         margin-bottom: 20px;
    }
}
 .navbar-title {
     color: transparent;
     font-size: 28px;
     margin-bottom: -50px;
     text-align: right;
}
 .navbar-menu {
     border-radius: 25px;
     height: -webkit-fit-content;
     height: -moz-fit-content;
     height: fit-content;
     display: inline-flex;
     background-color: rgba(0, 0, 0, 0.4);
     -webkit-backdrop-filter: blur(10px);
     backdrop-filter: blur(10px);
     align-items: center;
     padding: 0 20px;
     margin: 50px 0 0 0;
}
 .navbar-menu li {
     list-style: none;
     color: white;
     font-family: sans-serif;
     font-weight: bold;
     padding: 12px 60px;
     margin: 0 8px;
     position: relative;
     cursor: pointer;
     white-space: nowrap;
}
 .navbar-menu li::before {
     content: " ";
     position: absolute;
     top: 0;
     left: 0;
     height: 100%;
     width: 100%;
     z-index: -1;
     transition: 0.6s;
     border-radius: 25px;
}
 .navbar-menu li:hover {
     color: black;
}
 .navbar-menu li:hover::before {
     background: linear-gradient(to bottom, #e8edec, #d2d1d3);
     box-shadow: 0px 3px 20px 0px black;
     transform: scale(1.2);
}
 @media only screen and (max-width: 1000px) {
     .navbar-menu {
         border-radius: 25px;
         height: -webkit-fit-content;
         height: -moz-fit-content;
         height: fit-content;
         display: inline-flex;
         background-color: rgba(0, 0, 0, 0.4);
         -webkit-backdrop-filter: blur(10px);
         backdrop-filter: blur(10px);
         align-items: center;
         padding: 0 0px;
         margin: 50px 0 0 0;
    }
     .navbar-menu li {
         list-style: none;
         color: white;
         font-family: sans-serif;
         font-weight: bold;
         padding: 12px 10px;
         margin: 0 1px;
         position: relative;
         cursor: pointer;
         white-space: nowrap;
    }
     .navbar-menu li::before {
         content: " ";
         position: absolute;
         top: 0;
         left: 0;
         height: 100%;
         width: 100%;
         z-index: -1;
         transition: 0.6s;
         border-radius: 25px;
    }
     .navbar-menu li:hover {
         color: black;
    }
     .navbar-menu li:hover::before {
         background: linear-gradient(to bottom, #e8edec, #d2d1d3);
         box-shadow: 0px 3px 20px 0px black;
         transform: scale(1.2);
    }
}
Finally, let's go to work on the components of the SearchForm
// components/SearchForm
import React, { useState } from "react";
import "./SearchForm.css";

const SearchForm = (props) => {
  const [value, setValue] = useState("");

  const submitSearchValue = () => {
    setValue("");
    props.onSubmit(value);
  };

  return (
    <div>
      <input
        className="search-input"
        type="text"
        placeholder={props.placeholder}
        value={value}
        onChange={(event) => setValue(event.target.value)}
      />
      <label htmlFor="name" className="search-label">
        Search Project
      </label>
      <button
        className="search-button"
        type="submit"
        onClick={() => submitSearchValue()}
      >
        {props.buttonText}
      </button>
    </div>
  );
};

export default SearchForm;
Remember to include the following style in the SearchForm.css file
@import url("https://fonts.googleapis.com/css2?family=Finger+Paint&display=swap");


.search-button {
  background-image: linear-gradient(
    to right,
    #02aab0 0%,
    #00cdac 51%,
    #02aab0 100%
  );
}
.search-button {
  margin: 0 auto;
  padding: 10px 100px;
  margin-top: 0px;
  text-align: center;
  text-transform: uppercase;
  transition: 0.5s;
  background-size: 200% auto;
  color: white;
  box-shadow: 0 0 20px #eee;
  border-radius: 10px;
  display: block;
  outline: none;
}

.search-button:hover {
  background-position: right center; /* change the direction of the change here */
  color: #fff;
  text-decoration: none;
}

.search-label {
  color: white;
  font-family: "Finger Paint", cursive;
  font-size: 1.2rem;
  margin-left: 2rem;
  margin-top: 0.2rem;
  display: block;
  transition: all 0.3s;
  transform: translateY(0rem);
}

.search-input {
  color: #333;
  font-size: 1.2rem;
  margin: 0 auto;
  padding: 1rem 0.5rem;
  border-radius: 0.6rem;
  background-color: rgb(255, 255, 255);
  border: none;
  width: 50rem;
  display: block;
  border-bottom: 1rem solid transparent;
  transition: all 0.3s;
  outline:none;
}

@media only screen and (max-width: 900px) {
  .search-input {
    color: #333;
    font-size: 1.2rem;
    margin: 0 auto;
    padding: 1rem 0.5rem;
    border-radius: 0.6rem;
    background-color: rgb(255, 255, 255);
    border: none;
    width: 100%;
    display: block;
    border-bottom: 1rem solid transparent;
    transition: all 0.3s;
  }
}

.search-input:placeholder-shown + .search-label {
  opacity: 0;
  color: white;
  visibility: hidden;
  -webkit-transform: translateY(-4rem);
  transform: translateY(-4rem);
}
Now that we've successfully integrated the component into our application, it's time to specify our pages. So, inside our pages directory, create a RepoSearch folder and two files, RepoSearch.js and RepoSearch.css. So simply import SearchForm and CardItemList components into the RepoSearch page, then within that Reposearch construct one useState hook named repos with an empty array as the initial value.
This hook will enable us to integrate the state into our functional component. useState(), unlike state in class components, does not work with object values. If necessary, we can use primitives directly and create multiple react hooks for multiple variables. const [state, setState] = useState(initialState);
and also remember that hooks in React must always be declared at the top of a function. This also aids in the preservation of state between all rendering for the component. Finally, let's develop the searchRepository function, which uses the free github api to get all project information and simply returns with the SearchForm and CardItemList components, passing the searchRepository function as a prop on a SearchForm component and repos in CardItemLists components.
//pages/RepoSearch
import React, { useState } from "react";
import axios from "axios";

import SearchForm from "../../components/SearchForm";
import CardItemList from "../../components/CardItemList";

import "./RepoSearch.css";

const RepoSearch = () => {
  const [repos, setRepos] = useState([]);

  const searchRepository = (searchQuery) => {
    setRepos([]);
    axios
      .get(
        `https://api.github.com/search/repositories?q=${searchQuery}{&page,per_page,sort,order}`
      )
      .then((result) => setRepos(result.data.items));
  };

  return (
    <div className="container__RepoSearch">
      <SearchForm
        placeholder="Search Projects."
        buttonText="Search"
        onSubmit={(value) => searchRepository(value)}
      />
      <CardItemList items={repos} />
    </div>
  );
};

export default RepoSearch;
Don't forget to apply the following style to it as well.
.container__RepoSearch {
  display: flex;
  flex-direction: column;
  align-items: center;
}
Finally, let's build a functionality to generate notes in our application. To do so, construct two state notes and items,
const [notes,setNotes] = useState([]);
const [items,setItems] = useState("");
Then return to the code and implement the useEffect functionality. By using this Hook, you tell React that your component needs to do something after render. React will remember the function you passed (we’ll refer to it as our “effect”), and call it later after performing the DOM updates. To this effect, we set the document title, but we could also perform data fetching or call some other imperative API. Placing useEffect() inside the component lets us access the count state variable (or any props) right from the effect. We don’t need a special API to read it — it’s already in the function scope. Hooks embrace JavaScript closures and avoid introducing React-specific APIs where JavaScript already provides a solution.useEffect() hook is somewhat similar to the life-cycle methods that we are aware of for class components. It runs after every render of the component including the initial render. Hence it can be thought of as a combination of componentDidMount, componentDidUpdate, and componentWillUnmount.If we want to control the behavior of when the effect should run (only on initial render, or only when a particular state variable changes), we can pass in dependencies to the effect to do so. This hook also provides a clean-up option to allow cleaning up of resources before the component is destroyed. basic syntax of the effect:useEffect(didUpdate);
Here, didUpdate is a function that performs mutations, subscriptions, timers, logging, etc. It will get triggered after the component is rendered to the screen as well as on every subsequently completed render.
useEffect(() => {
  axios.get("http://localhost:4000").then((response) => {
    let data = [];
    for (var i = 0; i < response.data.data.length; i++) {
      data.push(response.data.data[i].note);
    }
    setNotes(data);
  });
}, []);
and after implementing useEffect functionality create two function called clickHandler and changeHandler .
const changeHandler = (e) => {
  setItems(e.target.value);
};
and
const clickHandler = async (e) => {
  axios({
    method: "post",
    url: "http://localhost:4000",
    data: {
      note: items,
    },
  })
    .then(() => {
      setItems("");
    })
    .then(() => {
      window.location.reload(false);
    });
};
After you've built everything you need, simply return the following statement.
return (
  <div className="conatiner__back">
    <input
      className="todo-input"
      placeholder="Organize and keep track of newly explored awesome projects."
      type="text"
      onChange={changeHandler}
    />
    <button className="todo-button" type="submit" onClick={clickHandler}>
      ➕ Add Notes
    </button>
    <small style={{ color: "white", fontSize: "10px" }}>
      * all notes will get stored inside MongoDB
    </small>
    <div className="notes__layout">
      <ol className="gradient-list">
        {notes.map((note) => (
          <li key={note._id}>{note}</li>
        ))}
      </ol>
    </div>
  </div>
);
This is how your final code should look like.
// pages/TakeNote.js
import React, { useState, useEffect } from "react";
import axios from "axios";
import "./TakeNote.css";

const TakeNote = () => {
  const [notes, setNotes] = useState([]);
  const [items, setItems] = useState("");
  const changeHandler = (e) => {
    setItems(e.target.value);
  };
  const clickHandler = async (e) => {
    axios({
      method: "post",
      url: "http://localhost:4000",
      data: {
        note: items,
      },
    })
      .then(() => {
        setItems("");
      })
      .then(() => {
        window.location.reload(false);
      });
  };

  useEffect(() => {
    axios.get("http://localhost:4000").then((response) => {
      let data = [];
      for (var i = 0; i < response.data.data.length; i++) {
        data.push(response.data.data[i].note);
      }
      setNotes(data);
    });
  }, []);

  return (
    <div className="conatiner__back">
      <input
        className="todo-input"
        placeholder="Organize and keep track of newly explored awesome projects."
        type="text"
        onChange={changeHandler}
      />
      <button className="todo-button" type="submit" onClick={clickHandler}>
        ➕ Add Notes
      </button>
      <small style={{ color: "white", fontSize: "10px" }}>
        * all notes will get stored inside MongoDB
      </small>
      <div className="notes__layout">
        <ol className="gradient-list">
          {notes.map((note) => (
            <li key={note._id}>{note}</li>
          ))}
        </ol>
      </div>
    </div>
  );
};

export default TakeNote;
Lastly, make a TakeNote.css file inside the TakeNote and add the styles listed below to it.
// TakeNote.css
@import url("https://fonts.googleapis.com/css2?family=Finger+Paint&display=swap");

.conatiner__back {
  text-align: center;
  background-color: transparent;
}

.todo-button {
  background-image: linear-gradient(
    to right,
    #02aab0 0%,
    #00cdac 51%,
    #02aab0 100%
  );
}
.todo-button {
  margin: 0 auto;
  padding: 10px 100px;
  margin-top: 10px;
  text-align: center;
  text-transform: uppercase;
  transition: 0.5s;
  background-size: 200% auto;
  color: white;
  box-shadow: 0 0 20px #eee;
  border-radius: 10px;
  display: block;
  outline: none;
}

.todo-button:hover {
  background-position: right center;
  color: #fff;
  text-decoration: none;
}

.todo-input {
  color: white;
  font-size: 1.2rem;
  font-family: "Finger Paint", cursive;
  margin: 0 auto;
  padding: 1rem 0.5rem;
  border-radius: 0.6rem;
  /* background-color: rgb(255, 255, 255); */
  background: url("../../assets/gifs/inputBack.gif");
  -webkit-background-size: cover;
  -moz-background-size: cover;
  -o-background-size: cover;
  background-size: cover;
  border: none;
  width: 50rem;
  display: block;
  border-bottom: 1rem solid transparent;
  transition: all 0.3s;
  outline: none;
}

@media only screen and (max-width: 900px) {
  .todo-input {
    color: #333;
    font-size: 1.2rem;
    margin: 0 auto;
    padding: 1rem 0.5rem;
    border-radius: 0.6rem;
    background-color: rgb(255, 255, 255);
    border: none;
    width: 100%;
    display: block;
    border-bottom: 1rem solid transparent;
    transition: all 0.3s;
  }
}

/* ------------------------------------------------- */

ol.gradient-list > li::before,
ol.gradient-list > li {
  box-shadow: 0.25rem 0.25rem 0.6rem rgba(0, 0, 0, 0.05),
    0 0.5rem 1.125rem rgba(75, 0, 0, 0.05);
}

/*** STYLE ***/
*,
*:before,
*:after {
  box-sizing: border-box;
}

.notes__layout {
  display: block;
  margin: 0 auto;
  max-width: 40rem;
  padding: 1rem;
}

ol.gradient-list {
  list-style: none;
  margin: 1.75rem 0;
  padding-left: 1rem;
}
ol.gradient-list > li {
  background: white;
  text-align: left;
  font-family: "Finger Paint", cursive;
  border-radius: 0 0.5rem 0.5rem 0.5rem;
  counter-increment: gradient-counter;
  margin-top: 2rem;
  min-height: 3rem;
  border-radius: 20px;
  padding: 1rem 1rem 1rem 3rem;
  position: relative;
}
ol.gradient-list > li::before,
ol.gradient-list > li::after {
  background: linear-gradient(90deg, #83e4e2 0%, #a2ed56 100%);
  border-radius: 5rem 5rem 0 5rem;
  content: "🔖";
  height: 2.5rem;
  left: -1rem;
  overflow: hidden;
  position: absolute;
  top: -2rem;
  width: 3rem;
}
ol.gradient-list > li::before {
  align-items: flex-end;
  content: counter(gradient-counter);
  color: #1d1f20;
  display: flex;
  font: 1000 1.5em/1 "Montserrat";
  justify-content: center;

  justify-content: flex-end;
  padding: 0.125em 0.25em;
  z-index: 1;
}
ol.gradient-list > li:nth-child(10n + 1):before {
  background: linear-gradient(
    135deg,
    rgba(162, 237, 86, 0.2) 0%,
    rgba(253, 220, 50, 0.2) 100%
  );
}
ol.gradient-list > li:nth-child(10n + 2):before {
  background: linear-gradient(
    135deg,
    rgba(162, 237, 86, 0.4) 0%,
    rgba(253, 220, 50, 0.4) 100%
  );
}
ol.gradient-list > li:nth-child(10n + 3):before {
  background: linear-gradient(
    135deg,
    rgba(162, 237, 86, 0.6) 0%,
    rgba(253, 220, 50, 0.6) 100%
  );
}
ol.gradient-list > li:nth-child(10n + 4):before {
  background: linear-gradient(
    135deg,
    rgba(162, 237, 86, 0.8) 0%,
    rgba(253, 220, 50, 0.8) 100%
  );
}
ol.gradient-list > li:nth-child(10n + 5):before {
  background: linear-gradient(135deg, #a2ed56 0%, #fddc32 100%);
}
ol.gradient-list > li:nth-child(10n + 6):before {
  background: linear-gradient(
    135deg,
    rgba(162, 237, 86, 0.8) 0%,
    rgba(253, 220, 50, 0.8) 100%
  );
}
ol.gradient-list > li:nth-child(10n + 7):before {
  background: linear-gradient(
    135deg,
    rgba(162, 237, 86, 0.6) 0%,
    rgba(253, 220, 50, 0.6) 100%
  );
}
ol.gradient-list > li:nth-child(10n + 8):before {
  background: linear-gradient(
    135deg,
    rgba(162, 237, 86, 0.4) 0%,
    rgba(253, 220, 50, 0.4) 100%
  );
}
ol.gradient-list > li:nth-child(10n + 9):before {
  background: linear-gradient(
    135deg,
    rgba(162, 237, 86, 0.2) 0%,
    rgba(253, 220, 50, 0.2) 100%
  );
}
ol.gradient-list > li:nth-child(10n + 10):before {
  background: linear-gradient(
    135deg,
    rgba(162, 237, 86, 0) 0%,
    rgba(253, 220, 50, 0) 100%
  );
}
ol.gradient-list > li + li {
  margin-top: 2rem;
}
The application's full source code is available here.
Main article available here => https://aviyel.com/post/1419
Happy Coding!!
Follow @aviyelHQ or sign-up on Aviyel for early access if you are a project maintainer, contributor, or just an Open Source enthusiast.
Join Aviyel's Discord => Aviyel's world
Twitter =>[https://twitter.com/AviyelHq]
20