
25
How to deploy the Front-end(React) and Backend(Django) with Postgres at Heroku
Hey Everyone, I am pleased to announce that I and My friend(@thekrprince) has launched a new website called Task Tracker. (@thekrprince) developed the front-end and I developed the backend.
I deployed the Task Tracker at Heroku. In this blog I will share each steps what needs to be followed for deploying a full stack web application without any cost. Below are the steps to deploy Full stack web app using Heroku.
Front-End Setup
├── node_module
├── public
│   ├── favicon.ico
│   ├── index.html
│   ├── manifest.json
├── src
│   ├── App.css
│   ├── App.js
│   ├── App.test.js
│   ├── index.css
│   ├── index.js
│   ├── setupTests.js
├── .gitignore
├── package-lock.json
├── package.json
├── README.md
├── requirements.txt2.Install
axios which is simple promise based HTTP client for the browser & node.js.npm install axios3.Add
proxy at package.json.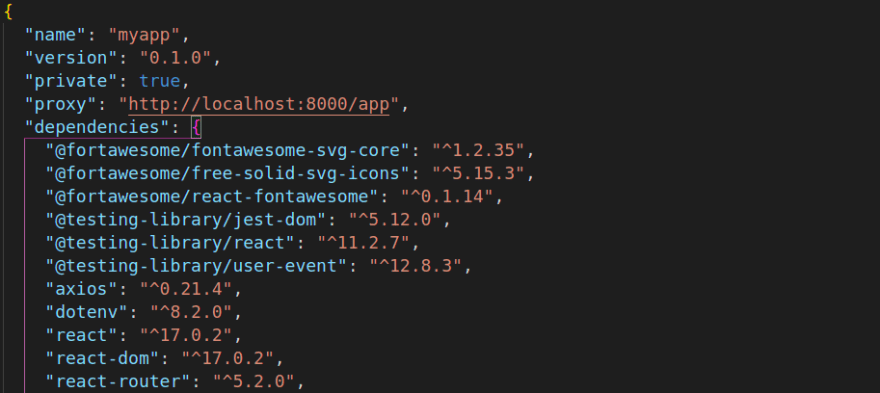
4.As we are going to deploy this app at Heroku, we have to add
npm & node version inside engines at package.json.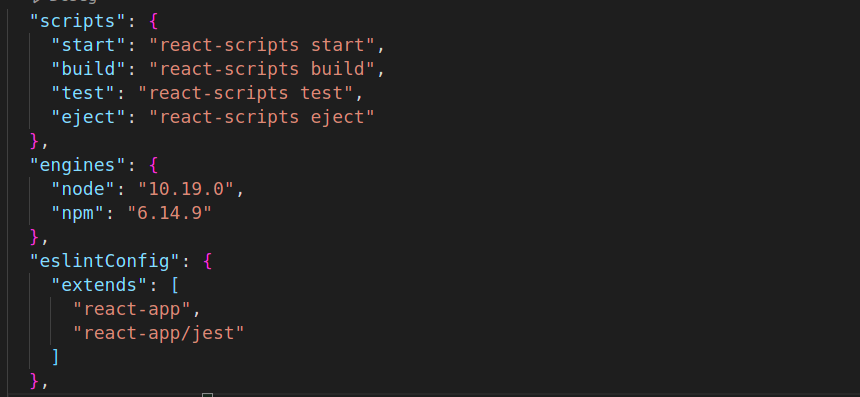
5.Django protects the server from malicious websites. So protect it by adding built-in feature. Add below code at
index.js.
Backend Setup
1.Back-end folder at root directory of git. Don't add your code under sub folder. Because Heroku need to understand which languages you are using.Check the below structure for your project and app.
├── node_module
├── public
│   ├── favicon.ico
│   ├── index.html
│   ├── manifest.json
├── src
│   ├── App.css
│   ├── App.js
│   ├── App.test.js
│   ├── index.css
│   ├── index.js
│   ├── setupTests.js
├── ToDoProject
│   ├── __init__.py
│   ├── __pycache__
│   ├── asgi.py
│   ├── settings.py
│   ├── urls.py
│   └── wsgi.py
├── todoapp
│   ├── __init__.py
│   ├── __pycache__
│   ├── admin.py
│   ├── apps.py
│   ├── models.py
│   ├── serializers.py
│   ├── tests.py
│   ├── urls.py
│   |── utils.py
│   |── views.py
├── .gitignore
├── manage.py
├── package-lock.json
├── package.json
├── README.md
├── requirements.txt
2.Add application at
INSTALLED_APPS in Settings.py.
3.We need to install few dependencies. Add below dependencies in your
requirements.txt
python-decouple: We can remove sensitive data like SEECERT_KEY, DB Password from settings.py and add it in .env file.
django-heroku: We have to Configure Django app for Heroku. This lib provides settings, logging and test runner configurations.
django: This will install the django.
djangorestframework: For creating the rest framework APIs we need to install it.
django-cors-headers: Django CORS(Cross Origin Resource Sharing) header allow resources to be accessed from other domains(i.e you can access your data from front-end domain).
gunicorn: Python WSGI HTTP Server.
whitenoise: This module helps to manage the static media for your application. This need to be added as a middleware in Django settings.py.
psycopg2: Psycopg is a PostgreSQL adapter for the Python programming language.
dj-database-url: This simple Django utility allows you to utilize the 12factor inspired DATABASE_URL environment variable to configure your Django application.
4.Add
rest_framework, corsheaders and whitenoise.runserver_nostatic in INSTALLED_APPS in Settings.py.
5.Add
Add
corsheaders and whitenoise as a middleware in Middleware section. Add
CORS_ORIGIN_ALLOW_ALL as True after Middleware.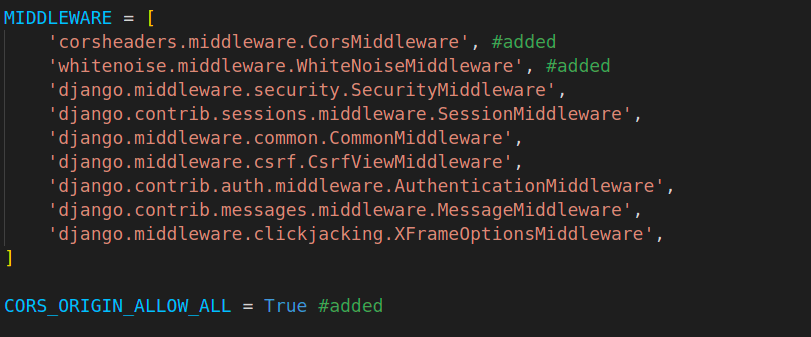
6.Import below requirements at
Settings.py.
7.Configure your
.env(This file is added at.gitignore file) file like below then configure you Database and add dj_database_url after DATABASES in Settings.py.
.env
SECRET_KEY =  xcr3tps4......
DEBUG = FALSE
DB_NAME = <DB_NAME>
USER_NAME = <USER_NAME>
PASSWORD = <PASSWORD>
HOST = localhost
8. We need to include react
build template at django templates in Settings.py.
9.Add below configurations in
Settings.py. STATICFILES_DIRS pointing tobuild/static path as React contains the static file to this path.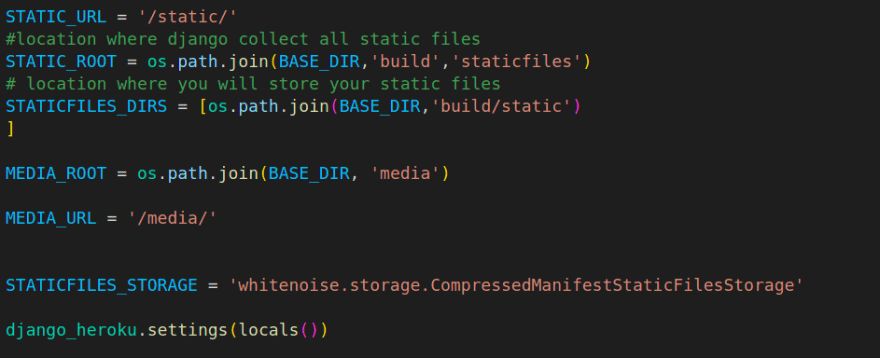
10.Add

index.html or home.html at urls.py(inside ToDoProject).3.Login to heroku account using
heroku login command.4.Create an app either using CLI or Heroku Dashboard.
CLI
heroku create <APP_NAME>Dashboard

5.Add Heroku remote.
heroku git:remote -a tasktrackerapps6.Add this app name into the
ALLOWED_HOSTS section at Settings.py.ALLOWED_HOSTS = ['localhost','127.0.0.1','tasktrackerapps.herokuapp.com']7.Heroku needs to understand what types of application you are going to deploy. So, Heroku introduced
buid packs. This is responsible to run dependencies of your application as well. CLI
$ heroku buildpacks:add --index 1 heroku/nodejs
$ heroku buildpacks:add --index 2 heroku/python
Dashboard

8.We have
.env file configuration from backend(steps 7). We should make sure that Heroku get those value from .env. But these values are not present at my github repo. Let's add those values using below techniques.
heroku config:set DEBUG=FALSE
heroku config:set SECRET_KEY=<SECRET_KEY>
heroku config:set DB_NAME=<DB_NAME>
heroku config:set USER_NAME=<USER_NAME>
heroku config:set PASSWORD=<PASSWORD>
heroku config:set HOST=localhost
Dashboard

9.Make sure all the config variables are added successfully else you might encounter an error while deploying the app.
heroku config10.Now come to Postgres configuration.
CLI
heroku addons:create heroku-postgresql:hobby-devheroku config | grep DATABASE_URL
OR
heroku pg:infoDashboard
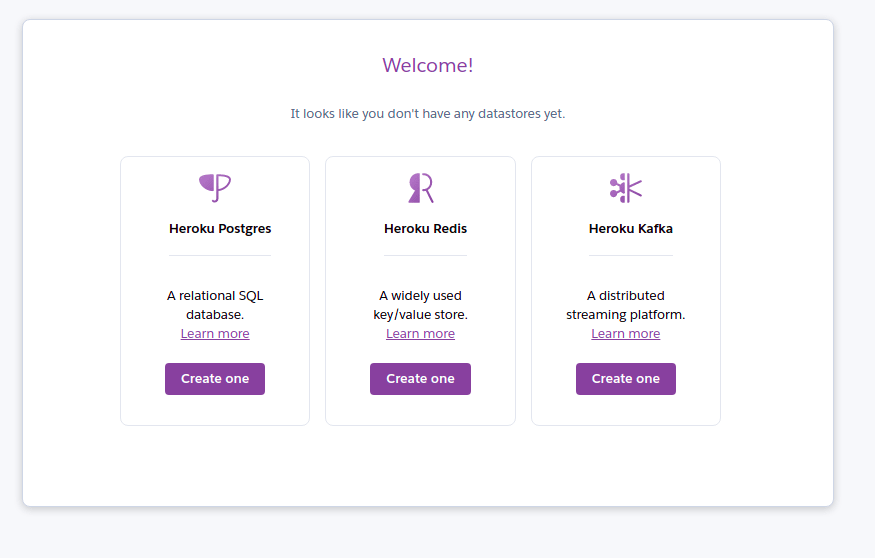
Click on Create One under Heroku Postgres.
Click on Install Heroku Postgres.

add-on plan accordingly. I have chosen Hobby dev-free plan for tasktrackerapps app. It provides 1GB available free Postgres database.

Click on Submit Form.

Confirm database created.

11.You can push your local database to Heroku Postgres.
PGUSER=<USER_NAME> PGPASSWORD=<PASSWORD>  heroku pg:push postgres://<HOST>/<DB_NAME>  <HERUKO_POSTGRES_DB_NAME>

Example:
PGUSER=postgres PGPASSWORD=postgres heroku pg:push postgres://localhost/taskapp postgresql-triangular-0805812.Avoid staticfile related error at heroku by disabling
collectstatic.heroku config:set DISABLE_COLLECTSTATIC=113.Create a file and name it Procfile. Add below code on it.
web: gunicorn <Project_Name_Which_Contains_Settings.py>.wsgi --log-file -14.You must add the python version that supported by Heroku runtime at runtime.txt.
python-3.9.9├── node_module
├── public
│ ├── favicon.ico
│ ├── index.html
│ ├── manifest.json
├── src
│ ├── App.css
│ ├── App.js
│ ├── App.test.js
│ ├── index.css
│ ├── index.js
│ ├── setupTests.js
├── ToDoProject
│ ├── __init__.py
│ ├── __pycache__
│ ├── asgi.py
│ ├── settings.py
│ ├── urls.py
│ └── wsgi.py
├── todoapp
│ ├── __init__.py
│ ├── __pycache__
│ ├── admin.py
│ ├── apps.py
│ ├── models.py
│ ├── serializers.py
│ ├── tests.py
│ ├── urls.py
│ |── utils.py
│ |── views.py
├── .gitignore
├── manage.py
├── package-lock.json
├── package.json
├── Procfile
├── README.md
├── requirements.txt
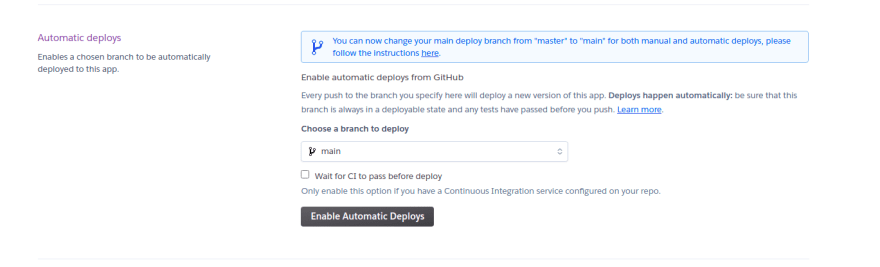
├── runtime.txt15.I have chosen Github as a deployment method and connected with profile.

14.Enabled automatic deployment. Once you pushed the code, deploy the app on heroku.
Open app and check if it the app successfully deployed or not.For any application issue try with below command.
heroku logs --tailAs you see it's very simple to deploy your application at Heroku. If you face any issue feel free to comment your issue here. I would love to help you out.😄
Thank you so much for reading.✌🏻
25