22
Building an Ethereum Gas Tracker

The London Hard Fork in August 2021 brought about one of the biggest upgrades that the Ethereum network has ever witnessed. The fork implemented EIP-1559; a gas pricing mechanism that is touted to be superior to the blind auction model. It also introduced fundamental changes in the monetary policy of Ether (ETH), making it a deflationary currency at least in the short term.
In this tutorial, we will build a gas tracker that tracks the two new components of gas fees in EIP-1559 as well as other statistics (such as block volume) for the latest 20 blocks. By doing so, we will achieve two important goals:
In order to do this, we will use Alchemy, the Alchemy web3.js library, Node, and React. Don't worry if some of these words sound alien to you, we will cover them in detail!
This tutorial does assume that you have a basic understanding of how gas and gas prices work on Ethereum though. A preliminary understanding of EIP-1559 is also helpful but not required. In case you need a primer, I strongly suggest going through this excellent article on Alchemy's blog.
EIP-1559 brought about the following changes in the gas pricing mechanism of Ethereum.
Apart from improving gas pricing, EIP-1559 also proposed an improvement to better equip the network in handling sudden spikes in traffic. As you may know, transactions in Ethereum are grouped into blocks. Prior to the fork, a block could hold only 15 million gas worth of transactions regardless of the volume of traffic.
With the upgrade, the upper limit of block size has been doubled to 30 million gas. This has been done so that periods of increased demand can be handled better. The expectation, however, is that the base fee will adjust in such a way that block volumes (or gas used by a block) averages at around 50% or 15 million gas.
You will be able to see how all of this works in real time with the gas tracker that we build. We will be building this project in two parts: in the first part, we will write a node script that will track transaction fee history in real time. In the second part, we will create a React app leveraging this script to build our final tracker.
In this section, we will write a script (in node) that will allow us to get the gas fee history of the latest 20 blocks on the Ethereum network.

Make sure you have node and npm installed on your local computer (at least v14 or higher). You can download it here
In order to get the latest gas fee history of blocks, we will have to connect to and communicate with the Ethereum network. Alchemy is a blockchain developer platform that allows us to do this without having to spin up our own nodes.
You can create an Alchemy account for free here.

Create an app on the Alchemy dashboard. Set the chain to Ethereum and the network to Mainnet.

Next, visit your app's page and click on View Key. This will open a popup with the HTTP and Websocket URLs of your app. For this tutorial, we will be using the websocket URL.
We are now in a good position to start writing our node script. Let's create an empty repository and install dependencies. For this script, we will be requiring the Alchemy web3.js library.
On your Terminal (or Command Prompt), run the following commands:
> mkdir gas-tracker-script && cd gas-tracker-script
> npm init -y
> npm install --save @alch/alchemy-web3
> touch main.js
This should create a repository named
gas-tracker-script that holds all the files and dependencies we need. Open this repo in you favorite code editor. We will be writing all our code in the main.js file.Creating a client instance with Alchemy web3 is incredibly simple.
In the
main.js file, add the following lines of code:const { createAlchemyWeb3 } = require("@alch/alchemy-web3");
// Using WebSockets
const web3 = createAlchemyWeb3(
"wss://eth-mainnet.alchemyapi.io/v2/<--API KEY-->",
);Make sure to replace the placeholder above with the websocket URL of your app.
We want to get the gas fees history of the last 10 blocks. Data we're interested in includes the base fee, range of priority fees, block volume, and block number.
Fortunately for us, Alchemy has a very convenient eth_feeHistory that returns all the aforementioned data automatically.
All we need to specify is the newest block we want data for, the total number of blocks to look at, and the percentile ranges for priority fees.
We are interested in the latest 20 blocks and the 25th, 50th, and 75th percentile of priority fees.
web3.eth.getFeeHistory(20, "latest", [25, 50, 75]).then(console.log)Running this script (using
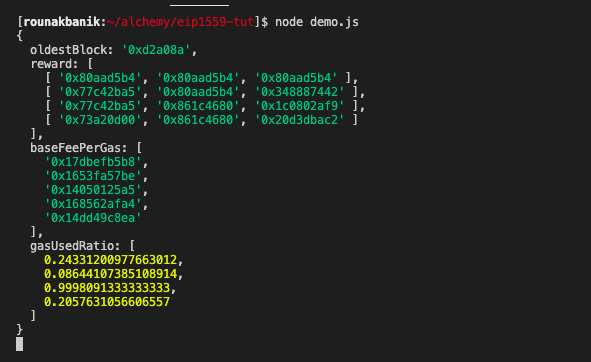
node main.js) should fetch you the data you're looking for. Here is some data I received after requesting for 5 blocks worth of data.
The output we received in step 5 is correct but is not very readable. The fees are expressed in hexadecimals and the data structure makes it difficult to figure out which data corresponds to which block.
Let's write a small function that transforms the raw data into a list of dictionaries where each dictionary will contain data on a particular block. The function also converts all hexadecimal gas values denominated in wei to decimals denominated in Gwei.
const formatOutput = (data, numBlocks) => {

    let blocks = []
    for (let i = 0; i < numBlocks; i++) {
        blocks.push({
            blockNumber: Number(data.oldestBlock) + i,
            reward: data.reward[i].map(r => Math.round(Number(r) / 10 ** 9)),
            baseFeePerGas: Math.round(Number(data.baseFeePerGas[i]) / 10 ** 9),
            gasUsedRatio: data.gasUsedRatio[i],
        })
    }
    return blocks;
}
Finally, let's use this function is callback of
feeHistory.const numBlocks = 5;
web3.eth.getFeeHistory(numBlocks, "latest", [25, 50, 75]).then((data) => {
const blocks = formatOutput(data, numBlocks);
console.log(blocks);
});Running this version of the script should yield output in the following format:

A new block gets added to the Ethereum blockchain approximately every 15 seconds. Therefore, we would ideally want to subscribe to the event of blocks being added and update our transaction history such that it always shows data for the latest 20 blocks.
Let's nest the
getFeeHistory functionality within a subscription event callback.let subscription = web3.eth.subscribe('newBlockHeaders');
subscription.on("data", () => {
web3.eth.getFeeHistory(numBlocks, "latest", [25, 50, 75]).then((data) => {
const blocks = formatOutput(data, numBlocks);
console.log(blocks);
});
});Running the
main.js script now will output the freshest batch of data every 15 seconds or so. If you've come this far, congratulations! You now have a fully functional gas tracker.
In the previous section, we wrote a script that retrieved the fee history of the last 20 blocks every time a new block was added to the Ethereum mainnet.
In this section, we will build a small React app that transports this data from our terminal to the browser. In addition to fee transaction history, we will also display the average gas fees and block volumes over the last 20 blocks.
Run the following commands:
> npx create-react-app gas-tracker-frontend
> cd gas-tracker-frontend
This should create a sample React project. Apart from the react dependencies, we will also need to install the Alchemy web3 library from the previous section.
> npm install --save @alch/alchemy-web3All our logic will reside in the
App.js file. Copy the following contents into the aforementioned file.import './App.css';
import { useEffect, useState } from 'react';
import { createAlchemyWeb3 } from '@alch/alchemy-web3';
const NUM_BLOCKS = 20;
function App() {
const [blockHistory, setBlockHistory] = useState(null);
const [avgGas, setAvgGas] = useState(null);
const [avgBlockVolume, setAvgBlockVolume] = useState(null);
const formatOutput = (data) => {
let avgGasFee = 0;
let avgFill = 0;
let blocks = [];
for (let i = 0; i < NUM_BLOCKS; i++) {
avgGasFee = avgGasFee + Number(data.reward[i][1]) + Number(data.baseFeePerGas[i])
avgFill = avgFill + Math.round(data.gasUsedRatio[i] * 100);
blocks.push({
blockNumber: Number(data.oldestBlock) + i,
reward: data.reward[i].map(r => Math.round(Number(r) / 10 ** 9)),
baseFeePerGas: Math.round(Number(data.baseFeePerGas[i]) / 10 ** 9),
gasUsedRatio: Math.round(data.gasUsedRatio[i] * 100),
})
}
avgGasFee = avgGasFee / NUM_BLOCKS;
avgGasFee = Math.round(avgGasFee / 10 ** 9)
avgFill = avgFill / NUM_BLOCKS;
return [blocks, avgGasFee, avgFill];
}
useEffect(() => {
const web3 = createAlchemyWeb3(
"wss://eth-mainnet.alchemyapi.io/v2/<--API KEY-->",
);
let subscription = web3.eth.subscribe('newBlockHeaders');
subscription.on('data', () => {
web3.eth.getFeeHistory(NUM_BLOCKS, "latest", [25, 50, 75]).then((feeHistory) => {
const [blocks, avgGasFee, avgFill] = formatOutput(feeHistory, NUM_BLOCKS);
setBlockHistory(blocks);
setAvgGas(avgGasFee);
setAvgBlockVolume(avgFill);
});
});
return () => {
web3.eth.clearSubscriptions();
}
}, [])
return (
<div className='main-container'>
<h1>EIP-1559 Gas Tracker</h1>
{!blockHistory && <p>Data is loading...</p>}
{avgGas && avgBlockVolume && <h3>
<span className='gas'>{avgGas} Gwei</span> | <span className='vol'>{avgBlockVolume}% Volume</span>
</h3>}
{blockHistory && <table>
<thead>
<tr>
<th>Block Number</th>
<th>Base Fee</th>
<th>Reward (25%)</th>
<th>Reward (50%)</th>
<th>Reward (75%)</th>
<th>Gas Used</th>
</tr>
</thead>
<tbody>
{blockHistory.map(block => {
return (
<tr key={block.blockNumber}>
<td>{block.blockNumber}</td>
<td>{block.baseFeePerGas}</td>
<td>{block.reward[0]}</td>
<td>{block.reward[1]}</td>
<td>{block.reward[2]}</td>
<td>{block.gasUsedRatio}%</td>
</tr>
)
})}
</tbody>
</table>}
</div>
);
}
export default App;Since this isn't a React course, we are not doing to dive deep into the React-specific bits. But you should be able to observe that all that we're doing is retrieving fee history like we did in our script and outputting it in the form of an HTML table.
The only additional logic we employ is computing average gas price and average block volumes over 20 blocks which is a trivial task to perform.
You can add some basic styles in the
App.css file as follows:.main-container {
text-align: center;
}
table {
border-collapse: collapse;
margin: 20px auto;
box-shadow: 0 8px 16px 0 rgba(0,0,0,0.2);
}
thead {
background: linear-gradient(267.45deg,#05d5ff -34.23%,#53f 99.39%);
color: white;
padding: 10px;
}
th {
font-size: 18px;
padding: 15px;
}
tbody > tr {
border-top: 1px solid #ccc;
border-bottom: 1px solid #ccc;
margin: 0px;
padding: 15px;
}
td {
padding: 6px;
}
.gas {
color: #4299E1;
}
.vol {
color: #4C51BF;
}We're all done. Watch your app in all its glory by running:
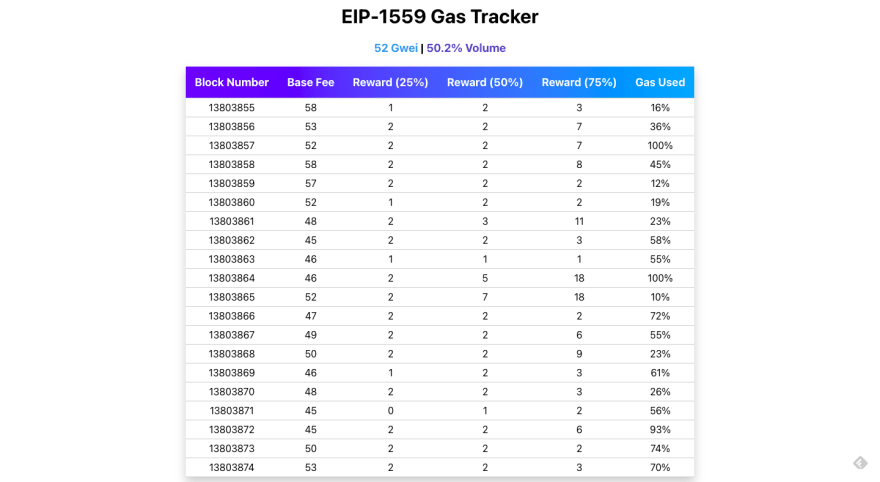
npm startThis is what the app should look like:

Congratulations! You've built a fully functional gas tracker app.
Let's take a step back and analyze the data above. Here are a few things we can observe which are a direct result of the EIP-1559 implementation.
The data does seem to suggest that gas fees in this model is much more predictable. Since everyone pays the same base fee and the priority fee, in most cases, is a small percentage of total fee, most transactions don't end up overpaying for gas. Therefore, this small sample of data suggests that EIP-1559 has succeeded in what it set out to achieve: more predictable gas prices, and less overpayment in gas.
We've covered a lot of ground in this article. By building an EIP-1559 gas tracker from scratch, I hope you were able to grasp and appreciate the improvement it brings to transacting on Ethereum.
I also hope that you've gotten a decent grasp on how to use Alchemy, its APIs, and the web3.js library. We've barely scratched the surface with respect to its capabilities and offerings. I strongly suggest you dig more into their documentation if and when you set out to build your next great dapp.
Until next time!
22
