29
YugabyteDB on OCI Free Tier
I have many friends with an always free tier VM on the Oracle Cloud. 1/8th of Intel Core, 1GB RAM... that's not a lot but sufficient to get a try at YugabyteDB. Having a VM always up is very handy. I use one of them to validate my blog posts and even let the credentials public if someone wants to try.
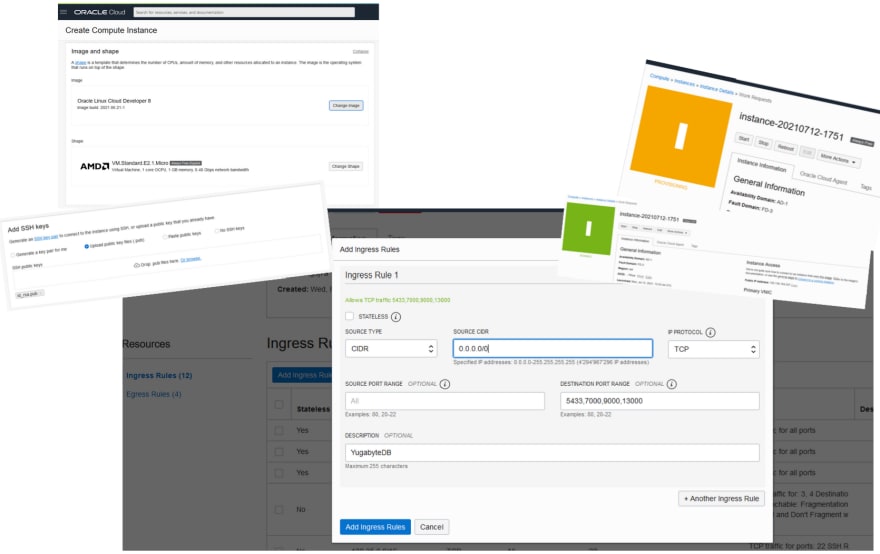
So here it is, you probably know how to create a free-tier VM. I create one from the Oracle Linux Cloud Developer (a OL8 with GCC toolset 10, go, python, GraalVM,...). The only additional thing I do is open the ports 5433, 7000, 9000, 13000 to connect to the database and to access the master and tserver metrics.
Once created (few minutes) you can ssh to it with the key for which you uploaded the the public key:
ssh -i ~/.ssh/id_rsa opc@150.136.164.237Because I'm lazy, I retrieve the last version number from the latest releases web page:
ver=$(curl -s https://docs.yugabyte.com/latest/releases/whats-new/latest-release/ | awk -F"-" '/https:[/][/]downloads.yugabyte.com[/]yugabyte-.*linux.tar.gz/{sub(/-linux.tar.gz.*/,"");print $NF;exit}' | tee /dev/stderr )I use this $ver environment variable to get the software and untar it, and go to the directory:
curl https://downloads.yugabyte.com/yugabyte-${ver}-linux.tar.gz | tar zxf -
cd yugabyte-$ver
Run the setup:
bin/post_install.shNow as root I increase the limits:
sudo echo '* - nofile 1048576' | sudo tee /etc/security/limits.d/99-yugabyte.confAnd still as root I open the ports:
sudo firewall-cmd --zone=public --permanent --add-port=5433/tcp
sudo firewall-cmd --zone=public --permanent --add-port=7000/tcp
sudo firewall-cmd --zone=public --permanent --add-port=9000/tcp
sudo firewall-cmd --zone=public --permanent --add-port=13000/tcp
sudo firewall-cmd --reload
That's all for the install. I can start the node:
bin/yugabyted start --listen 0.0.0.0I listen on all interfaces enable password authentication. This takes a few seconds and the database is ready, listening on port 5433 for any PostgreSQL compatible client. The displayed address is localhost but as I listen on 0.0.0.0 you can connect from the internet.
I can also connect locally, like here to change the default password and create a user for myself:
bin/yugabyted connect ysql <<< "alter role yugabyte with password 'yb-oci-franck'; create user franck with password 'YugabyteDB';"Note that for the moment there's no authentication. We will restart the server with --ysql_enable_auth=true later
There is also a command to create the Northwind demo schema:
bin/yugabyted demo connect <<< "grant all privileges on all tables in schema public to franck;"This creates the demo schema the first time (a few minutes on this free instance with limited CPU) and connects, and this is where I grant all privileges to my user.
I restart now enabling authentication:
bin/yugabyted stop
bin/yugabyted start --tserver_flags="ysql_enable_auth=true"
Let's show the connection string:
echo "psql postgres://franck:YugabyteDB@$(curl -s ifconfig.me):5433/yb_demo_northwind"You can connect from internet with this psql command. Or DBeaver providing this host, port and credentials. Or actually anything where you can choose the PostgreSQL driver. Please give me some feedback, here in comments, or on Twitter. And of course our yugabyte-db Slack where we can answer your questions. And I forgot the most important: when you start the server you may find a link to get your T-Shirt 👕
Want to run a K8s cluster? Stay tuned on https://blog.yugabyte.com/ I'll explain how to install YugabyteDB on OKE. Want a larger free VM? Again, follow to see how to install on the free 4 vCPU Ampere...

