Building A Payment Application using Python Flask Framework, Docker and the Beyonic API.

In this article, we are going to learn how to create a payment application using Python flask framework, Docker and the Beyonic API.

If you want some basics on how to use Flask to build web applications or APIS, I recommend you to read my previous article on Getting Started with Python Web Development 👇🏻

Beyonic Api

The Beyonic API is a REST based application programming interface that lets you extend the Beyonic dashboard features into your application and systems, allowing you to build amazing payment experiences.

With the Beyonic API you can:

  • Receive and send money and prepaid airtime.
  • List currencies and networks supported by the Beyonic API.
  • Check whether a bank is supported by the Beyonic API.
  • View your account transactions history.
  • Add, retrieve, list, and update contacts to your Beyonic account.
  • Use webhooks to send notifications to URLs on your server that when specific events occur in your Beyonic account (e.g. payments).

Getting Help

For usage, general questions, and discussions about the Beyonic API the best place to go to is Beyhive Slack Community, also feel free to clone and edit this repository to meet your project, application or system requirements.

You can download all code snippets used in this article from this GitHub repository 👇🏻

GitHub logo HarunMbaabu / BeyonicAPI-Python-Examples

Beyonic API Python official client library simplified examples using Flask, Django and Fast API.

Beyonic API Python Examples.

The beyonic APIs Docs Reference: https://apidocs.beyonic.com/

Discuss Beyonic API on slack

The Beyonic API is a representational state transfer, REST based application programming interface that lets you extend the Beyonic dashboard features into your application and systems, allowing you to build amazing payment experiences.

With the Beyonic API you can:

  • Receive and send money and prepaid airtime.
  • List currencies and networks supported by the Beyonic API.
  • Check whether a bank is supported by the Beyonic API.
  • View your account transactions history.
  • Add, retrieve, list, and update contacts to your Beyonic account.
  • Use webhooks to send notifications to URLs on your server that when specific events occur in your Beyonic account (e.g. payments).

Getting Help

For usage, general questions, and discussions the best place to go to is Beyhive Slack Community, also feel free to clone and edit this repository to meet your project, application…

To start using the Beyonic Python API, you need to start by downloading the Beyonic API official Python client library and setting your secret key.

Install the Beyonic API Python Official client library.

>>> pip install beyonic

Setting your secret key.

To set the secret key install the python-dotenv modeule, Python-dotenv is a Python module that allows you to specify environment variables in traditional UNIX-like “.env” (dot-env) file within your Python project directory, it helps us work with SECRETS and KEYS without exposing them to the outside world, and keep them safe during development too.

Installing python-dotenv modeule

>>> pip install python-dotenv

Creating a .env file to keep our secret keys.

>>> touch .env

Inside your .env file specify the Beyonic API Token .

.env file

BEYONIC_ACCESS_KEY = "enter your API key here"

You will get your API Token by clicking your user name on the bottom left of the left sidebar menu in the Beyonic web portal and selecting ‘Manage my account’ from the dropdown menu. The API Token is shown at the very bottom of the page.

getExamples.py

import os 
import beyonic
from dotenv import load_dotenv 

load_dotenv()

myapi = os.environ['BEYONIC_ACCESS_KEY']

beyonic.api_key = myapi 

# Listing account: Working. 
accounts = beyonic.Account.list() 
print(accounts)


#Listing currencies: Not working yet.
'''
supported_currencies = beyonic.Currency.list()
print(supported_currencies)

Supported currencies are: USD, UGX, KES, BXC, GHS, TZS, RWF, ZMW, MWK, BIF, EUR, XAF, GNF, XOF, XOF
'''

#Listing networks: Not working yet.
"""
networks = beyonic.Network.list()
print(networks)
"""

#Listing transactions: Working. 
transactions = beyonic.Transaction.list()
print(transactions) 

#Listing contact: Working. 
mycontacts = beyonic.Contact.list() 
print(mycontacts) 


#Listing events: Not working yet.
'''
events = beyonic.Event.list()
print(events)

Error: AttributeError: module 'beyonic' has no attribute 'Event'
'''

You can get these and more examples implemented using flask and Fast API frameworks from the links below:

Dockerfile

A Dockerfile is a text document that contains all the commands a user could call on the command line to assemble an image. Using docker build users can create an automated build that executes several command-line instructions in succession.

FROM python:3.8-slim-buster

COPY . .

COPY ./requirements.txt ./requirements.txt

WORKDIR .

RUN pip install -r requirements.txt

CMD [ "python3", "getExamples.py" ]

Build docker image called demo

>>> docker build -t bey .

Run docker image called demo

>>>docker run -t -i bey

Now, let create a Docker compose file to build and run a docker container using the Docker image we just created.

docker-compose.yml

A docker-compose.yml is a config file for docker-compose. it allows to deploy, combine and configure multiple docker-container at the same time. the Docker "rule" is to outsource every single process to an own docker container.

version: "3.6"
services:
  app:
    build: .
    command: python getExamples.py
    volumes:
      - .:/pythonBeyonicExamples

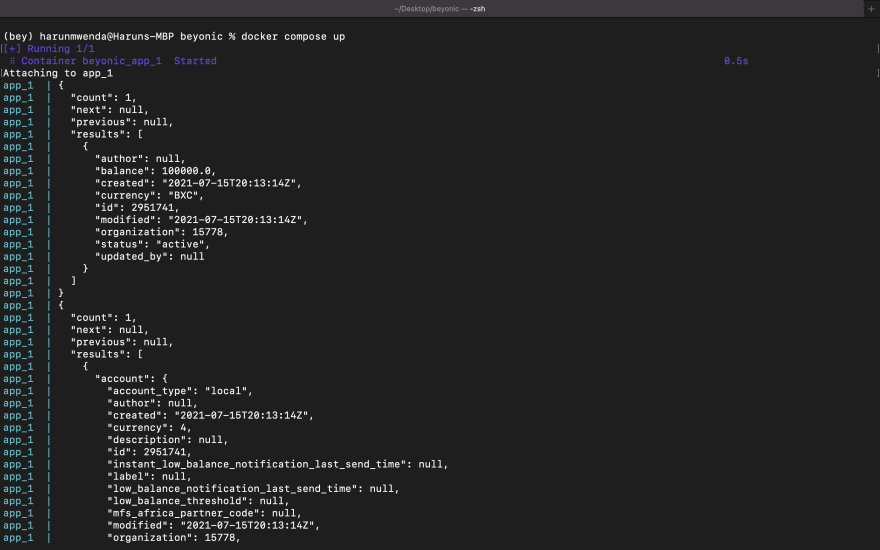
Now we are going to run the following command from the same directory where the docker-compose.yml file is located. The docker compose up command will start and run the entire app.

>>> docker compose up

Output
NB: The screenshot below might differ according to your account deatils and your transcations in deatils.

To stop the container running on daemon mode use the below command.

>>> docker compose stop

Output
image

Contributing to this repository.

All contributions, bug reports, bug fixes, enhancements, and ideas are welcomed. I hope you enjoy reading the article as much as i enjoyed writing it, you can connect with me on twitter 👉🏻 @HarunMbaabu.

18