32
MERN Stack Authentication Tutorial (Part 1 - The Backend)
This tutorial will be split into two parts because its a lengthy, although relatively straightforward, process, so stay tuned for the second part that shows how to implement auth for the frontend (coming very soon). Sadly, we must start with the backend code because most of the authentication code is written here, but this entire process is very intuitive, so make sure to stick until the end!
This article requires that you have already connected your react frontend to your server, but if you haven't, you can check out my previous article about how to do that.
You must first install these 5 packages with npm or yarn:
npm i express
npm i bcrypt
npm i jsonwebtoken
npm i mongoose
npm i body-parser
Why these packages?
- bcrypt is used to hash the password we save to the database and is used later to verify that we entered the right token with each login
- I will explain JSON Web Tokens (JWTs) more later on but in short, the jsonwebtoken package is used to authorize a user (by the way, authorize means to check whether a user has access to a certain resource or route whereas authenticate means to verify that a user is who they claim to be which happens during the login process)
- mongoose is used to connect to our database, but I won't really explain the nitty gritty details of it because this tutorial is about authentication
- Lastly, we have body-parser which just allows us to access post data from React in our post requests
Before we start, we need to create a file structure that looks something like this (I'll explain the purpose of the models directory and users file soon)

The snippet below shows the basic setup of our server.js file and includes connecting to the database as well as including some required body-parser middleware. To get your dbURI, you need to create a collection on MongoDB Atlas, but make sure to save your username and password in environment variables and not directly in the string like I did in my example below

The next step is creating a model that describes how each user will be structured in our database. Typically, users are modeled as an object with these five properties: username, email, password, and id when they were created. MongoDB provides us with the id, but we have to show mongoose what the rest of the data will look like. We can do this by using a Schema which takes in an object representing our data. This model will be called upon later when we create our register route because each user will need to utilize it.

In the snippet above, you can see that we need to specify the data type of each item and whether it should be required by the user or not. In this case, every field is required, and we even have a second parameter that lets us set timestamps for the creation of the database entry.
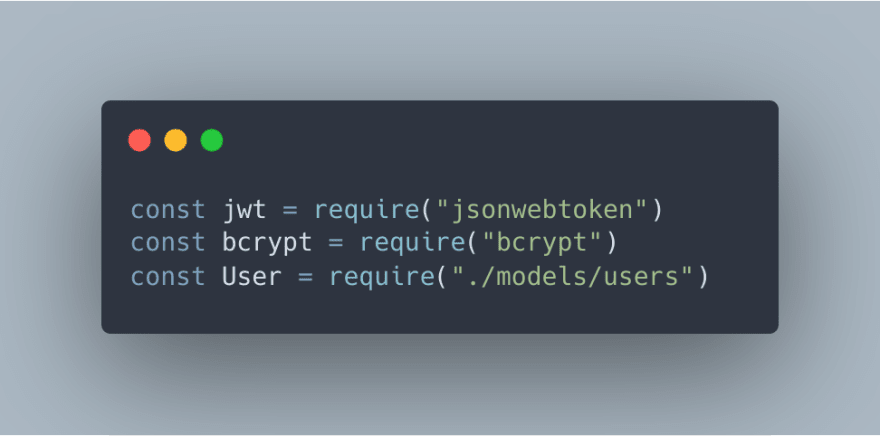
We haven't created the frontend for our registration system yet, but pretend that we have a field for a username, email, and password that posts a JSON object with this data to our "/register" route. Our body parser middleware from above will allow us to access this post data in req.body But first, let's require some helpful modules at the top of our server.js file. JWTs will be used for the login system, but the register route needs access to the User schema and bcrypt as well.

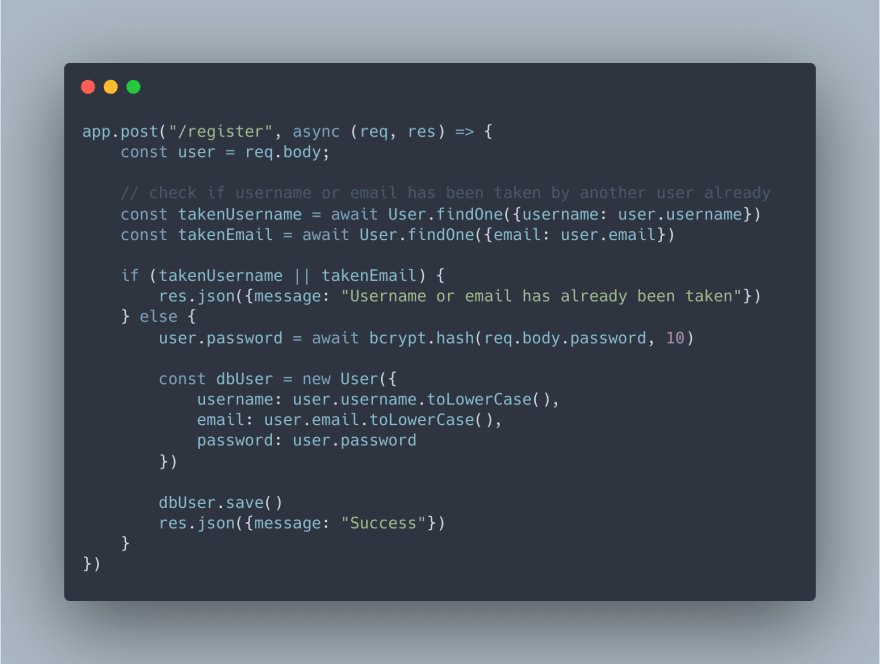
Now we must actually register the user by placing their info into the database as shown in the code snippet below. We start by checking if the username or email is already in the database through mongoose's findOne method with an object providing what we are looking for. Also, make sure that the findOne method is on the User model that we imported from our user.js file and that it is awaited because we don't want to have our if statement happen before we check if the username or email is in the database. After confirming that a user is not already in the database, we use bcrypt to hash the password. The second parameter of bcrypt's hash method describes how many rounds the hashing algorithm should perform, so for mine it would go 2^10 or 1024 times. The higher the number, the harder it is for the password to be brute forced but the more processing time is required. Finally, we can create the user in the database by describing their information in the same way that you specified in the user schema in user.js. We then save it using the .save() method which is asynchronous and can be awaited if you need to do further actions once the database has been updated. One last note about this process is that you should try to keep your res.json() calls consistent for an entire route by having the same keys so that your frontend does not receive undefined when trying to access properties from a server response. This is why I have "message" as a key in all of my res.json() calls.

Before we move any further, our server.js file will get pretty complicated from the login system, so I would advise that you create a separate file for authentication routes and import it into your server.js file (Read about how to do that in this tutorial. For simplicity's sake and because this application has no other features right now, I'm shoving everything into server.js, but this isn't a good practice, so be wary.
Understanding JWTs is an important prerequisite to creating a login route, so I'll explain what they are first. When thinking about how to create an authentication system, you might have pondered over how your application remembers which user is logged in so that it could serve them custom content.
Well, JSON web tokens let you do that. They are encrypted hashes generated on every login that must be decoded to confirm which user is trying to access a resource. When a user logs in, the server will send a token that describes a certain user to the frontend, and that token can then be saved in either localStorage or cookies (so that the token is not lost when the user refreshes the page).
If that's still a little confusing, here's an analogy that I hope can clear it up: You are at a fair (the website) and to get in, you need a ticket (jwt) to get in and access rides (protected routes). Whenever, you want to get on a ride, your ticket (jwt) needs to be verified. If you rip up your ticket, then it becomes destroyed and you can't access rides anymore (deleting your token from localStorage). This means that you're logged out and need to go back to the ticket stand to get another ticket (log back in). And if you come back the next day, your ticket won't be valid anymore (JWTs expire after a specified amount of time).
We will start by creating the logic to create a token when the user logs in, and then we will make a middleware function that verifies the token and is applied to every route that we want to protect.

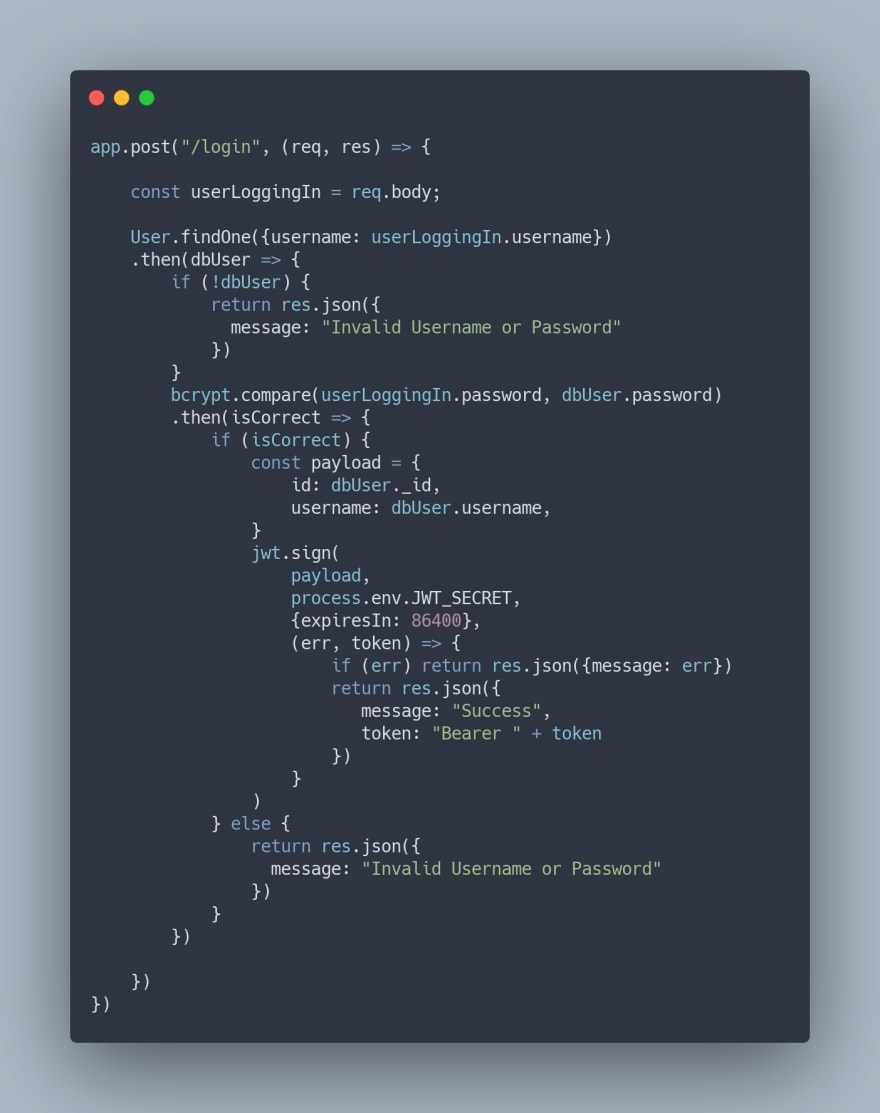
Now bear with me. The code above looks monstrous, but it's actually relatively simple. Let me explain how. This is the login post request where we start by taking in the user information and searching the database for the username. Since this returns a promise, we attach a .then to check if the user exists, and if they don't, we send back a message saying that the username or password is invalid. Pretty simple so far, right? If the user exists, we then validate the password with crypto's compare method which also returns a promise. If this promise resolves, we move on to "signing" the JWT which means that we create the token and send it to the front end. The first parameter of jwt.sign is a payload which is basically the information that you get when you decode the jwt later on. It's ideal to put any information about the current user here, so the username, id, and email should probably go here, especially if your app has a profile page for the current user. The next parameter is a secret key used for encryption which you should store in your environment variables, and the third parameter is an options object in which I specified how long before a token should expire (86400 seconds is equal to 1 day). You can also specify the encryption algorithm here. Finally, the fourth parameter is a callback which you can use to signal a success to the frontend and send the token to be stored on the client side. We need to prepend "Bearer " to the token because it specifies that we're using token based authentication. The alternatives are Basic and Digest authentication which utilize a username and a secret key instead.
Now that we have created a JWT, thus letting a user sign in, we need a way to verify that the same user who logged in is accessing a route. Conveniently the jsonwebtoken library has a .verify() method which helps us do this.
We can create a middleware function to verify a user that is placed before every route we want to protect. If the verification fails, next() is not called in the middleware function and the user can't access data from a certain route. And instead, we can send back an object with properties describing the access capabilities of the user. We can set an isLoggedIn method to false if the verification fails, but if it passes, we can advance to the route and send back isLoggedIn set to true. If we advance to the next route, we can also utilize properties of the specific user that we decoded from the JWT inside of the route call. For example, we can use req.user and set the decoded username and id to req.user.id and req.user.username as shown in the code below.

Looking at the code, we start by getting the token from the request headers, so in our front end, we need to set a header called "x-access-token" and set it to the token which we can get from localStorage. We then split it to remove the "Bearer" which we tagged on earlier because all we need is the token. We then call jwt.verify() which takes in the token, the same secret key we used to sign the token and then a callback which takes in a decoded parameter that holds the current user data. Since we set the req.user data below that, the next route that comes will have access to the req.user data as well. Lastly, if the token does not exist or fails to authenticate, you can see that we send {isLoggedIn: false} back to the client side which will redirect the user (we will use react-router to do this)

Here you can see that passing in the verifyJWT middleware as the second parameter to app.get() lets us access the current user's data in whichever route we would like
When you delete the token from localStorage (which can be done through a simple button click that calls localStorage.removeItem("token")), the verifyJWT middleware will fail and thus send a response that has isLoggedIn set to false. If your frontend handles that correctly (which I will discuss how to do in my next article), you can redirect the user to the login page whenever this response is received
Before the frontend code is made, you can still test the server code by using Postman, which I strongly advise doing because this code might not fit into your codebase perfectly or there might be small changes in the imported packages that change some of the functionality shown above.
Anyways, a lot of work went in to this tutorial, so please leave feedback to help me perfect it, or leave a like if this helped you out. Thanks for reading!
32
