12
React Interview Questions 🔥
Do you want to make a career change to something more lucrative? Or have you been putting in a lot of time and effort in preparation for an interview the following weekend? Do you know how many people are rejected in interviews because they only prepare for concepts rather than focusing on the real questions that will be asked? This time, avoid being that person. This is the most comprehensive collection of React JS interview questions you'll ever find. It includes a large number of often requested and crucial React JS interview questions and answers. Freshers, seasoned professionals, senior developers, and testers will benefit from a wide range of questions that cover not only the fundamentals of React JS but also the most advanced and challenging problems. This blog post will guide thoroughly for those who want to practice and enhance their react.js skills. I recommend that you read everything thoroughly beforehand and practice and sharpen your react knowledge.
An Element is a plain object describing what you want to appear on the screen in terms of the DOM nodes or other components. Elements can contain other Elements in their props. Creating a React element is cheap. Once an element is created, it is never mutated. The object representation of React Element would be as follows:
const element = React.createElement(
  'div',
  {id: 'login-btn'},
  'Login'
)
The above React.createElement() function returns an object:
{
  type: 'div',
  props: {
    children: 'Login',
    id: 'login-btn'
  }
}
And finally, it renders to the DOM using ReactDOM.render():
<div id='login-btn'>Login</div>Whereas a component can be declared in several different ways. It can be a class with a render() method or it can be defined as a function. In either case, it takes props as an input, and returns a JSX tree as the output:
const Button = ({ onLogin }) =>
  <div id={'login-btn'} onClick={onLogin}>Login</div>
Then JSX gets transpiled to a React.createElement() function tree:
const Button = ({ onLogin }) => React.createElement(
  'div',
  { id: 'login-btn', onClick: onLogin },
  'Login'
)
There are two possible ways to create a component.
- Function Components: This is the simplest way to create a component. Those are pure JavaScript functions that accept props object as first parameter and return React elements:
function Greeting({ message }) {
  return <h1>{`Hello, ${message}`}</h1>
}- Class Components: You can also use ES6 class to define a component. The above function component can be written as:
class Greeting extends React.Component {
render() {
  return <h1>{`Hello, ${this.props.message}`}</h1>
 }
}
React.PureComponent is exactly the same as React.Component except that it handles the shouldComponentUpdate() method for you. When props or state changes, PureComponent will do a shallow comparison on both props and state. Components on the other hand won't compare current props and state to next out of the box. Thus, the component will re-render by default whenever shouldComponentUpdate is invoked.
The stateof a component is an object that holds some information that may change over the lifetime of the component. We should always try to make our state as simple as possible and minimize the number of stateful components.Let's create a user component with a message state,
class User extends React.Component {
  constructor(props) {
    super(props)

    this.state = {
      message: 'Welcome to React world'
    }
  }
  render() {
    return (
      <div>
        <h1>{this.state.message}</h1>
      </div>
    )
  }
}
State is similar to props, but it is private and fully controlled by the component. i.e, It is not accessible to any other component until the owner component decides to pass it.
- What are props in React?
Propsare inputs to components. They are single values or objects containing a set of values that are passed to components on creation using a naming convention similar to HTML-tag attributes. They are data passed down from a parent component to a child component.The primary purpose of props in React is to provide the following component functionality:
Pass custom data to your component.
Trigger state changes.
Use via this.props.reactProp inside component render() method
For example, let us create an element with reactProp property:
<Element reactProp={'1'} />This react pro (or whatever you came up with) name then becomes a property attached to React's native props object which originally already exists on all components created using React library.
props.reactProp
Both props and state are plain JavaScript objects. While both of them hold information that influences the output of render, they are different in their functionality with respect to components. Props get passed to the component similar to function parameters whereas the state is managed within the component similar to variables declared within a function.
If you try to update the state directly then it won't re-render the component.
//Wrong
this.state.message = 'Hello world'
Instead, usesetState() method. It schedules an update to a component's state object. When the state changes, the component responds by re-rendering.
//Correct
this.setState({ message: 'Hello World' })
Note: You can directly assign to the state object either in theconstructor or using the latest javascript's class field declaration syntax.

The callback function is invoked when setState finishes and the component gets rendered. Since setState()is asynchronous the callback function is used for any post action.
Note: It is recommended to use the lifecycle method rather than this callback function.
setState({ name: 'John' }, () => console.log('The name has updated and component re-rendered'))Below are some of the main differences between HTML and React event handling:
- In HTML, the event name usually represented in lowercase as a convention:
<button onClick={activateLasers}>Whereas in React it follows camelCase
<button onClick={activateLasers}>- In HTML, you can return false to prevent the default behavior.
<a href='#' onclick='console.log("The link was clicked."); return false;' />Whereas in React you must call preventDefault() explicitly:
function handleClick(event) {
  event.preventDefault()
console.log('The link was clicked.')}- In HTML, you need to invoke the function by appending () Whereas in react you should not append () with the function name. (refer to "activateLasers" function in the first point for example)
There are 3 possible ways to achieve this:
Binding in Constructor: In JavaScript classes, the methods are not bound by default. The same thing applies to React event handlers defined as class methods. Normally we bind them in the constructor.
class Foo extends Component {
  constructor(props) {
    super(props);
    this.handleClick = this.handleClick.bind(this);
  }
  handleClick() {
    console.log('Click happened');
  }
  render() {
    return <button onClick={this.handleClick}>Click Me</button>;
  }
}
Public class fields syntax: If you don't like to use the bind approach then public class fields syntax can be used to correctly bind callbacks.
handleClick = () => {
  console.log('this is:', this)
}

<button onClick={this.handleClick}>
  {'Click me'}
</button>
Arrow functions in callbacks: You can use arrow functions directly in the callbacks.
handleClick() {
    console.log('Click happened');
}
render() {
    return <button onClick={() => this.handleClick()}>Click Me</button>;
}
Note: If the callback is passed as a prop to child components, those components might do an extra re-rendering. In those cases, it is preferred to go with the .bind() or public class fields syntax approach considering performance.
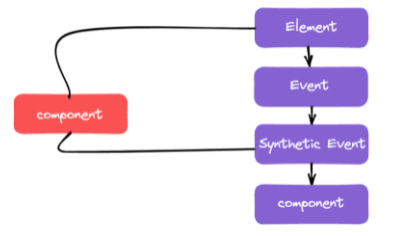
SyntheticEvent is a cross-browser wrapper around the browser's native event. Its API is the same as the browser's native event, including stopPropagation() and preventDefault(), except the events work identically across all browsers.


A key is a special string attribute you should include when creating arrays of elements.Keyprop helps React identify which items have changed, are added, or are removed.Most often we use the ID from our data askey:
const todoItems = todos.map((todo) =>
  <li key={todo.id}>
    {todo.text}
  </li>
)
When you don't have stable IDs for rendered items, you may use the itemindex as a key as a last resort:

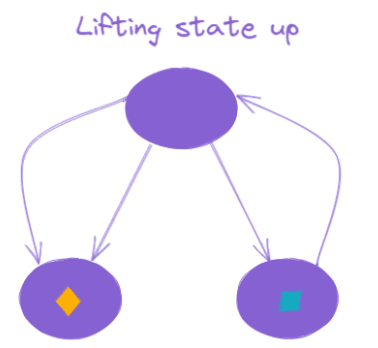
When several components need to share the same changing data then it is recommended to lift the shared state up to their closest common ancestor. That means if two child components share the same data from its parent, then move the state to parent instead of maintaining local state in both of the child components.
The component lifecycle has three distinct lifecycle phases:
Mounting: The component is ready to mount in the browser DOM. This phase covers initialization from constructor(), getDerivedStateFromProps(), render(), and componentDidMount() lifecycle methods.
Updating: In this phase, the component gets updated in two ways, sending the new props and updating the state either from setState() or forceUpdate(). This phase covers getDerivedStateFromProps(), shouldComponentUpdate(), render(), getSnapshotBeforeUpdate() and componentDidUpdate() lifecycle methods.
Unmounting: In this last phase, the component is not needed and gets unmounted from the browser DOM. This phase includes the componentWillUnmount() lifecycle method.
It's worth mentioning that React internally has a concept of phases when applying changes to the DOM. They are separated as follows:
Render The component will render without any side effects. This applies for Pure components and in this phase, React can pause, abort, or restart the render.
Pre-commit Before the component actually applies the changes to the DOM, there is a moment that allows React to read from the DOM through the getSnapshotBeforeUpdate().
Commit React works with the DOM and executes the final lifecycles respectively componentDidMount() for mounting, componentDidUpdate() for updating, and componentWillUnmount() for unmounting.
Portal is a recommended way to render children into a DOM node that exists outside the DOM hierarchy of the parent component.
ReactDOM.createPortal(child, container)The first argument is any render-able React child, such as an element, string, or fragment. The second argument is a DOM element.

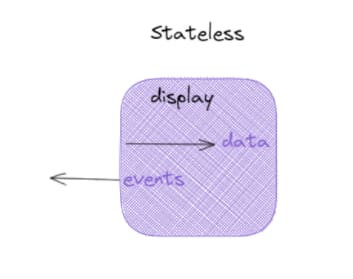
If the behaviour is independent of its state then it can be a stateless component. You can use either a function or a class for creating stateless components. But unless you need to use a lifecycle hook in your components, you should go for function components. There are a lot of benefits if you decide to use function components here; they are easy to write, understand, and test, a little faster, and you can avoid this keyword altogether.

If the props on the component are changed without the component being refreshed, the new prop value will never be displayed because the constructor function will never update the current state of the component. The initialization of state from props only runs when the component is first created.The below component won't display the updated input value:
class MyComponent extends React.Component {
  constructor(props) {
    super(props)
    this.state = {
      records: [],
      inputValue: this.props.inputValue
    };
  }
  render() {
    return <div>{this.state.inputValue}</div>
  }
}
Using props inside the render method will update the value:
class MyComponent extends React.Component {
  constructor(props) {
    super(props)

    this.state = {
      record: []
    }
  }

  render() {
    return <div>{this.props.inputValue}</div>
  }
}A history instance has two methods for navigation purposes.

If you think of the history as an array of visited locations, push() will add a new location to the array and replace() will replace the current location in the array with the new one.
There are three different ways to achieve programmatic routing/navigation within components.
Using the withRouter() higher-order function:The withRouter() higher-order function will inject the history object as a prop of the component. This object provides push() and replace() methods to avoid the usage of context.
import { withRouter } from 'react-router-dom' // this also works with 'react-router-native'

const Button = withRouter(({ history }) => (
  <button
    type='button'
    onClick={() => { history.push('/new-location') }}
  >
    {'Click Me!'}
  </button>
))
Using component and render props pattern:The component passes the same props as withRouter(), so you will be able to access the history methods through the history prop.
import { Route } from 'react-router-dom'

const Button = () => (
  <Route render={({ history }) => (
    <button
      type='button'
      onClick={() => { history.push('/new-location') }}
    >
      {'Click Me!'}
    </button>
  )} />
)
Using context:This option is not recommended and is treated as an unstable API.
const Button = (props, context) => (
  <button
    type='button'
    onClick={() => {
      context.history.push('/new-location')
    }} >
    {'Click Me!'}
  </button>
)
Button.contextTypes = {
  history: React.PropTypes.shape({
    push: React.PropTypes.func.isRequired
  })
}The ability to parse query strings was taken out of React Router v4 because there have been user requests over the years to support different implementations. So the decision has been given to users to choose the implementation they like. The recommended approach is to use the query strings library.
const queryString = require('query-string');
const parsed = queryString.parse(props.location.search);
You can also use URLSearchParams if you want something native:
const params = new URLSearchParams(props.location.search)
const foo = params.get('name')
You should use apply fill for IE11.
Selectorsare functions that take the Redux state as an argument and return some data to pass to the component. For example, to get user details from the state:
const getUserData = state => state.user.dataThese selectors have two main benefits,
The selector can compute derived data, allowing Redux to store the minimal possible state
The selector is not recomputed unless one of its arguments changes
There are a few ways of binding action creatorsto dispatch() in mapDispatchToProps().Below are the possible options:
const mapDispatchToProps = (dispatch) => ({
 action: () => dispatch(action())
})
const mapDispatchToProps = (dispatch) => ({
 action: bindActionCreators(actioimport { ADD_TODO } from './actionTypes'
export default (state = [], action) => {
  switch (action.type) {
    case ADD_TODO:
      return [
        ...state,
        {
          text: action.text,
          completed: false
        }
      ];
    default:
      return state
  }
}
n, dispatch)
})
const mapDispatchToProps = { action }
The third option is just a shorthand for the first one.

The component is a class or function component that describes the presentational part of your application.The container is an informal term for a component that is connected to a Redux store. Containerssubscribe to Redux state updates and dispatch actions, and they usually don't render DOM elements; they delegate rendering to presentational child components.

Saga is like a separate thread in your application, that's solely responsible for side effects. redux-saga is a redux middleware, which means this thread can be started, paused and cancelled from the main application with normal Redux actions, it has access to the full Redux application state and it can dispatch Redux actions as well.
Both call() and put() are effect creator functions. call() function is used to create effect description, which instructs middleware to call the promise. put() function creates an effect, which instructs middleware to dispatch an action to the store.Let's take the example of how these effects work for fetching particular user data.
function* fetchUserSaga(action) {
  // `call` function accepts rest arguments, which will be passed to `api.fetchUser` function.
  // Instructing middleware to call promise, it resolved value will be assigned to `userData` variable
  const userData = yield call(api.fetchUser, action.userId)

  // Instructing middleware to dispatch corresponding action.
  yield put({
    type: 'FETCH_USER_SUCCESS',
    userData
  })
}
Redux Thunk middleware allows you to write action creators that return a function instead of an action. The thunk can be used to delay the dispatch of action or to dispatch only if a certain condition is met. The inner function receives the store methods dispatch() and getState() as parameters.
Selectors are functions that take the Redux state as an argument and return some data to pass to the component.For example, to get user details from the state:
const getUserData = state => state.user.dataThese selectors have two main benefits,
The selector can compute derived data, allowing Redux to store the minimal possible state
The selector is not recomputed unless one of its arguments changes

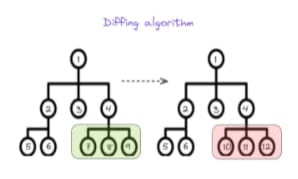
React needs to use algorithms to find out how to efficiently update the UI to match the most recent tree. The diffing algorithm is generating the minimum number of operations to transform one tree into another. However, the algorithms have a complexity in the order of O(n3) where n is the number of elements in the tree.In this case, for displaying 1000 elements would require in the order of one billion comparisons. This is far too expensive. Instead, React implements a heuristic O(n) algorithm based on two assumptions:
- Two elements of different types will produce different trees.
- The developer can hint at which child elements may be stable across different renders with a key prop.
Even though the pattern named render props, you don’t have to use a prop named render to use this pattern. i.e, Any prop that is a function that a component uses to know what to render is technically a “render prop”. Lets take an example with the children prop for render props,
<Mouse>
{mouse => (
    <p>The mouse position is {mouse.x}, {mouse.y}</p>
  )}</Mouse>children={mouse => (
  <p>The mouse position is {mouse.x}, {mouse.y}</p>
)}/>
Actually children prop doesn’t need to be named in the list of “attributes” in JSX element. Instead, you can keep it directly inside element,
<<Mouse>
{mouse => (
    <p>The mouse position is {mouse.x}, {mouse.y}</p>
  )}</Mouse>
While using this above technique(without any name), explicitly state that children should be a function in your propTypes.
Mouse.propTypes = {
  children: PropTypes.func.isRequired
};If you create a function inside a render method, it negates the purpose of the pure component. Because the shallow prop comparison will always return false for new props, and each render in this case will generate a new value for the render prop. You can solve this issue by defining the render function as an instance method.

You can implement most higher-order components (HOC) using a regular component with a render prop. For example, if you would prefer to have a with Mouse HOC instead of a component, you could easily create one using a regular with a render prop.
function withMouse(Component) {
  return class extends React.Component {
    render() {
      return (
        <Mouse render={mouse => (
          <Component {...this.props} mouse={mouse} />
        )}/>
      );
    }
  }
}
This way to render props gives the flexibility of using either pattern.

Windowing is a technique that only renders a small subset of your rows at any given time, and can dramatically reduce the time it takes to re-render the components as well as the number of DOM nodes created. If your application renders long lists of data then this technique is recommended. Both react-window and react-virtualized are popular windowing libraries which provide several reusable components for displaying lists, grids, and tabular data.

React portals are very useful when a parent component has overflow: hidden or has properties that affect the stacking context(z-index,position,opacity etc styles) and you need to visually “break out” of its container.
For example, dialogs, global message notifications, hovercards, and tooltips.
In React, the value attribute on form elements will override the value in the DOM. With an uncontrolled component, you might want React to specify the initial value, but leave subsequent updates uncontrolled. To handle this case, you can specify a defaultValue attribute instead of value.
render() {
  return (
    <form onSubmit={this.handleSubmit}>
      <label>
        User Name:
        <input
          defaultValue="John"
          type="text"
          ref={this.input} />
      </label>
      <input type="submit" value="Submit" />
    </form>
  );
}
The same applies for select and text Area inputs. But you need to use default Checked for checkbox and radio inputs.
We have created a completely free eBook for you to download in the link below because we are unable to add all 300+ complete lists of questions due to character limitations.
Download for absolutely free here
This eBook will provide detailed instructions for anyone wishing to practice and improve their react.js skills. I urge that you properly read everything ahead of time and practice and sharpen your react skills. This is the most complete React JS interview questions book available. It has a lot of essential and often asked React JS interview questions and answers. Freshers, seasoned professionals, senior developers, and testers will benefit from a wide range of questions that cover not only the basics of React JS but also the most advanced questions. Cheers!! Happy coding and Best of Luck !!
Join us on our Discord community !!
12
