21
Granular Access Control: Hasura & Auth0 for authenticated database access
In the previous post, I talked about how we can set up Hasura and Auth0 and sync user data. In this post, we'll see how we can connect a frontend to this workflow and how we can enable stricter access control for database access.
We set up a database that stores users and their tweets. Now, we'll add an authentication layer such that only logged-in users can access the tweets and only the owners of the tweet can edit/ delete the tweet.
Before we go any further, let's create a tweets table to store the tweets of each user. In our current implementation, anyone with a valid Auth0 authentication can view and edit the table data. A user should be able to add, update, and delete tweets only if they own those tweets. Authenticated users shouldn't be able to update other people's tweets.
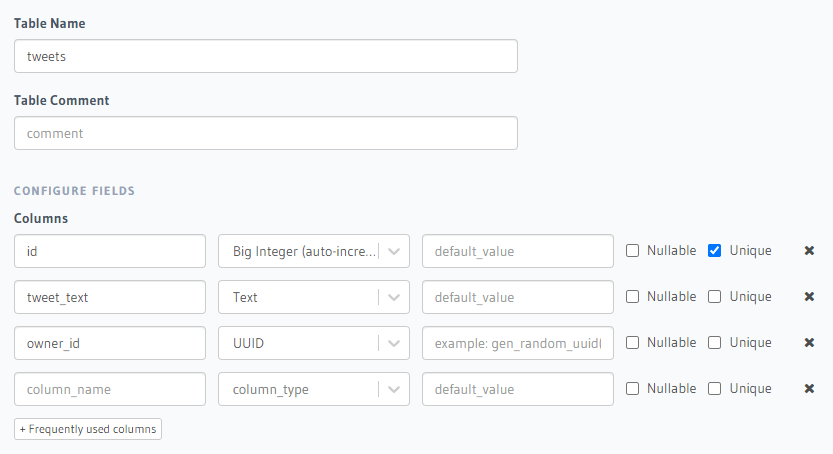
Add a new tweets table with configuration as shown in the image.
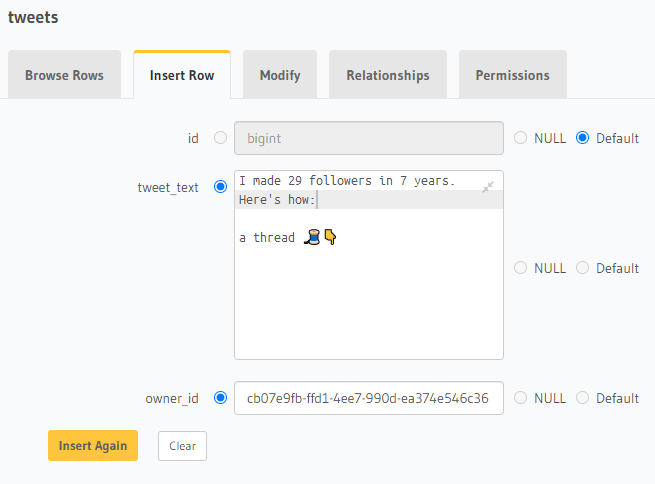
To add some sample data, click on Insert Row and enter the data. Refer to the users table to get an id that you can insert in the owner_id field.
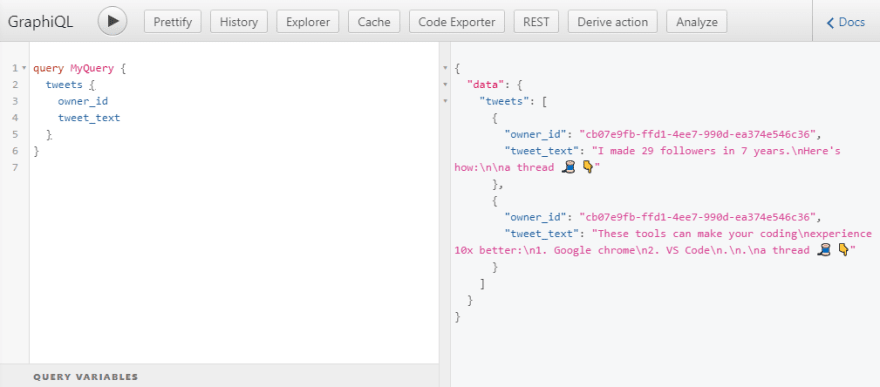
After adding a few rows, click the API tab on top. Enter a sample query and run it to test if everything is functioning properly
query MyQuery {
  tweets {
    owner_id
    tweet_text
  }
}Auth0 provides great guides on how to set up your frontend with Auth0. The technology used for the frontend of this post is irrelevant, we are more interested in how access control works. Anyhoo, for demonstration's sake, I'll be using Next.js. If you're interested, you can also check out this guide on how to set up Next.js with Auth0.
For our app to work correctly we need to add a file /pages/api/session.ts in the Next.js project folder.
import { getSession, withApiAuthRequired } from "@auth0/nextjs-auth0";

import type { NextApiRequest, NextApiResponse } from "next";

export default withApiAuthRequired(async function getSessionId(
  req: NextApiRequest,
  res: NextApiResponse
) {
  try {
    const session = await getSession(req, res);
    res.status(200).json({ session });
  } catch (error) {
    console.error(error);
  }
});
This will provide an endpoint that can be used to gain access to the idToken which is needed to establish a connection with Hasura.
Now we need to set up Apollo to make the graphql stuff easier. We'll install a couple of packages and add a few files.
yarn add @apollo/client graphql axiosHasura analyzes the authorization token associated with each request to see if the request sender is authenticated. The token will be read by Hasura to determine what all permissions should be granted to the request sender.
To embed the token into every request, create a new file apollo-client.js in the root of the folder with the following code.
import { ApolloClient, createHttpLink, InMemoryCache } from "@apollo/client";
import { setContext } from "@apollo/client/link/context";
import axios from "axios";

const httpLink = createHttpLink({
  uri: "insert_url_here",
  fetch: (...args) => fetch(...args),
});

async function fetchSession() {
  const res = await axios.get(`/api/session`);
  return res.data.session.idToken;
}

const authLink = setContext((_, { headers }) => {
  const authLinkWithHeader = fetchSession().then((token) => {
    return {
      headers: {
        ...headers,
        authorization: token ? `Bearer ${token}` : "",
      },
    };
  });

  return authLinkWithHeader;
});

export const client = new ApolloClient({
  link: authLink.concat(httpLink),
  cache: new InMemoryCache(),
});

export default client;
This code gets your token from Auth0 and embeds that token in every request sent to the Hasura instance. The token will contain information such as your user_id and role. Remember to change the url to your Hasura graphql endpoint.
Edit your /pages/_app.tsx and wrap the app component with providers from Apollo and Auth0.
import type { AppProps } from "next/app";
import { ApolloProvider } from "@apollo/client";
import { UserProvider } from "@auth0/nextjs-auth0";
import client from "../../apollo-client";

function MyApp({ Component, pageProps }: AppProps): JSX.Element {
  return (
    <UserProvider>
      <ApolloProvider client={client}>
         <Component {...pageProps} />
      </ApolloProvider>
    </UserProvider>
  );
}
export default MyApp;
Let's run a GraphQL query and see what we'll get. Edit your /pages/index.tsx so that it looks like this:
import type { NextPage } from "next";
import { gql, useQuery } from "@apollo/client";
import Head from "next/head";
import styles from "../styles/Home.module.css";

interface TweetType {
  owner_id: string;
  tweet_text: string;
  __typename: string;
}

const GET_TWEETS = gql`
  query GetTweets {
    tweets {
      owner_id
      tweet_text
    }
  }
`;

const Home: NextPage = () => {
  const { data, loading } = useQuery(GET_TWEETS);

  return (
    <div className={styles.container}>
      <Head>
        <title>Create Next App</title>
        <meta name="description" content="Generated by create next app" />
        <link rel="icon" href="/favicon.ico" />
      </Head>
      <a href="/api/auth/login">Login</a>
      <a href="/api/auth/logout">Logout</a>
      <div>
        {loading
          ? "loading..."
          : data?.tweets.map((tweet: TweetType, index: number) => (
              <div
                key={`${tweet.owner_id}-${index}`}
                style={{ margin: "12px 0px" }}
              >
                <div>By user: {tweet.owner_id}</div>
                <div>{tweet.tweet_text}</div>
              </div>
            )) ?? "No data received."}
      </div>
    </div>
  );
};

export default Home;
We've set up an extremely simple, unstyled (read "ugly") page that retrieves all the tweets from the Hasura instance. Run the app using yarn run dev. Log in to the app with the test account you used to add dummy data into the Hasura instance. The graphql should retrieve all the tweets in the database irrespective of the owner.
Hasura uses 'roles' to figure out what permissions to be given to each request. If you've been following from the last post, you'll remember that we set up an Auth0 action login-hasura-token which embeds the user_id and role into the token that we receive from Auth0. In the code, we hardcoded the role as user for simplicity. We're getting the above error because we haven't set up the permissions for the user role. Let's do that now.
In the Hasura console, go to the tweets table and click on the permissions tab. You'll see that the role admin is given all-access. In the text field under admin type user. Now click on the red cross under the select column to open up the permission settings.
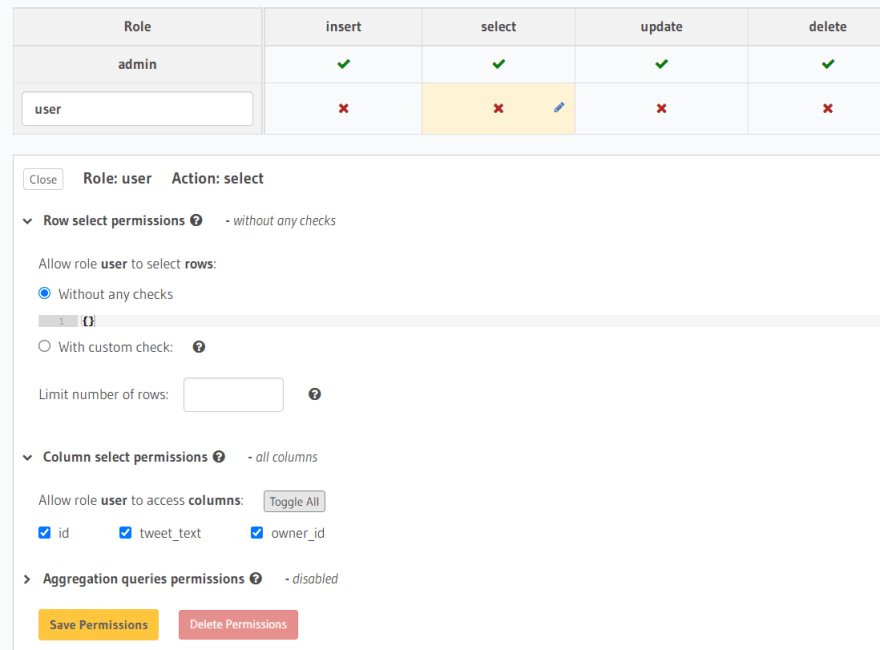
For row select permissions, select Without any checks, and for column select permissions, select the columns that you want the user to access. Click on Save Permissions. Go back to the Next.js app and refresh. The tweets should show up now.

Phew! That was a lot yeah? Well, I got news for ya. We can take this even further. There's a problem with this setup. All the users who sign up through Auth0 will have the user role attached to them. This means everyone has access to your data. And hence, all registered users can update or delete your data. That sucks.
We only want the owner of the tweet to be able to edit or delete their tweets. To verify whether the requesting user is the owner of the tweet, compare the user_id embedded in the token and the owner_id of the tweet. If they are the same, then the requester is the owner of the tweet.
To implement this, go to the tweets table, click on the permissions tab and click on the update operation corresponding to the user role.
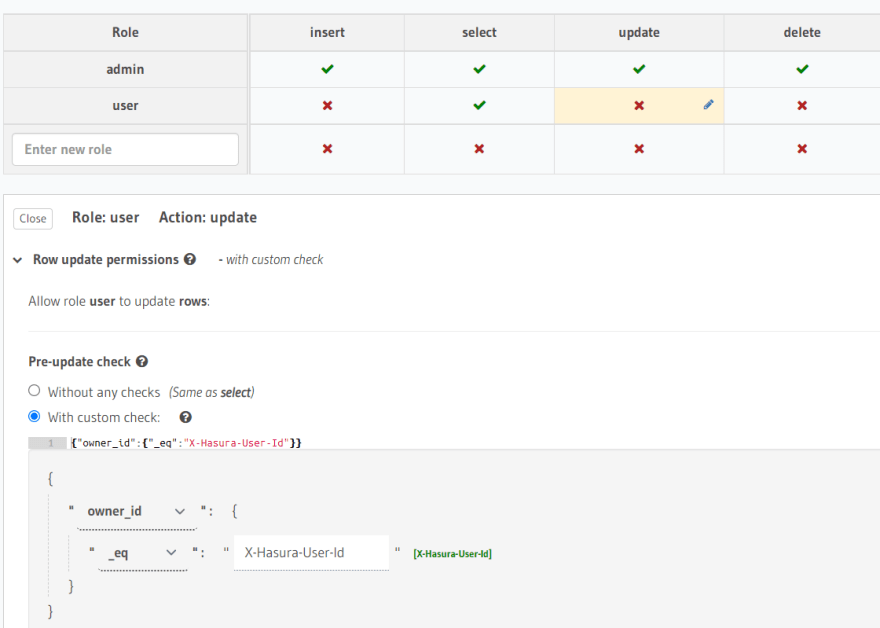
In the additional settings that just open up, choose With custom check. Click on the drop-down and choose owner_id. We want to see if it is equal to the user_id in the token, so select the _eqoperation and second variable as X-Hasura-User-Id. In the Column update permissions, choose which all columns you want the requester to have access to. Apply the settings.
Across the two blog posts, we have implemented an authentication system that syncs user data with the database and provides restricted access to the database. This is the tip of the iceberg. You can add more flexible role assignments in Auth0 to add a custom role-assigning workflow. These multiple levels of roles can be used to provide multiple levels of database access.
21

