41
Deploying Django Web App Using Heroku (Updated)
Heroku is one of the most popular hosting platforms for web applications. In this article, I will provide a step-by-step guide on how to deploy a Django web application in Heroku.
Signup for Heroku if you don't have an existing account.
Install the Heroku CLI. For MacOS, use
$ brew install heroku.-
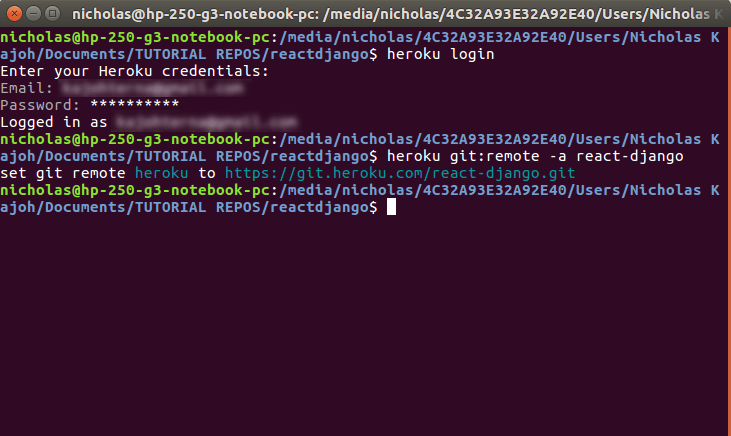
Log in to your Heroku account by entering your credentials using
$ heroku loginor$ heroku login -iif you faced IP address mismatch issue like the one shown below:
$ heroku login
Enter your Heroku credentials:
Email: your_email@emailprovider.com
Password: *********
Logged in as jameseze.ca@gmail.com
Create a new Heroku app either via Heroku CLI (
$ heroku create APP_NAME) or directly in the Heroku dashboard:
Add the Heroku remote via
$ heroku git:remote -a your-heroku-app
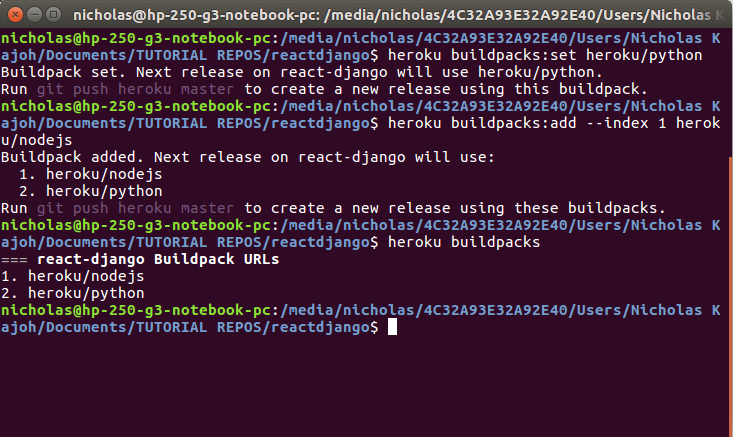
Configure the Heroku buildpacks. For Django, we just need 1 buildpack for Python:
$ heroku buildpacks:set heroku/python. Run$ heroku buildpacksto see the configured buildpack. For your information, if you have multiple buildpacks, the last buildpack on the list determines the process type of the app.
Configure PostgreSQL Heroku addon
* During production, Heroku will **not be using SQLite database**. Instead, we need to use **PostgreSQL** by configuring the addon to our app using `$ heroku addons:create heroku-postgresql:hobby-dev`
* You can check whether this is successful by running `$ heroku config`:
```Shell
$ === APP_NAME Config Vars
DATABASE_URL: postgres://[DATABASE_INFO_HERE]
```* The database info from the code snippet above refers to the URL containing your database’s location and access credentials all in one. Anyone with this URL can access your database, so be careful with it.
* You will notice that Heroku saves it as an **environment variable** called `DATABASE_URL`. This URL can and does change, so you should never hard code it. Instead, we’ll use the variable `DATABASE_URL` in Django.- Please note that
APP_NAMEmentioned here onwards refers to the Django project name, NOT the individual apps within the Django project!
- Configure Heroku config variables
* According to Heroku, **config variables** are environment variables that can change the way your app behaves. In addition to creating your own, some add-ons come with their own.
* There are several environment variables that need to be set:
```Shell
$ heroku config:set ALLOWED_HOSTS=APP_NAME.herokuapp.com
$ heroku config:set ALLOWED_HOSTS=APP_NAME.herokuapp.com
$ heroku config:set SECRET_KEY=DJANGO_SECRET_KEY
$ heroku config:set WEB_CONCURRENCY=1
```- Install the following essential Python libraries using
pip install:
$ pip install django-heroku gunicorn python-dotenv dj-database-url whitenoise psycopg2-
django-herokuis a Django library for Heroku applications that ensures a more seamless deployment and development experience.- This library provides:
- Settings configuration (Static files / WhiteNoise)
- Logging configuration
- Test runner (important for Heroku CI)
- This library provides:
dj-database-urlallows the app to automatically use the default database depending on the environment the app is in. For example, if the app is run locally, it will use SQLite3 whereas in Heroku, it will default to PostgreSQL.python-dotenvis useful for setting up and load environment variables.gunicornis a Python web server that is commonly used for deployment.whitenoiseallows your web app to serve its own static files, making it a self-contained unit that can be deployed anywhere without relying on nginx, Amazon S3 or any other external service (especially useful on Heroku and other PaaS providers).psycopg2is the most popular PostgreSQL database adapter for the Python programming language. This is essential to allow the Django web app to use external PostgreSQL database.
- Create a
.envfile containingDATABASE_URL=sqlite:///db.sqlite3. This is to tell Django to use SQLite when running locally. We don’t want.envto make it to Heroku, because.envis the part of our app that points to SQLite and not PostgreSQL. Hence, we need git to ignore.envwhen pushing to Heroku.
$ echo 'DATABASE_URL=sqlite:///db.sqlite3' > .env
$ echo '.env' >> .gitignore- Configure installed libraries in
settings.py
- First, import the following packages at the top of the file:
import django_heroku
import dj_database_url
import dotenv- Load the environment variables:
from dotenv import load_dotenv
load_dotenv()
# or
dotenv_file = os.path.join(BASE_DIR, ".env")
if os.path.isfile(dotenv_file):
dotenv.load_dotenv(dotenv_file)- Next, we configure the
DEBUG,SECRET_KEYandALLOWED_HOSTS.DEBUGmust be set toFalseduring production.ALLOWED_HOSTSshould also only point to the Heroku address once deployed (which is whenDEBUGis set toFalse).
# SECURITY WARNING: keep the secret key used in production secret!
SECRET_KEY = '' # Change to empty string
DEBUG = False
# ALLOWED_HOSTS = ['*']
if DEBUG:
    ALLOWED_HOSTS = ["localhost", "127.0.0.1"]
else:
ALLOWED_HOSTS = ['https://APP_NAME.herokuapp.com/']- Then, we configure
whitenoisemiddleware, static and media files settings. Django security middleware should already be the first thing on the list. Never load any middleware before Django security.
MIDDLEWARE = [
        'django.middleware.security.SecurityMiddleware',
        'whitenoise.middleware.WhiteNoiseMiddleware',
        # ...
 ]
# ...
STATIC_URL = '/static/'
STATICFILES_DIRS = (
    os.path.join(BASE_DIR, 'static'),
)
STATIC_ROOT = os.path.join(BASE_DIR, 'staticfiles')
STATICFILES_STORAGE = 'whitenoise.storage.CompressedManifestStaticFilesStorage'
MEDIA_URL = '/media/'
MEDIA_ROOT = os.path.join(BASE_DIR, 'media')
X_FRAME_OPTIONS = 'SAMEORIGIN'- Afterwards, update the
DATABASESusingdj-database-url. The idea here is to clear theDATABASESvariable and then set the'default'key using thedj_database_urlmodule. This module uses Heroku’sDATABASE_URLvariable that we set up previously if it’s on Heroku, or it uses theDATABASE_URLwe set in the.envfile if we’re working locally.
# Database
# https://docs.djangoproject.com/en/3.1/ref/settings/#databases
# DATABASES = {
#     'default': {
#         'ENGINE': 'django.db.backends.sqlite3',
#         'NAME': BASE_DIR / 'db.sqlite3',
#     }
# }
DATABASES = {}
DATABASES['default'] = dj_database_url.config(conn_max_age=600)- Lastly, configure
django-herokuand SSL issue workaround at the very bottom of the file. If you ran the Django application, you might get an error when working locally because thedj_database_urlmodule wants to log in with SSL. Heroku PostgreSQL requires SSL, but SQLite doesn’t need or expect it. So, we’ll use a hacky workaround to getdj_database_urlto forget about SSL at the last second:
django_heroku.settings(locals())
options = DATABASES['default'].get('OPTIONS', {})
options.pop('sslmode', None)-
Set up Heroku-specific files
A. runtime.txt
Heroku will install a default Python version if you don't specify one, but if you want to pick your Python version, you'll need a
runtime.txtfile.Create one in the root directory, next to your
requirements.txt,manage.py,.gitignoreand the rest. Specify your Python version with the prefixpython-that you want your application to run on. Heroku usually recommends running on the latest stable version of Python:
python-3.9.5B. requirements.txt
When deploying the web app, Heroku will need to install all the required dependencies for the web app to run by referring to the
requirements.txtfile.To ensure that all dependencies are included, consider freezing your dependencies using the command
$ pip freeze > requirements.txt. This will make your build a little bit more predictable by locking your exact dependency versions into your Git repository. If your dependencies aren't locked, you might find yourself deploying one version of Django one day and a new one the next.C. Procfile
Heroku apps include a Heroku-specific
Procfilethat specifies the processes our application should run. The processes specified in this file will automatically boot on deploy to Heroku.Create a file named
Procfilein the root level directory using$ touch Procfilecommand, right next to yourrequirements.txtandruntime.txtfiles. (Make sure to capitalize the P of Procfile otherwise Heroku might not recognise it!):Then, fill in the codes below:
release: python manage.py migrate web: gunicorn DJANGO_PROJECT_NAME.wsgi --log-file - -
Deploy the Web App
Once all the previous steps are completed, we need to collect all the static files using
python manage.py collectstaticcommand. Astaticfilesfolder should be created.After that, we are ready to finally commit and push all changes:
    $ git add .
    $ git commit -m "blah blah blah"
    $ git push heroku master
After the build is done and your app has been released, visit
YOUR-APP-NAME.herokuapp.com
When deploying to Heroku, make sure that your migrations folder are not included inside .gitignore! Heroku will need the migration files to update the PostgreSQL database.
If you encounter 500 Server Error issues in only the following cases:
* Debug=True && DB=local => Runs fine
* Debug=True && DB=production => Runs fine
* Debug=False && DB=local => Runs fine
* **Debug=False && DB=Production => 500 Server Error**
First, try including the following code in settings.py to display logging messages:
import logging
LOGGING = {
    'version': 1,
    'disable_existing_loggers': False,
    'handlers': {
        'console': {
            'class': 'logging.StreamHandler',
        },
    },
    'loggers': {
        'django': {
            'handlers': ['console'],
            'level': os.getenv('DJANGO_LOG_LEVEL', 'DEBUG'),
        },
    },
}
Then, try refreshing the site. Once the same error occurs, run $ heroku logs --tail inside terminal, the log will tell you the error message caused. This is because this problem is commonly caused by missing static files. By running said command, we can see what static files cannot be found.
41
