
24
Part 2 - Design Our Application and Prepare Networks
Now that we've gotten a better idea of what our platform looks like and how it works, we can start building something on top of it. But what are we building? The easiest for me to build out and demonstrate some of the features of OpenStack would be to build up a simple web application.
My goal for this post is to understand the basic components of OpenStack, how to create a project on top of them and hopefully directly interact with some of those components. For the goal we are trying to achieve, I can think of some basic items that will be required.
The basic structure is to have the Service and Proxy instances on the same network while we provide access to the application via a router into our Proxy.
You'll notice quickly if you've come from previous posts that this setup is very similar to the Sample Web Application Configuration without some notable components like Load-Balancers and multiple Networks/Security Groups. This is to keep the focus on the base structure. I can make other posts that covers how to expand on the OpenStack application for horizontal/vertical scaling and integrating additional components. If you want that to happen, please message me and I can work on a follow up series.
For this exercise, we'll need to do the following:
There's a lot to cover here so in the next post, we'll create the instance images and deploy them using what we build here and test access.
Across OpenStack, all management of role-based logic (Projects, Users, Roles, Domains, etc) is handled via Keystone Identity Management. This topic can be quite lengthy so to keep this post short, I'm going to focus on the necessary parts which means a dedicated project to contain our components. We can cover other aspects of the Keystone component (like Users, Roles and Domains) in a later post.
From our OpenStack Admin Console, we'll move into the Identity section and select Projects.
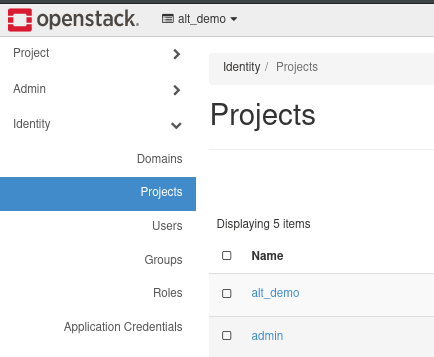
From here you will want to create a new project using the "+ Create Project" button. This will show a dialog prompting for details about your project.
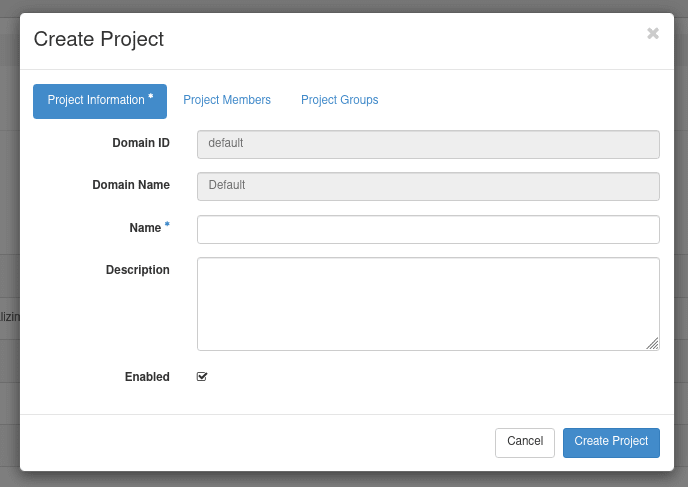
Enter in the following details to create the project:
- Name: my_app
- Description: Sample Web App Project
- Select the (+) icon for admin into the project.
- Once moved over, set the role to admin to give this user admin privileges. This will allow the admin user to manage the project. We can also create other user accounts specific to this project, but we're keeping things simple for now.

Once these sections have been filled in, we can select "Create Project" to create the new project and start using it.
From the top of the Dashboard, you should see the currently selected project. Selecting on this drop down should allow you to select a different project as the current project.
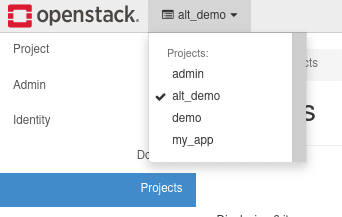
Once selecting "my_app", we can switch back to the Project section of the dashboard to view the components specific to this project.
By default, OpenStack does not provide open access to any component you create. Instead, we need to set everything up on Virtual Networks (VNETs) which we can provide access to the internet via Routers. We will also need to specify rules to open our application using a combination of Security Groups and Floating IPs.
I found this Youtube video by David Mahler to be very helpful in understanding how these components work. In general, I've been able to identify a small list of key items to know about networking in OpenStack:
public network is the externally accessible network which can be accessed by the host system. This is visible on the host system as br-ex by default.public network allows instances on the VNET to access the internet (important for installing applications and packages)public network range of ports that you can assign to almost any Port. This provides an external reference to a node within a VNET.With these covered, we can start creating our networks and piecing them together.
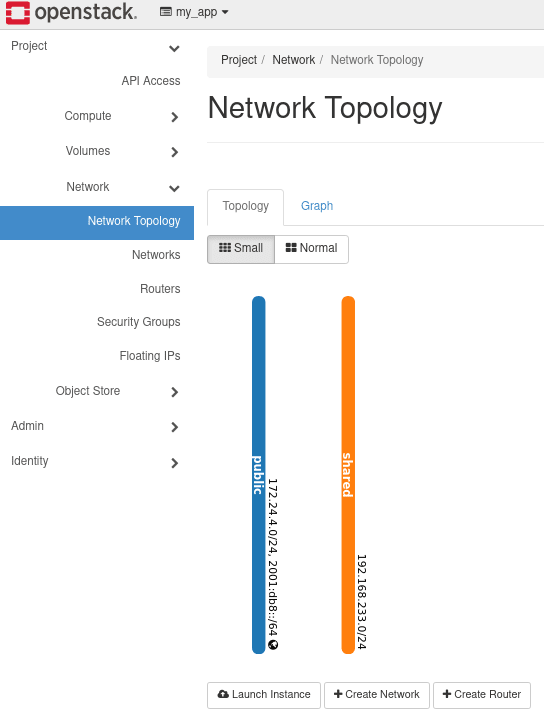
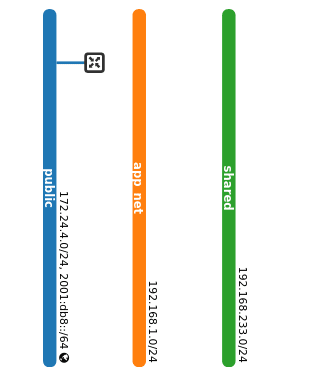
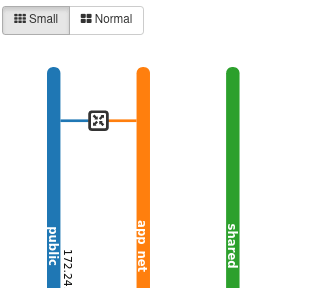
From our Dashboard console, we are going to open up the Network tab and review Network Topology. The generated diagram shows the existing Networks and VNETs available to the project and what devices are connected to each and how they are connected together. As we build our project, you can check back to this to see how things connect together.
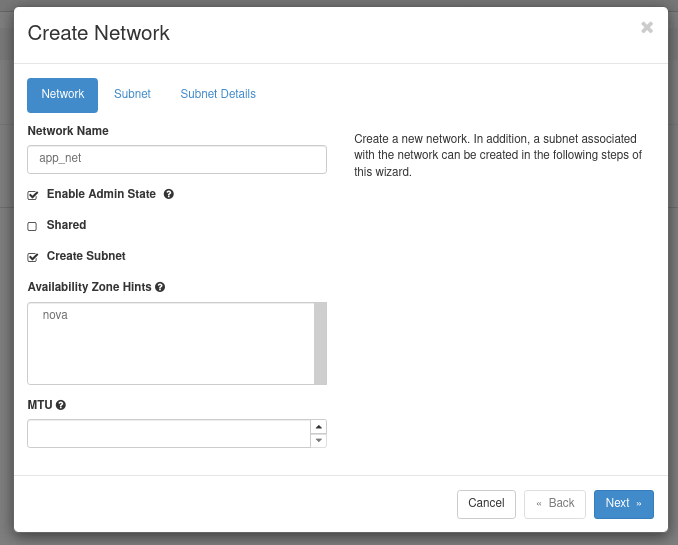
At the bottom of the diagram, we should select Create Network to open the New Network dialog. In this dialog we need to specify the following items:
-
Name:
app_net - Click Next to move to Subnet
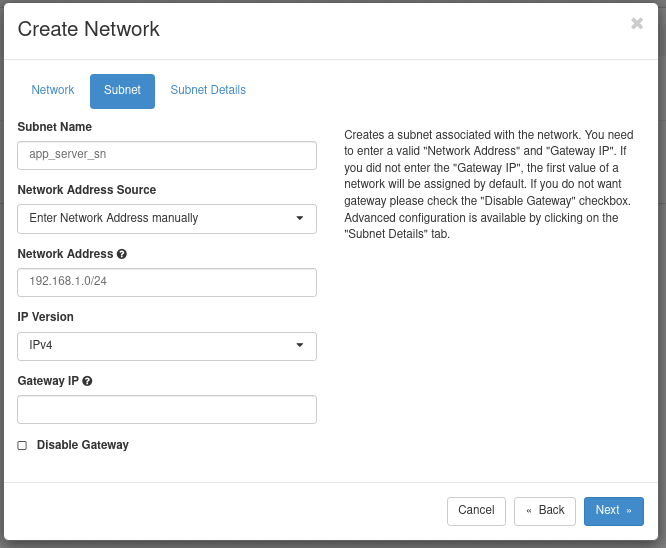
-
Subnet Name:
app_server_sn -
Network Address: This is CIDR Notation definition,
192.168.1.0/24. You can choose something else here as long as the range doesn't conflict with another network you may later connect to. - Click Next to move to Subnet Details
- Under DNS Name Servers, add
8.8.8.8to add a Google Nameserver. You can use multiple others by entering other entries on new lines (like Google's other Nameserver "8.8.4.4" or Cloudflare's "1.1.1.1"). - Click Create.

The new network is now available in the Topology dialog ready to accept new devices.
It would be simple enough to test out an application by creating our instances directly on the public network. But Routers provide more than just traffic routing. They also provide firewall-like capabilities with custom routing rules and also enables the Service Metadata feature which will be required later when we start creating our server instances.
To create a router, select Create Router to open the New Router dialog.
app_router
public

Now you will see a new device appears on our public network. This is the router we will use for our application.
From here, we need to connect our VNET to this router so anything within our VNET can be accessible both in and out. From the Routers section in the sidebar, select the
app_router name to open the Router's details. Under the Interfaces tab, we can now add our VNET as another interface:app_net. If our VNET had multiple subnets, each would be listed as their own so it might be good to look at the subnet name at the end of each entry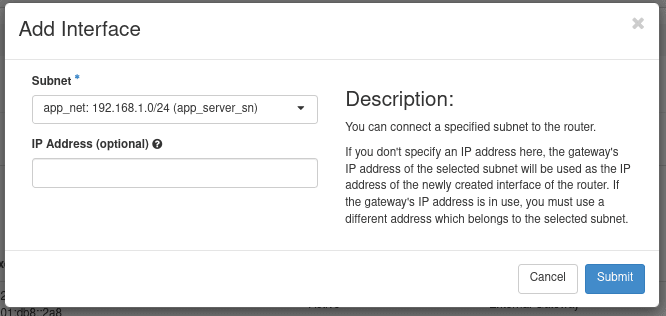
Going back to Network Topology, our two networks are now linked.
Security Groups define the policies of how applications can connect outward and how external applications can connect in. All instances created are added to the
default Security Group automatically which provides the following access:default Security Group.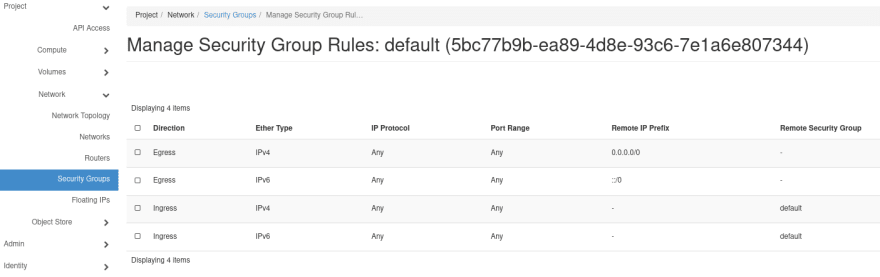
Playing around with these policies could allow for some complex behaviour and control. For example, you could create a policy where all database traffic never leaves the VNET while maybe an MQTT service is setup and it's traffic spreads across all VNETs.
For our exercise, the only changes we want to make are:
From the Security Groups section in the sidebar, click on Manager Rules next to the
default item. From here, we want to create 2 new rules for what we defined above.
You should now have 4 Ingress rules within your Security Group.

Floating IPs can be thought of as the publicly-accessible address for our internal virtual network. These IPs can be associated to something within our network which will accept the traffic being passed to it (as long as it meets the rules in your Security Group).
To create one:

This will create a random, pre-defined IP from the range allowed in the public network (or other externally available network). At the moment, it's Status is down only because it's not associated to anything. We will fix this in the next section.
So far in this series, we've created a dedicated project and the network access rules that will open our application to the internet. In the next post, we'll start creating the functional components that will perform the application-specific duties we set out to do.
If you've been following along and have feedback or suggestions, please feel free to comment or message me.
24