78
Getting Started with .NET MAUI
❗ .NET MAUI is still in Preview, and the team at Microsoft continuously release changes. Some tools, features, and steps mentioned in this post may change.
To find out more about what is .NET MAUI and how it came to be, I recommend reading my blog post Aloha! Welcome to .NET MAUI before continuing with this tutorial.
We will cover:
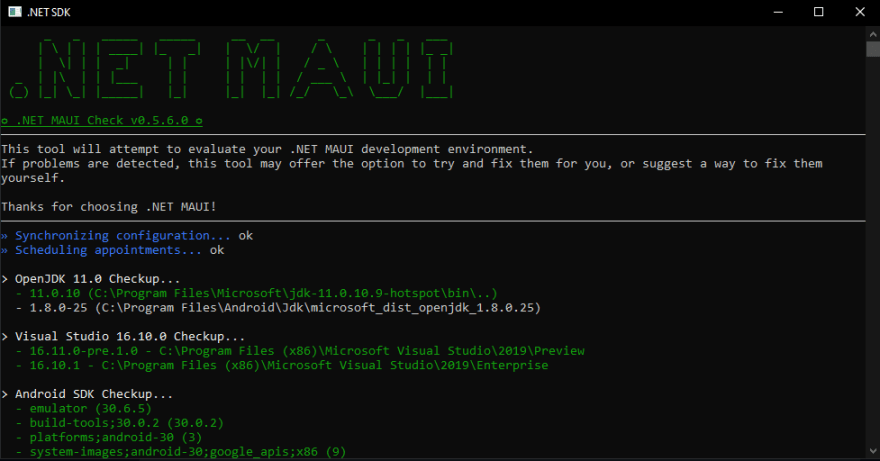
Before starting with a .NET MAUI project, we need to install all the proper dependencies. Microsoft has made this easy for us with a
dotnet tool that evaluates your system. The tool will detect any problems and offer to try to fix them for you or suggest a way to fix them yourself.First install the tool: (source: https://github.com/Redth/dotnet-maui-check)
dotnet tool install -g Redth.Net.Maui.CheckRun the tool using the command:
maui-checkFollow the instructions given in the tool to get everything you need to start working with .NET MAUI.

For the best development experience with .NET MAUI, it is recommended you use Visual Studio.
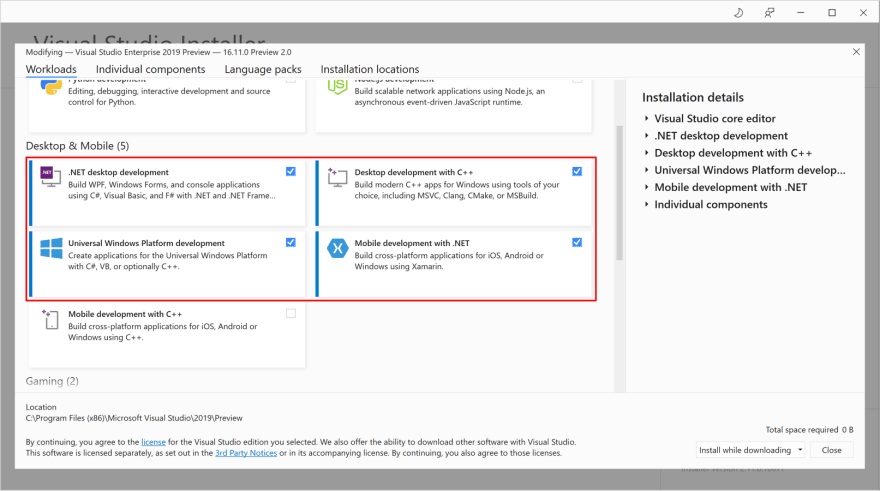
At the time of writing, Microsoft recommends starting with Visual Studio 2019 16.11 Preview 2 to develop .NET MAUI applications. Full support for .NET MAUI will be available in Visual Studio 2022, now in Preview.
Install the following workloads with Visual Studio:

To run and debug in an Android emulator, setup an emulator within Visual Studio following this guide https://docs.microsoft.com/en-us/xamarin/android/get-started/installation/android-emulator/
Once you have installed all that and the
maui-check succeeds, you are ready to create your first .NET MAUI application!This guide will use Visual Studio to create our first .NET MAUI application. However, you can also create a new .NET MAUI application from the command line.
In Visual Studio 16.11 Preview 2, select
Create a new project, search for MAUI or choose Project Type > MAUI from the dropdown.
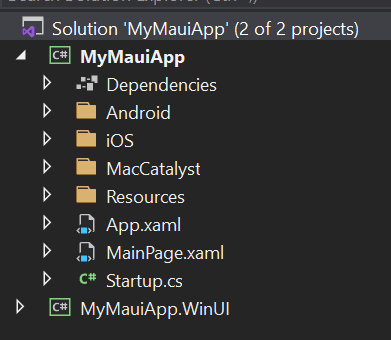
The generated template contains two projects:

The team is working hard to consolidate all the projects into one to build and deploy across all platforms. The final consolidation will come in later versions.
Run the application by selecting the target device, such as
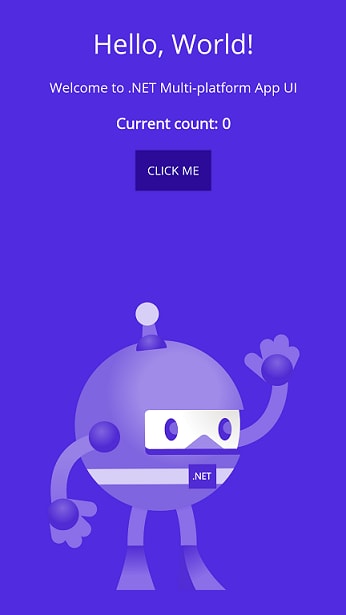
Android Emulator, in the Visual Studio toolbar dropdown next to the Start button.The application is a simple Hello World counter app with a button to increase the counter.

Congratulations! You have created and run your first .NET MAUI application!
❗ At the time of writing, there are a few bugs in the layout of the template application. (issue #1382)
The two issues in the template application are:
To fix this, we can change the layout from the
StackLayout in MainPage.xaml to a VerticalStackLayout, newly introduced in .NET MAUI and remove each Grid.Row.See this commit on my GitHub for the full details of the change.
As is to be expected with any preview, there are some issues you may have to address before you can fully get the project up and running. Below are the issues I ran into when writing this blog post.
To fix this, disable XAML Hot Reload in Visual Studio, follow the instructions in this comment from the existing issue: https://github.com/dotnet/maui/issues/1361
See the Microsoft documentation here: https://github.com/dotnet/core/blob/main/release-notes/6.0/known-issues.md#preview-5
I expect the team will continue to work through all the issues leading up to General Availability in November.
As a C# developer with little experience using Xamarin and XAML, I am most excited about the ability to define pages in .NET MAUI applications using C#. The existing examples and templates get you started using the traditional XAML based approach, carried over from Xamarin.Forms. In Xamarin.Forms, XAML is used to define the visual contents and works with a C# code-behind file. In .NET MAUI, you now have the option of using fluent C# or XAML to define the visual contents of a page.
To translate the template from XAML to C#, follow the steps below or get the complete source code from my GitHub: https://github.com/melissahoughton/GettingStartedMaui
To use fluent C# to define the UI of the template .NET MAUI app, we will change:
Note: The two projects in the template (.NET MAUI and WinUI) share the App, MainPage, and Startup files. Any changes will automatically be reflected across both.
Delete App.xaml and the code-behind App.xaml.cs
Note: In Visual Studio, the code-behind file is nested under the App.xaml. Deleting a XAML file in Visual Studio automatically deletes the associated code-behind.
Create a new class called App.cs with the below content
using Microsoft.Maui;
using Microsoft.Maui.Controls;
using Microsoft.Maui.Graphics;
using System.Collections.Generic;

namespace GettingStartedMaui
{
    public class App : IApplication
    {
        List<IWindow> _windows = new List<IWindow>();
        public IReadOnlyList<IWindow> Windows => _windows.AsReadOnly();

        public App(IImageSourceServiceConfiguration imageConfig)
        {
            imageConfig.SetImageDirectory("Assets");
        }

        public IWindow CreateWindow(IActivationState activationState)
        {
            var window = new Window(new MainPage());
            _windows.Add(window);
            return window;
        }
    }
}
Add the Extension Service Provider Factory to the app configuration in Startup.cs to enable dependency injection for the ImageSourceServiceConfiguration used in the step above.
appBuilder.UseMicrosoftExtensionsServiceProviderFactory();
Delete MainPage.xaml and the code-behind MainPage.xaml.cs
Create a new class called MainPage.cs with the below content
using Microsoft.Maui;
using Microsoft.Maui.Controls;
using Microsoft.Maui.Graphics;

namespace GettingStartedMaui
{
    public partial class MainPage : ContentPage
    {
        public MainPage()
        {
            BackgroundColor = Color.FromArgb("#512bdf");

            var verticalStack = new VerticalStackLayout() { Spacing = 20 };

            verticalStack.Add(new Label
            {
                Text = "Hello, World!",
                FontSize = 32,
                HorizontalOptions = LayoutOptions.CenterAndExpand,
                TextColor = Colors.White
            });
            SemanticProperties.SetHeadingLevel((BindableObject)verticalStack.Children[verticalStack.Children.Count - 1], SemanticHeadingLevel.Level1);

            verticalStack.Add(new Label
            {
                Text = "Welcome to .NET Multi-platform App UI",
                FontSize = 16,
                HorizontalOptions = LayoutOptions.Center,
                TextColor = Colors.White
            });

            var counterLabel = new Label
            {
                Text = "Current count: 0",
                FontSize = 18,
                FontAttributes = FontAttributes.Bold,
                HorizontalOptions = LayoutOptions.Center,
                TextColor = Colors.White
            };

            var button = new Button
            {
                Text = "Click me",
                HorizontalOptions = LayoutOptions.Center,
                TextColor = Colors.White,
                BackgroundColor = Color.FromArgb("#2b0b98"),
                Padding = new Thickness(14, 10)
            };

            var count = 0;
            button.Clicked += (sender, args) =>
            {
                count++;
                counterLabel.Text = $"Current count: {count}";
            };

            verticalStack.Add(counterLabel);
            verticalStack.Add(button);
            verticalStack.Add(new Image { Source = "dotnet_bot.png", WidthRequest = 300, HorizontalOptions = LayoutOptions.Center });

            Content = new ScrollView
            {
                Padding = 30,
                Content = verticalStack
            };
        }
    }
}
Clean and rebuild the project
You now are using fluent C# with your .NET MAUI application!
Take a look at the .NET MAUI GitHub for future updates and news on what is next with .NET MAUI. Mahalo!
78
