
25
Add shiels on github
Hello everyone, today we are going to discuss another way to customize your README.md file from a github repository. Indeed, we will see how to add shields. Shields are SVG badges that automatically update themselves according to the interactions related to your repository. For example, if a new release appears, the "release" badge will automatically update to show the latest release.
So I propose to discover together how to handle shields, and why not use them later for your next projects.
So I propose to discover together how to handle shields, and why not use them later for your next projects.
To begin, go to your GitHub repository, if you have not already created a README.md file you will have to create it since it is on this file that we will work.

Then go to the editing area of your README file, to start, we will create a centered paragraph, with some links and some images that will be our badges later on :
<p align="center">
  <a href=""><img alt="" src="" /></a>
  <a href=""><img alt="" src="" /></a>
  <a href=""><img alt="" src="" /></a>
</p>
We want to add a badge that will display the latest version of our release, so our first
<a> tag will look like this in our README file (of course replacing the text in square brackets with your username and repository) :<p align="center">
<a href="https://github.com/[user]/[repository]/releases/"><img alt="" src="" /></a>
<a href=""><img alt="" src="" /></a>
<a href=""><img alt="" src="" /></a>
</p>Now it's time to get serious: we're finally going to add our badge !
Go to Shields.io, and click on : "GitHub release (latest by date)" as shown in the following illustration:
Go to Shields.io, and click on : "GitHub release (latest by date)" as shown in the following illustration:

You now arrive at this window, where you fill in various information such as your username, and the name of your repository. For the style, I advise you to use the
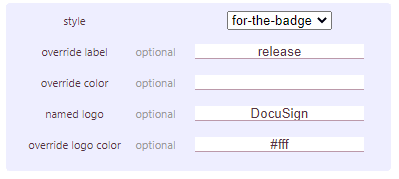
for-the-badge, even if it is quite subjective. In the input "override label" you can specify the label of the badge, whereas in the "override color" you can specify a colour.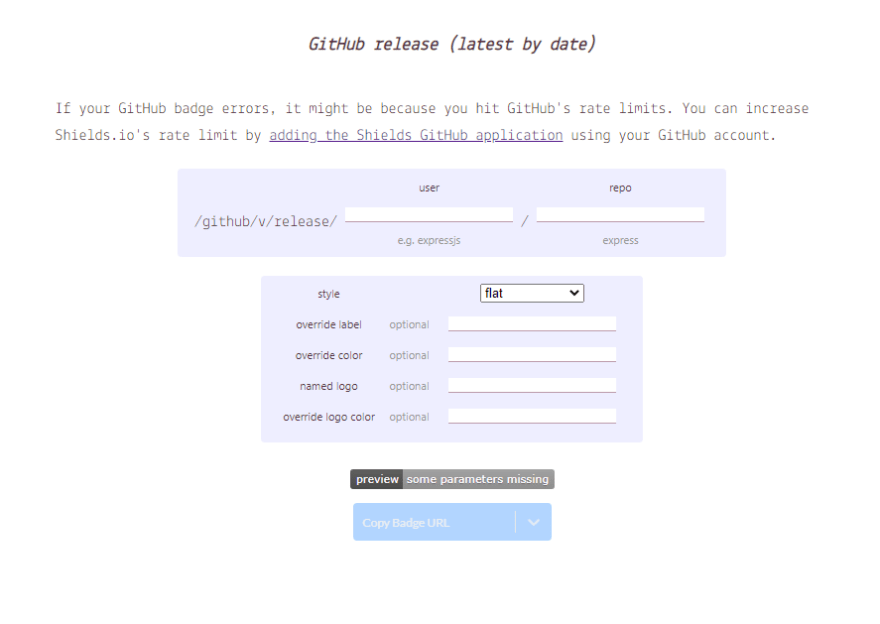
If you want to add a logo, it is quite possible and this is what we will see now. Open a new tab and go to Simple Icons.org to search for a logo you like. In my case, I will choose the DocuSign logo :

Go back to the shields.io tab, and the previously opened window. In the input named logo, enter the name of your logo, in my case : DocuSign.
You can also give your logo a colour in the input named "override logo color" :
You can also give your logo a colour in the input named "override logo color" :
Once this is done, you can click on : "Copy badge url", which will generate a url with the different parameters you have just entered.

Now let's go back to our README.md file, and the code we wrote earlier. In the first link of our paragraph, which is the release page, we will change the source of the image within it. As you may have guessed, we will paste the url previously copied thanks to the "Copy badge url" button.
<p align="center">
  <a href="https://github.com/[user]/[repository]/releases/">
    <img alt="Releases" src="https://img.shields.io/github/v/release/[user]/[repository]?label=release&logo=DocuSign&logoColor=%23fff&style=for-the-badge" />
  </a>
  <a href=""><img alt="" src="" /></a>
  <a href=""><img alt="" src="" /></a>
</p>
Save your README.md file and you will see the release badge appear. If you create a new release, the badge will automatically update. You can also try with other badges such as the number of "forks", "stars", "watchers"...
For my part, my badge looks like this :

I hope this tutorial has allowed you to add your own shields on GitHub, or at least to have discovered how to use them, if you have any questions, don't hesitate to ask me in the comments, or even to share a repository in which you have added badges. 👍
25