
28
Retrieve datas from postgreSQL to Google Sheets with Heroku for free
Connecting postgreSQL to Google Sheets might be tricky, as there is no explicit solution to do so, unless you use third party tools such as Zapier, Kloud.io or Blend.co. Moreover, some of those solutions are not forever free.
As a developer, I’d rather create my own things, and share them with people who might need them for their own projects. Let’s see how it goes.
As a developer, I’d rather create my own things, and share them with people who might need them for their own projects. Let’s see how it goes.
The main goal is to retrieve datas from a place to another : basically for better monitoring. As you may know, Google Sheets is available from Desktop and mobile, and it’s free to use. You will see some scripts on Google Appscripts that will empower your app easily. You can also connect your sheets to Tableau Public for some magical Data Viz, and refresh datas daily without any effort from you. You can find how to do so here.
The following code is assuming that you’re using the same dbname-username-password for all the databases that you want to monitor. Of course, if this assumption is not true, you should write down a new way to handle all dbnames-users-passwords, by changing the variables
DB_NAME, DB_USERNAME and DB_PASSWORD.You will need to register to the following tools:
Once you’re done signing up to these 3 platforms, let’s go to step 2.
If you already have a postgreSQL database to monitor, discard this step and go to step 3 directly.
If you never heard about Supabase, it’s the open source firebase alternative, using postgreSQL. They are offering a free tier pricing for 3 hobby projects, that you may use for the purpose we have here. To get started, just sign up with your Github account, and allow all required credentials.
Once logged in, click on New Project > Your org’s name.
Provide the project name, the database password, and the region closest to your current location. In this example, I’m going to use the following details:
Name :
Database password :
Region :
my-super-projectDatabase password :
hellothisisapasswordandihopeitsstrongenough2021Region :
West EU (London)Just let the magic process for 1 minute or 2.
Once your database is ready, use the button on the left side bar:  to run the following SQL query. It will create the table you will retrieve datas from later on.
to run the following SQL query. It will create the table you will retrieve datas from later on.CREATE TABLE public.conv
(
id uuid NOT NULL DEFAULT uuid_generate_v4(),
sender character varying COLLATE pg_catalog."default",
receiver character varying COLLATE pg_catalog."default",
content text COLLATE pg_catalog."default",
datetime timestamp with time zone DEFAULT now(),
CONSTRAINT conv_pkey PRIMARY KEY (id)
) TABLESPACE pg_default;
COMMENT ON COLUMN public.conv.sender
IS 'the one who sends the message';
COMMENT ON COLUMN public.conv.receiver
IS 'the one supposed to receive the message';
COMMENT ON COLUMN public.conv.content
IS 'the actual message';
COMMENT ON COLUMN public.conv.datetime
IS 'the date time the sender sends the content to the receiver';
ALTER TABLE ONLY public.conv ADD CONSTRAINT conv_pkey PRIMARY KEY (id);Now, let’s insert some datas in it.
d5f67084-c0ca-4ae5-8957-348237ba51be    A   B   Hey! It's been a while. How you're doing?   2021-06-26 12:03:22+00
5287170c-b6f6-47fe-ad0c-9f724ef60acb    B   A   Hey.\nThanks for your message. I'm doing fine, thanks!\nWhat's up?  2021-06-26 12:03:31+00
1c927c51-dd2f-4f1c-9ead-609f71b7747e    A   B   Nothing much. Wanna hang out tonight?   2021-06-26 12:04:10+00
f243838c-1596-46d1-86d5-304def0840db    B   A   Sure, I must be free at 7pm. What was the name of the bar we used to hang out in?   2021-06-26 12:04:50+00
a3ce9c80-8333-4fc7-8d27-7c19c31326d4    A   B   Foo. The Foo Bar.   2021-06-26 12:05:45+00
8f990cc9-35e7-4fa8-baac-d87bcf9f213e    B   A   Oh, yeah. How could I forget something that is so obvious. LOL  2021-06-26 12:06:14+00
02c18b5f-098e-479e-bcf5-42946cf34fe1    A   B   See you there btw, is 7:30pm ok for you?    2021-06-26 12:07:02+00
6fb02446-263d-4bf9-bdc1-51ad7f03c40c    B   A   Perfect. See you!   2021-06-26 12:07:23+00
Your supabase table must now look like this:

Your database connection string should look like this:
postgres(ql)://user:password@your-host-location.com:portnumber/dbname.If you created a database from Supabase, you can find it in Settings > Database > Connection string. The actual connection string will look like this: 
Now that you have this connection string, let’s code!
Directly from the repo.
Our goal here is to create the controller that receives a SQL statement (such as
Important cautions :
SELECT * FROM NAMETABLE), and gives back the datas as JSON. It’s actually a REST API controller.Important cautions :
Now create a local directory, named
python-server for example. From now on, you will need to create 5 files. 2 of those 5 files will be auto-generated , you will read more about it later, just right hereThe code is here.
Those 2 files are auto-generated, generally from openssl in terminal, or an easier solution like this website that provides self-signed certificates. Once you provide the Common Name, you can generate both files and have some kind of texts like this: 
In your root directory (
python-server in our example), copy and paste the :cert.pem
key.pem
The code is here.
It’s telling you (and Heroku right before deployment) the useful dependancies for your project.
It’s telling you (and Heroku right before deployment) the useful dependancies for your project.
I promise we’re almost done! You can run it locally to verify that everyhing works fine. Run
python app.py then go to:https://127.0.0.1:5000/<YOUR-DB-HOST>/<YOUR-SELECT-STATEMENT>In my case, I have this JSON: 
Now, push all those files in your forked and private repo on github.
Once you’re done, go to your Heroku account, we’re going to create your app.
Once you’re done, go to your Heroku account, we’re going to create your app.
After logging in, go to your Heroku dashboard and click on Create new app.
For my example, I will use the same name as from the repo:
Use the closest location to where you’re from. Then click on Create app.
For my example, I will use the same name as from the repo:
python-server-heroku.Use the closest location to where you’re from. Then click on Create app.
Go on Deploy tab > Deployment method > Connect to Github. Authorize credentials.
You will then have a “App connected to GitHub” section. Write down the repo-name with your own. In this example, mine is still
You will then have a “App connected to GitHub” section. Write down the repo-name with your own. In this example, mine is still
python-server-heroku. Once the repo is found, click on Connect.Go on Deploy tab > Deployment method > Automatic deploys. Just click on Enable Automatic Deploys.
The
Procfile file will help your app to run on the web and scale:web: gunicorn app:app
heroku ps:scale worker=1On the up right corner of your Heroku App Dashboard, click on Open app. If the Hello World statement is displayed, your app is running. Try now to go to
<YOUR-HEROKU-APP>.herokuapp.com/<YOUR-DB-HOST>/<YOUR-SELECT-STATEMENT> and see the datas displaying as JSON object.Go to drive.google.com and create a new Google Sheet file. This will lead you to a new tab. Rename the file to whatever you want. Name the first sheet with the same name as your target table. In my case, I will name it
conv. Open a new tab for the next and very last step.Go to script.google.com. Create a new script and save it (the name still doesn’t matter). Paste the following code in
Code.gs file:const URL_OF_THE_SPREADSHEET = "https://docs.google.com/spreadsheets/d/1QMEr6ABZpLqo8d0h_nY4BCu3hdE0Bkbo-Zj7qgp37Qw/edit#gid=0" //to be changed
const URL_OF_HEROKU_APP = "https://python-server-heroku.herokuapp.com/db.ehbnuyfpyplmhgjshzmd.supabase.co/SELECT%20*%20FROM%20conv" //to be changed
const ss = SpreadsheetApp.openByUrl(URL_OF_THE_SPREADSHEET)
function go(){
update_my_sheet("conv")
}
function getJSONDataFromUrl(url,params) {
console.log(url)
if(!params) params = {}
params['muteHttpExceptions'] = true
params['method'] = "GET"
var response = UrlFetchApp.fetch(url, params);
var parsedJsonData = JSON.parse(response.getContentText());
return parsedJsonData;
}
function update_my_sheet(sheet_name){
var url_to_be_fetched = URL_OF_HEROKU_APP
var initial_results = getJSONDataFromUrl(url_to_be_fetched)
//clear everything at the beginning
var sheet = ss.getSheetByName(sheet_name);
sheet.getRange(1, 1, sheet.getMaxRows(), sheet.getMaxColumns()).clear({contentsOnly: true});
//no datas found
if(initial_results.length === 0) return false
var results = initial_results.map(it => Object.values(it))
var headers = Object.keys(initial_results[0])
var rows_number = Number(results.length)
var columns_number = results[0].length
set_headers(sheet_name, headers)
//2nd row cause we have the headers in 1st row
var range = sheet.getRange(2,1,rows_number, columns_number);
range.setValues(results);
}
function set_headers(sheet_name, headers){
var last_column_address = columnToLetter(headers.length)
ss.getSheetByName(sheet_name).getRange("A1:"+last_column_address+"1").setValues([headers]);
}
function columnToLetter(column)
{
var temp, letter = '';
while (column > 0)
{
temp = (column - 1) % 26;
letter = String.fromCharCode(temp + 65) + letter;
column = (column - temp - 1) / 26;
}
return letter;
}IMPORTANT You will need to change
URL_OF_THE_SPREADSHEET and URL_OF_HEROKU_APP from the code above.Click on 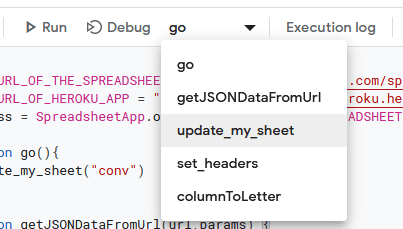 Run it.
Accept all authorizations.
Go back to your spreadsheet tab, and see the magic!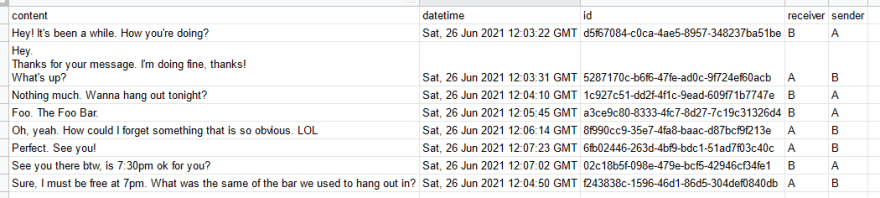
go function from the dropdown menu: Run it.Accept all authorizations.
Go back to your spreadsheet tab, and see the magic!
Instead of running the 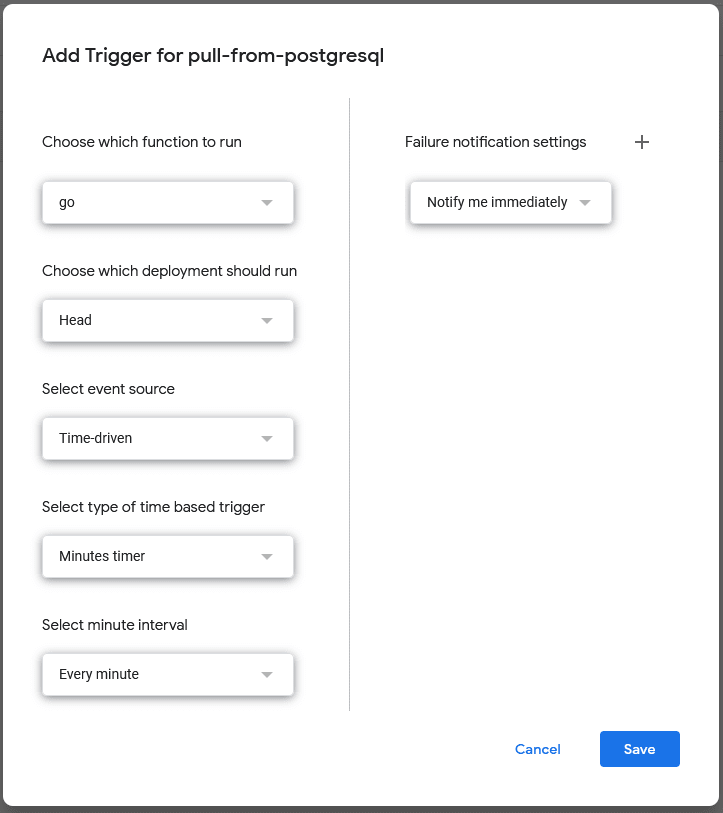
go function manually, you can setup a trigger. Go on the left-side pannel > Triggers. Then configure the parameters as follows, if you want a per-minute refresh for instance: And that’s it ! Enjoy your datas from Google Sheets directly.
28