
33
Building An Automated Testing Pipeline with GoCD
CI/CD enables developers, engineers and DevOps team to create a fast and effective process of packaging the product to market, thereby allowing them to stay ahead of the competition. When Selenium automation testing joins force with an effective CI/CD tool, it does wonders for the product delivery. GoCD is one such open-source Continuous Integration (CI) and Continuous Delivery (CD) tool developed by ThoughtWorks that supports the software development life cycle by enabling automation for the entire process. Right from development –. test –> deployment, GoCD ensures that your delivery cycles are on time, reliable, and efficient.
Ok. I know what you are thinking!
We have Jenkins for CI & CD ! Why a new tool ?

In this GoCD pipeline tutorial, we will deep dive into all the information you would need to set up a GoCD pipeline and in conjunction with the underlying concepts. You will also learn how to perform automation testing using Selenium in GoCD Pipeline through an Online Selenium Grid.
Jenkins is just awesome! We can do just anything and everything related to CI & CD with Jenkins by choosing the right plugins. Does that mean that other CI/CD tools, including GoCD, are less extensive in comparison to Jenkins? Definitely, not! Read our blog on Jenkins vs. GoCD to get detailed insights on the core offerings of GoCD when compared to Jenkins.
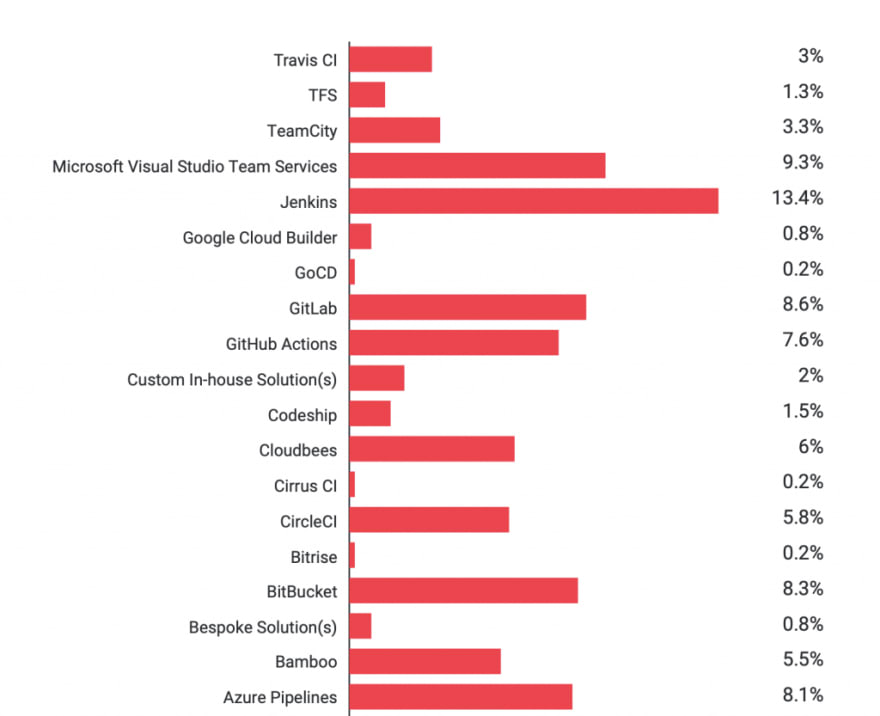
As per the results of State of CI/CD 2020, GoCD is slowly & steadily gaining momentum vis-a-vis other CI/CD tools.
Playing around with plugins in Jenkins requires a fair amount of experience and expertise, which is not the case with GoCD. It aims to provide the core value with fewer integration plugins unlike Jenkins that requires multiple plugins for delivering the right environment fit.
According to ThoughtWorks team
“GoCD aims to support the most common CD scenarios out of the box without any plugin installation”
There are certain advantages of GoCD that make it a prominent Jenkins alternative for Continuous Delivery and Continuous Deployment, some of them are mentioned below:on, such as:
The first step in the GoCD pipeline tutorial is to set up the two important components
The GoCD server is the one which provides work for the agents & GoCD agents are the ones that perform the assigned work like running sh scripts, build, deployment etc.
First things first, you can download the GoCD server & agents from https://www.gocd.org/download/#windows. GoCD comes up with its own bundled Java JRE version. Hence installation of Java is not a prerequisite unless we want to use a custom JRE version. After we unzip the GoCD server, we can start the server first by running the command
> cd <GoCD_SERVER_UNZIP_PATH>
> ./bin/go-server start
Once done, GoCD server can be accessed at http://localhost:8153/go/
For this GoCD pipeline tutorial, we are going to use a sample Spring Boot application https://github.com/iamvickyav/spring-boot-h2-war-tomcat
Let’s get started by creating our first GoCD pipeline.


Click on Test Connection to ensure the repo is reachable

Theoretically speaking, a CI/CD pipeline usually consists of multiple stages that run sequentially. Each stage contains a list of tasks to be executed. Each stage has to pass for the subsequent stages to run.

In this section of the GoCD pipeline tutorial, we look at configuring the tasks. This step is one of the most crucial steps that should be performed prudently. Here is the list of tasks we need to perform as part of the GoCD pipeline build:
Let’s name our first job as PROJECT_BUILD_TASK
Under Type your tasks below at the prompt* section, list our first command as mvn clean package which will create the JAR file

mvn clean package once executed will create a WAR file. Next we need to deploy the WAR file in Tomcat
As we are not done with the configuration yet, Click on Save + Edit Full Config (not the Save + Run The Pipeline) button

After clicking on the Save + Edit Full Config button, the full configuration page should have opened by now. Click on STAGES in the menu

Click on the Add New Stage button

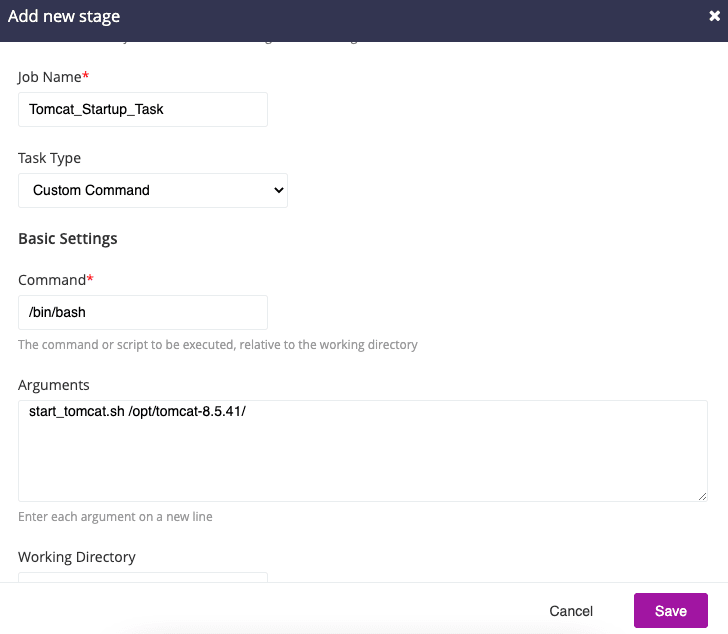
In the popup, enter the Stage name as Tomcat_Setup_Stage. Scroll down in the popup & enter the job name as Tomcat_Startup_Task
Choose the Task Type as Custom Command

We kept a script file called start_tomcat.sh under the project root directory. You can refer to the file here.
This file contains commands to start the Tomcat server. We need to pass the Tomcat installation directory as the input for this sh file.
It’s time for some action in this part of the GoCD pipeline tutorial 🙂 Let’s execute this script file from the GoCD pipeline. In the Add new stage popup, scroll down to Basic Settings section & configure as below
Command –
Arguments –
/bin/bashArguments –
start_tomcat.sh /opt/tomcat-8.5.41/Click on Save button

As we did in the previous section of the GoCD pipeline tutorial, let’s add another new stage by click on Add New Stage Button under Stages from menu. In the popup, enter the Stage name as Demo_Deployment_Stage. Scroll down in the popup & enter the job name as Deployment_Task
Choose the Task Type as Custom Command

We kept a script file called start_tomcat.sh under the project root directory. You can refer to the file here.
This file contains commands to start the Tomcat server. We need to pass the Tomcat installation directory as the input for this sh file.
It’s time for some action in this part of the GoCD pipeline tutorial 🙂 Let’s execute this script file from the GoCD pipeline. In the Add new stage popup, scroll down to Basic Settings section & configure as below
Command – /bin/bash
Arguments – start_tomcat.sh /opt/tomcat-8.5.41/
Click on Save button
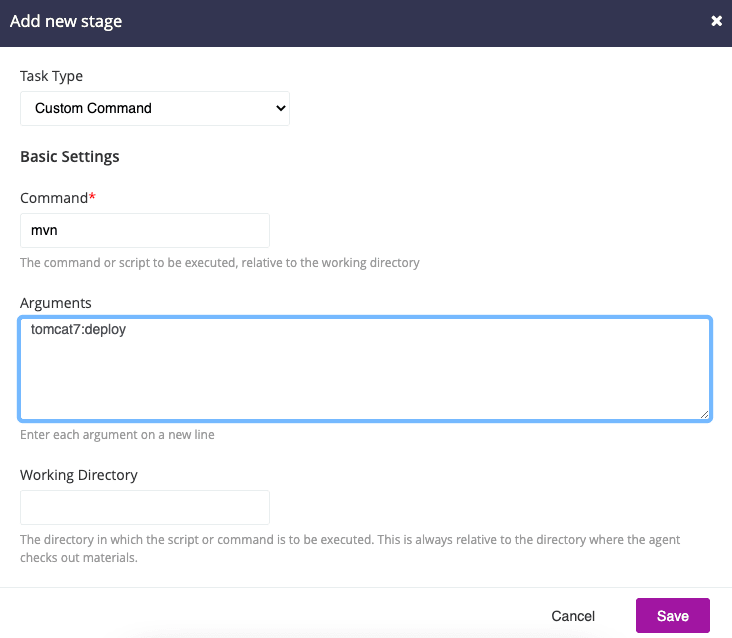
As we did in the previous section of the GoCD pipeline tutorial, let’s add another new stage by click on Add New Stage Button under Stages from menu. In the popup, enter the Stage name as Demo_Deploy
Choose the Task Type as Custom Command

Under Basic Settings section & configure as below
Command – mvn
Arguments – tomcat7:deploy
Click on Save button
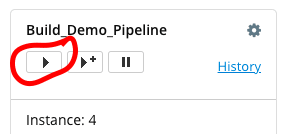
Now we have the pipeline with three stages ready for execution
By default, the pipeline will be in PAUSED state till we UNPAUSE it explicitly. Once the pipeline configuration is done, click on the UNPAUSE button next to the pipeline

Yay !! Congratulations ! We have configured our pipeline successfully. Before execution, you need to configure GoCD Agent – one of the most critical parts of the GoCD system. As mentioned earlier, the GoCD agent is where the execution really happens. So let’s configure our GoCD agent
Unzip the GoCD agent we already downloaded from https://www.gocd.org/download/
cd./bin/go-agent startOnce agent is started, visit http://localhost:8153/go/agents to verify whether agent gets registered to GoCD server

We can attach multiple agents to our GoCD server at a time. But for our task one GoCD agent is suffice our task
Now let’s get back back to our GoCD dashboard at http://localhost:8153/go/pipelines & execute the pipeline
We can see the logs & status of each stage below the pipeline in the dashboard itself. The three green boxes indicate the execution of all three stages were successful
In order to check the pipeline logs, click on the History link next to Pipeline run button


Click on any stage & then click on Go to Stage Details Page hyperlink to see the logs

Brush up the basics of CI/CD with this video that deep dives into the nitty-gritty of CI/CD:
GoCD Pipeline as Code is an optional feature. Instead of creating the pipeline using UI, we can create a separate pipeline configuration file with step by step instructions about the pipeline. This file can be written in either YAML or JSON formats.
Usually the pipeline configuration file is stored in the root directory along with the source code
For better understanding, I am going to recreate the previous pipeline we used in this article using Pipeline as Code technique
In that pipeline, we had three stages
Here is the sample YAML configuration to achieve the same
format_version: 2
pipelines:
  pipeline_code_demo:
    group: defaultGroup
    materials:
      backend:
        git: https://github.com/iamvickyav/spring-boot-h2-war-tomcat.git
        branch: master
    stages:
      - Build_Demo_Project_Stage:
          clean_workspace: true
          jobs:
            build_task:
              tasks:
                - exec:
                    run_if: passed
                    command: mvn
                    arguments:
                    - package
      - Start_Tomcat_Stage:
          clean_workspace: true
          jobs:
            start_tomcat_task:
              tasks:
                - exec:
                    run_if: passed
                    command: /bin/sh
                    arguments:
                    - start_tomcat.sh
                    - /opt/tomcat-8.5.41
      - Deploy_Project_Stage:
          clean_workspace: true
          jobs:
            deploy_project_task:
              tasks:
                - exec:
                    run_if: passed
                    command: mvn
                    arguments:
                    - tomcat7:deploy
We created a YAML file called pipeline.gocd.yaml under the project root directory with above configuration content
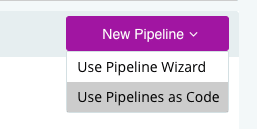
Lets create a pipeline using this YAML. Go to GoCD dashboard at
Click on New Pipeline -> Use Pipelines as Code
In the configuration page, follow the below configuration
Select Configuration Language – YAML
Material Type – Git
Repository URL – https://github.com/iamvickyav/spring-boot-h2-war-tomcat.git
Click on Test Connection to ensure connectivity

Scroll down to Connect Your SCM Repo to This GoCD Server section & give a name for the connection say Git-Connection

Scroll down to the Add Your Config File to Your SCM Repo section & click on
Scan Repositories for Config button.
Scan Repositories for Config button.
This will scan for *.gocd.yaml file in the git repo we configured in previous step (that’s why we named our configuration file as pipeline.gocd.yaml)
Once the scan is complete, GoCD will list our file name as found. Click on Save button

Once saved, GoCD will try to parse the YAML file & validate the syntax of the configuration. If there are any error in the syntax, GoCD will show the same here
If the syntax is valid, GoCD will show a green tick button

Now go back to the GoCD dashboard at http://localhost:8153/go/pipelines where we can see our new pipeline created. Click on Play button to run the pipeline

As mentioned earlier this GoCD pipeline tutorial not only covers the entire pipeline setup but also explains the agenda of the entire setup. Let’s try to configure & run a Selenium test automation project with the GoCD pipeline, this will help you understand how automation expedites the project delivery. For running the Selenium automation test, we will be using cloud-based Selenium Grid on LambdaTest.
Using LambdaTest Selenium grid, you can maximize your browser coverage as it offers a wide array of 2000+ browsers and supports multiple platforms across a plethora of devices. With the LambdaTest Selenium automation suite, you can perform cross browser testing much faster and easier than on the local grid.
By leveraging GoCD with LambdaTest>, you can achieve faster feedback loops through its modelling constructs which makes your complex CI/CD pipeline look a lot simpler. You also get features like dependency management & parallel execution to help you deliver better products quicker.
Prerequisites:
For demonstration of GoCD with LambdaTest, we are going to use the Cucumber sample project from LambdaTest’s Github repository. It contains automation test cases to test LambdaTest ToDo App.
Let’s start by creating a pipeline
The first step in this GoCD pipeline tutorial for running the Selenium automation tests is to create the pipeline. All you got to do is follow the instructions below!


Click on Test Connection to ensure the repo is reachable

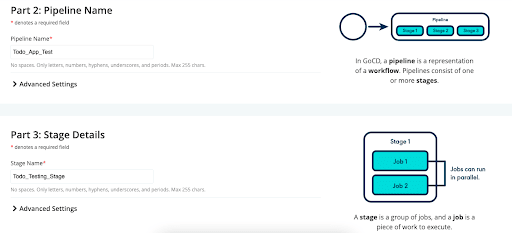
Next we need to name our pipeline & stage. In concept, Pipeline is the collection of stages & each stage contains list of tasks to be executed
Lets name our pipeline as Todo_App_Test & Stage as Todo_Testing_Stage
Next should be configuring the Jobs & Tasks section. In order to run our testing code, we need to use the mvn clean test command
Let’s specify the maven command under Jobs & Tasks

Since the code is meant to run in LambdaTest, we need to set the LambdaTest’s username & access token as environment variables
In order to set Environment variables, click on Advanced Settings -> Plain Text Variables -> Add button
Add the variables LT_USERNAME and LT_ACCESS_KEY and its corresponding values from LambdaTest website – https://accounts.lambdatest.com/detail/profile

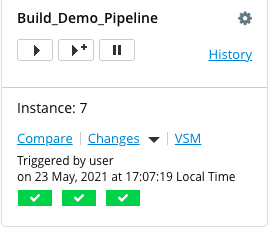
That’s it. Now click on Save + Run this pipeline button to execute our pipeline

You can see the build running now

Once the build ran successfully, we can check the log by clicking on the green tick & click on Go to Stage Details Page

Click on Job link under passed section in left side menu

Click on Expand All option under Console menu to see the entire log
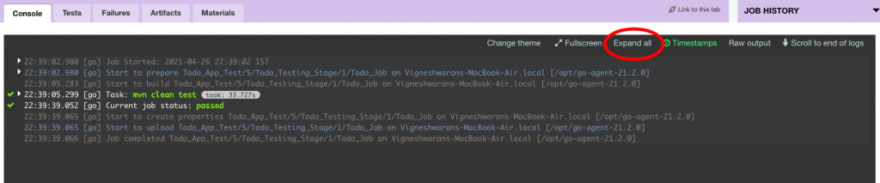
Hurray ! We have executed our first pipeline job successfully & verified the logs available on the Console.
You can find the logs (e.g. command logs, network logs, etc.) for the Selenium automation test on the LambdaTest platform. The video available with the test run helps in checking the in’s & out’s of the test execution (or test run).
Cool isn’t it?


A well orchestrated pipeline makes the job much easier for the team and ensures reliable deployment and delivery. In this GoCD pipeline tutorial, we had a detailed look at how to configure GoCD pipeline, configuring multiple stages, configuring GoCD agents, using environment variables , and using Selenium test automation with the GoCD pipeline. Hope you found this useful. Please let us know your thoughts & queries in the comment section.
Happy Testing!
33