
 About the idea:
 About the idea:
39
Managing API layers in Vue.js with TypeScript
Almost every Single-Page Application at some point needs to get some data from the backend. Sometimes there are several sources of data like REST APIs, Web Sockets etc. It's important to manage the API layer in the right way to make it simple and easy to use in any place of your application no matter if it's store, component or another type of source file.
If you already have some experience in development and want to check the solution here is the
FancyUserCard example. If some things would be hard to understand feel free to check the detailed step-by-step path.
To make things work better we need to slightly change our code and move all the API calls into a separate place.
AxiosInstance that is configured to work with /users API branch and our code becomes modular;

The approach shown above is enough to handle standard API layer workflow. If you want to make it even more flexible you could think about implementing some ideas below:
In the example, you can see that now we have an interface for our
HttpClient so we could have as many implementations as we need. It works if we have different HTTP clients like axios, fetch, ky and if we will need to migrate from one to another we would simply need to rewrite our HttpClient implementation in one place and it will be applied automatically in any place where we use our service;If you have few different data sources you could use some sort of factory to create the instance with needed implementation without an explicit class declaration. In this case, you just need to provide a contract interface and then implement each API method as you want.
As you already know, dealing with API calls in your components is harmful because whenever the changes come you have plenty of work to do to maintain your code in the working state. Also, it can be pretty challenging to test components and API because they are directly and deeply coupled. We want to avoid those things while writing code so let's get through the example.
This is the code for the initial example of an API call. For simplicity let's omit other code and keep attention only on the method itself.
axios
  .get<User>(`https://api.fancy-host.com/v1/users/${this.userId}`)
  .then((response) => {
    this.user = response.data;
  })
  .catch((error) => {
    console.error(error);
  });
As you can already see, we're accessing the component
data() directly and use global axios which forces us to type more code for setting the request configuration.then syntax to async/await;axios instance;Class.To start with, lest move our code to the separate file and simply export a function that accepts
userId as input parameter and return user object if the call was successful:export function getUser(userId: number) {
axios
.get<User>(`https://api.fancy-host.com/v1/users/${userId}`)
.then((response) => {
return response.data;
})
.catch((error) => {
console.error(error);
});
}Already an improvement! Now we can import this function whenever we need to get
User. We just need to specify the userId and we're ready to go.In real world there are often situations when you need to make sequential calls. For example, when you fetch
user you probably want to get information about posts or comments related to user, right? Sometimes you want to perform requests in parallel and it can be really tricky if we're talking about .then implementation. So why won't we make it better?export async function getUser(userId: number): Promise<User | undefined> {
try {
const { data } = await axios.get<User>(`https://api.fancy-host.com/v1/users/${userId}`);
return data;
} catch (error) {
console.error(error);
}
}As you can see, now we are providing additional typings and using
await to stop our code from running until the API call finishes. remember that you're able to use await only inside the async function.Okay, so now the longest line is the one with the end-point URL. Your server host is probably not going to change often and it's better to keep your API branch set up in one place so let's get into:
const axiosInstance = axios.create({
  baseURL: "https://api.fancy-host.com/v1/users"
});

export async function getUser(userId: number): Promise<User | undefined> {
  try {
    const { data } = await axiosInstance.get<User>(`/users/${userId}`);
    return data;
  } catch (error) {
    console.error(error);
  }
}
Much better. Now if your
/users API branch will change, you could simply rewrite it in the instance configuration and it will be applied to every call made using this AxiosInstance. Also, now you could use something called Interceptors which allows you to make some additional changes to requests/responses or perform logic when a request is made or response is back. Check out the link to get more details!What if I will say to you that your user doesn't understand if (and why) something went wrong .. until! Until you provide some information about "what went wrong". UX is really important to keep your user happy and make the workflow better at all. So how are we going to do that? Simply by returning both
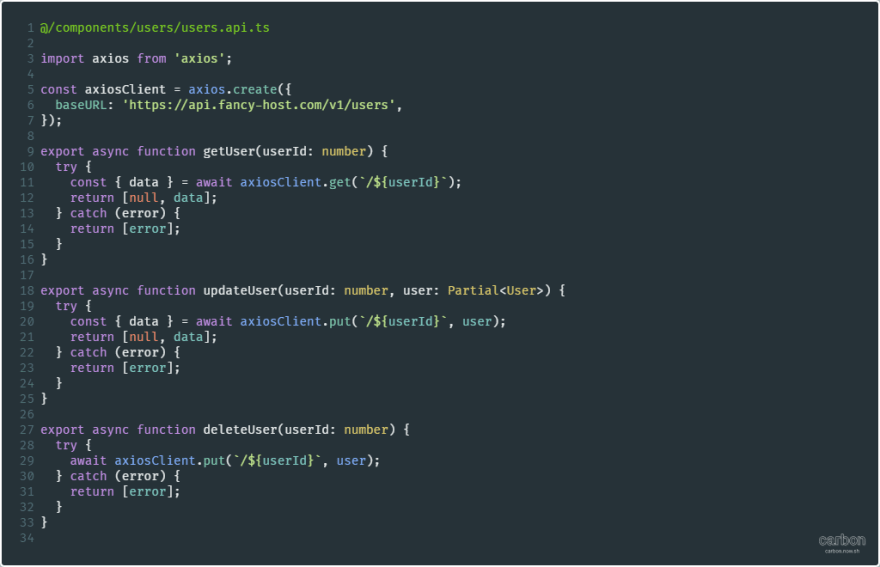
data and error from our API call. You could also return as many things as you need (if you need them, right?):export type APIResponse = [null, User] | [Error];
export async function getUser(userId: number): Promise<APIResponse> {
try {
const { data } = await axiosInstance.get<User>(`/${userId}`);
return [null, data];
} catch (error) {
console.error(error);
return [error];
}
}And how it will look when we use it, for example in our
created() callback:async created() {
const [error, user] = await getUser(this.selectedUser);
if (error) notifyUserAboutError(error);
else this.user = user;
}So in this case, if any error happens, you would be able to react to this and perform some actions like pushing an error notification, or submit a bug report or any other logic you put in your
notifyUserAboutError method. Elsewise, if everything went okay, you could simply put the user object into your Vue component and render fresh information.Also, if you need to return additional information (for example status code to indicate if it is
400 Bad Request or 401 Unautorized in case of failed request or if you want to get some response headers if everything was okay), you could add an object in your method return:export type Options = { headers?: Record<string, any>; code?: number };
export type APIResponse = [null, User, Options?] | [Error, Options?];
export async function getUser(userId: number): Promise<APIResponse> {
try {
const { data, headers } = await axiosInstance.get<User>(`/${userId}`);
return [null, data, { headers }];
} catch (error) {
console.error(error);
return [error, error.response?.status];
}
}And usage:
async created() {
    const [error, user, options] = await getUser(this.selectedUser);

    if (error) {
      notifyUserAboutError(error);

      if (options?.code === 401) goToAuth();
      if (options?.code === 400) notifyBadRequest(error);
    } else {
      this.user = user;

      const customHeader = options?.headers?.customHeader;
    }
  }
As you can see, your requests become more and more powerful but at the same time, you can make your components free from that logic and work only with those details you need.
And now there is time for the final touch. Our code is already doing a great job but we can make it even better. For example, there are cases when we want to test how our components interact with other layers. At the same time, we don't want to perform real requests and it's enough to ensure that we make them correctly at all. To achieve this result we want to be able to mock our HTTP client. To make it possible, we want to "inject" a mocked instance into our module and it's hard to imagine a better way to do that than with
Class and its constructor.export class UserService {
constructor(private httpClient: AxiosInstance) {}
async getUser(userId: number): Promise<APIResponse> {
try {
const { data } = await this.httpClient.get<User>(`/${userId}`);
return [null, data];
} catch (error) {
console.error(error);
return [error];
}
}
}And the usage:
const axiosInstance = axios.create({
  baseURL: "https://api.fancy-host.com/v1/users"
});

export const userService = new UserService(axiosInstance);
In this case, you don't expose your
AxiosInstance and provide access only thru your service public API.Hope that this article was useful for you. Do not hesitate to leave a comment if you have some other ideas or if there are any questions about the content of this post. I will update this post with detailed information about the problem, the solutions and the refactoring process soon.
Cheers!
Cheers!
39