
27
The 23 € Symbol Node
This guide will help to create your node in a cost-efficient and secure way. We will use symbol-bootstrap to set up the node and Hetzner cloud provider to run the virtual Ubuntu box. You can read more about nodes in the official documentation.
In order to follow along with this tutorial, it would be best to have knowledge of Symbol Blockchain, Symbol Wallets, Linux, and Networking. You should try the guide on Symbol's TestNet and eventually create your MainNet node where real tokens are used!
For this example, we are using Hetzner as it's user-friendly and fairly low-cost. You can use a similar approach with Digital Ocean or even AWS.


Now we will install the required software to run a Symbol node using Bootstrap in the Cloud VM. The following setup is for a typical Ubuntu OS, other distributions may be slightly different.
Connect to the box's terminal using ssh:
ssh root@REPLACE_WITH_THE_BOX_IP
Install the following required software:
curl -fsSL https://download.docker.com/linux/ubuntu/gpg | sudo apt-key add -
curl -sL https://deb.nodesource.com/setup_14.x | sudo -E bash -
add-apt-repository "deb [arch=amd64] https://download.docker.com/linux/ubuntu $(lsb_release -cs) stable"
apt-get update
apt-cache policy docker-ce
apt-get install -y docker-ce unzip gcc g++ make nodejs unzip docker-compose
docker --version
docker-compose --version
Install symbol-bootstrap tool:
npm install -g symbol-bootstrap@1.0.6-alpha-202105122247
symbol-bootstrap version
Create the bootstrap and docker user:
# Create the bootstrap user
adduser bootstrap
# Enter a password for the bootstrap user
usermod -aG sudo bootstrap
groupadd -f docker
usermod -aG docker bootstrap
Note: Version symbol-bootstrap@1.0.6-alpha-202105122247 is an alpha version with a new wizard feature we will be using.
Here we have the option to create the Symbol node directly on the Cloud VM box, but for security reasons, we are going to create it a in separate private computer, aka, your own computer. Then, the configured node will be copied over to the VM box.
Install bootstrap and verify the installation
npm install -g symbol-bootstrap@1.0.8-alpha-202107131135
symbol-bootstrap version
symbol-bootstrap verify
Run the bootstrap wizard and follow the instructions. This is where the magic happens.
symbol-bootstrap wizard
Select the network, let's use Testnet for this guide.
Select your node assembly (Dual).
Enter a strong password. This password will be used to encrypt and decrypt the node's private keys. Keep this password and the bootstrap files safe!

Select your Symbol Reward Program if it applies to you.
Generate random keys. In this example, we are going to generate new random keys for our node. If you already have keys, you can enter their private part.
Enter the IP/Hostname of your node and a catchy friendly name.
Select the default security mode (PROMPT_MAIN_TRANSPORT) and enable voting if it applies to you.
Once the wizard finishes, it will create the custom-preset.yml file with your node's customization. This file includes the private keys of your node. The private keys are encrypted using the password provided in the wizard. Keep this file and the password safe!
The wizard displays the node's generated or entered accounts. The Main account is the account that "owns" the node. It defines the node's importance (or the chance to harvest a block) and links the different secondary accounts.
The custom preset will allow you to regenerate (most) of the node's configuration. The only exceptions are voting keys. If you regenerate your voting node, you will need to re-link the voting keys.
The wizard will also show different useful commands you can use to continue the node setup.
You now have the option to start the node or to create a zip of the node configuration that can be deployed to a different machine. In our case, we want the latter, create a zip to be deployed in the Hetzner VM:
symbol-bootstrap pack -p testnet -a dual -c custom-preset.ymlBootstrap's
pack, start, and config create the target folder. The target folder is the generated configuration based on the selected preset, assembly, and custom preset. Bootstrap maintains the files inside, they should not be manually changed. The way to tune them is via the custom preset file.A Symbol node requires several accounts and keys. Bootstrap handles them under the hood but you need to link them. Liking keys is a blockchain transaction that requires XYM to pay the nodes' fees.
First, you need to fund the node's main account. You can transfer a min amount of 10 XYM from your Symbol funder wallet providing the Main account's address.
Once your main account has enough XYM, you can link the node's keys using the following wizard.
symbol-bootstrap link --useKnownRestGateways -c custom-preset.yml --maxFee 100000Your node is fully configured to run, now let's copy it to the Cloud VM box.
Copy the zip file from your private computer into the Cloud VM and connect to it. Note that we are connecting and copying as the bootstrap Linux user, not as the root user.
scp testnet-dual-node.zip  bootstrap@REPLACE_WITH_THE_BOX_IP:~/target.zip
ssh bootstrap@REPLACE_WITH_THE_BOX_IP
Once in the box, unzip the target.zip file.
unzip target.zip -d symbol-node
cd symbol-node
Verify once again symbol-bootstrap installation.
symbol-bootstrap verify
Run the node!
symbol-bootstrap run -d
Once the node is running, you can check it by going to the next URLs from your browser:
These links display the node information and the (synching) chain state.
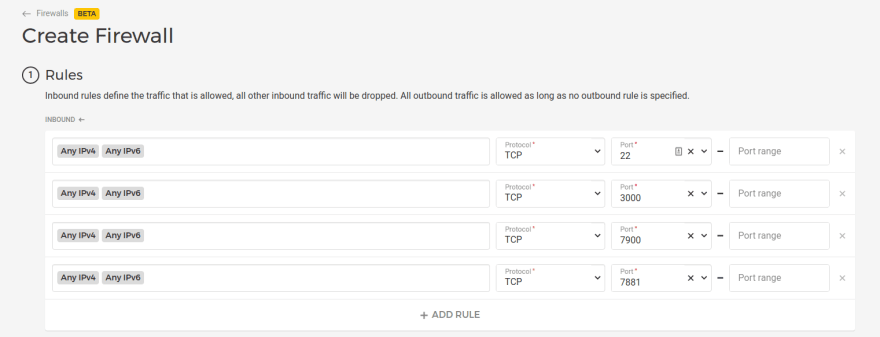
In general, to upgrade your node you need to connect to the VM box (remember to reopen port 22 in the firewall):
ssh bootstrap@REPLACE_WITH_THE_BOX_IPOnce in the terminal:
sudo npm install -g symbol-bootstrap
cd symbol-node
symbol-bootstrap stop
cp target backup-target -r
symbol-bootstrap start -c config-only-custom-preset.yml --upgrade -d
Before doing any update, it's recommended to backup the target folder (
cp target backup-target -r). Once the network grows, the node's target folder could be fairly large. Backing up will require doubling the used disk space. A larger volume would need to be considered. The
--upgrade params recreates the node's configuration and docker-compose file upgrading any service. The target folder is upgraded, any manual changes done inside may be overwritten!Why did we use a separate private computer to generate the configuration? Why not just run Bootstrap's wizard directly on the VM Cloud box? Some of the reasons:
If the Cloud VM box gets compromised, the hacker wouldn't be able to retrieve the main private key.
Other security recommendations:
You can read more about how to enable delegate harvesting and this awesome ultimate guide to start harvesting blocks post.
In this guide, we explained how to run a node under 23 euros per month. But will the node pay for itself? Let's do some numbers.
At the very minute of writing, XYM price is 0.12 USD or 0.10 EUR. In XYM coins, the server costs around 230 XYM per month.
If any of the accounts delegating to your node harvests a block, your node's main account will receive 45 XYM. Meaning that your node needs to harvest around 5.1 blocks per month to pay for itself.
According to this super useful xym-calculator, to harvest those blocks your node needs to "collect" 133K XYM. Using Symbol's delegated harvesting, you don't need to have 133K XYM, instead, you need harvesters to delegate to your node this amount. Then, the node (probably) pays itself.
These numbers literally change every hour so if your margins are tight, you need to revisit them often.
The node will need to be supported. You need to spend some time keeping up with Symbol news and upgrades. If your node is down, neither the node nor the harvesters will harvest. You need to monitor the node to keep it running. Low to no downtime will keep your harvesters happy.
If running a node is not for you, you can always delegate your private wallet to another community node. Find one that brings you the best uptime and support!
I've created Symbol Bootstrap out of the necessity to create private networks quickly in order to end-to-end tests the Symbol's SDKs. From there, Bootstrap has evolved into a user-friendly way to create public Symbol nodes. This guide and Bootstrap's wizard reflect the learnings I have acquired along the way from NEM colleagues and the community.
Bootstrap lets you create all the types of nodes (Dual, API, Peer), include all the known components (Mongo, Server, Broker, Supernode Agent, Rest, Explorer, Wallet, Faucet, etc) for both public or private networks. It allows you to "save" your configuration with just a YML file and update your nodes with --upgrade. Bootstrap hides configuration and implementation details while retaining the tunability with custom presets.
If you are interested in creating a Symbol node from scratch without using Bootstrap, try this great Running a Symbol node manually guide. The Deploying node for paranoids post explains how to create the server certificates in detail.
27