
44
Migrating existing REST API Server to Serverless with AWS Lambda, MongoDB and Serverless Framework
With the increased interest in serverless backend development, companies, startups have began to look towards migrating their exiting projects from using a server to essentially a serverless server*.
Serverless has different meanings depending on the context. It could be a third party managed services like Firebase or an event driven service.
In this tutorial, you will learn how to migrate your existing project to a serverless approach using AWS Lambda, MongoDB, and Serverless Framework.
The movie app is a simple CRUD based application that stores, retrieves, updates and deletes movies from a MongoDB database. The application is written in Fastify but the process is the same for every other NodeJS Framework e.g, Express, Hapi, Koa.
Serverless Framework: The Serverless Framework is a framework that allows you to build Serverless applications. It is provider-agnostic meaning it you can use it to build quite a number of serverless providers. Read more on their.
AWS Lambda: AWS Lambda is and event-driven serverless computing platform, meaning, it executes your code in response to event. It is the third compute service from Amazon. The others being EC2 (Elastic Compute Cloud) and ECS (Elastic Container Service).
Enough talk. Let's get into the code
Alright alright, even I am getting tired of talk. Let's code
This is might be a given, but be sure to clone your code and not edit the original one,
It may not affect but it's makes for freedom to edit to satisfaction
Install Serverless CLI
(Recommended to install system wide, makes for easy cli usage outside your current project)
(Recommended to install system wide, makes for easy cli usage outside your current project)
$ npm install -g serverless(if you are not interested in installing system wide)
$ cd your-project-directory
$ npm install --save serverless
This command will install serverless and makes available 2 commands
serverless & sls. sls is an alias to serverlessAdd Serverless to your current project
$ sls create --template aws-nodejs --name <custom-unique-name>This will create three files
.
├── .npmignore
├── handler.js
└── serverless.yml
Explanation time (bear with me)
'use strict';

module.exports.hello = async (event) => {
  return {
    statusCode: 200,
    body: JSON.stringify(
      {
        message: 'Go Serverless v1.0! Your function executed successfully!',
        input: event,
      },
      null,
      2
    ),
  };

  // Use this code if you don't use the http event with the LAMBDA-PROXY integration
  // return { message: 'Go Serverless v1.0! Your function executed successfully!', event };
};provider:
name: aws
runtime: nodejs12.x
lambdaHashingVersion: 20201221
stage: dev
region: us-west-1
...--name flag we specified when adding adding serverless)
functions:
hello:
  handler: handler.hello
...resources:
Resources:
NewResource:
Type: AWS::S3::Bucket
Properties:
BucketName: my-new-bucket
Outputs:
NewOutput:
Description: "Description for the output"
Value: "Some output value"Update serverless.yml file
We will configure the serverless.yml file to reference your existing API endpoints and other configurations
We will configure the serverless.yml file to reference your existing API endpoints and other configurations
I won't bore you with the details, you can update it as shown below. It should work for your application too
service: <autogenerated> # Service name (must be unique for your account, no two services can share the same name)

frameworkVersion: "2" # Recommended to pin it to a working version so updates won't break your application

provider:
  name: aws # Name of the cloud provider
  runtime: nodejs14.x # node runtime that the deploy will work on, this is different from the nodejs version required for sls to run
  lambdaHashingVersion: 20201221 # Recommended (honestly, no idea why. Lemme know in the comments what it means)
  memorySize: 130 # Memory size required for lambda functions to run
  timeout: 10 # 10s timeout for a request to be cancelled
  stage: {opt:stage, 'dev'} # Stage to run the functions, it is used for development process to specify which ENV to run
  region: eu-west-1 # Optional override, it will be automatically set from AWS

functions:
  api: # can be any name, this will be mapped to the functions on lambda. It has to be unique
    handler: handler.api # The file.exportedFunction that the functions will be use when the event is created
    events:
      - http: ANY / # RegExps all the HTTP Routes GET|POST|PUT|PATCH|DELETE|OPTIONS, etc.
      - http: ANY /{proxy+} # If your routes use queries and parameters
Oh look, I ended up adding the details. Make sure to remove the comments.
Install the aws-lambda-fastify
npm install aws-lambda-fastifyOpen
handler.js using your editor and update it as followsconst awsLambdaFastify = require('aws-lambda-fastify');
const app = require('./app');
const proxy = awsLambdaFastify(app);
exports.api = (event, context) => proxy(event, context);Open
app.js and update itconst fastify = require('fastify');
const cors = require('fastify-cors');
const mongoose = require('mongoose');
require('dotenv').config();
const controllers = require('./controllers');
const MONGO_URI = process.env.MONGO_URI || 'mongodb://localhost:27017/movie';
const PORT = process.env.PORT || 3000;
// Connect to the db
mongoose
.connect(MONGO_URI, {
useCreateIndex: true,
useFindAndModify: false,
useNewUrlParser: true,
useUnifiedTopology: true,
})
.then((connection) => {
console.log(`Database connected ::: ${connection.connection.host}`);
})
.catch((err) => {
console.error(`Error ::: ${err.message}`);
process.exit();
});
// Initialize app
const app = fastify();
// CORS
app.register(cors, {
origin: '*',
});
// Routes
app.get('/', controllers.getAll);
app.post('/create', controllers.create);
app.get('/:id', controllers.getOne);
app.put('/:id/update', controllers.updateOne);
app.delete('/:id/delete', controllers.deleteOne);
// Run as backend server if the file is called directly
if (require.main === module) {
  app.listen(PORT, (err) => {
    if (err) console.error(err);
    console.log(`server running on ${PORT}`);
  });
} else {
  // Execute as aws lambda function when required as a module
  module.exports = app;
}As noticed here, there's not much change except
// Run as backend server if the file is called directly
if (require.main === module) {
app.listen(PORT, (err) => {
if (err) console.error(err);
console.log(`server running on ${PORT}`);
});
} else {
// Execute as aws lambda function when required as a module
module.exports = app;
}Which runs the file as normal server if called directly
node app.js and runs it as a function when imported from our handler.js fileAnother change is in the
we will replace
controllers.js filewe will replace
req,res with event since our requests are now events but it works the same. Fastify Power!// const create = async (req,res) {
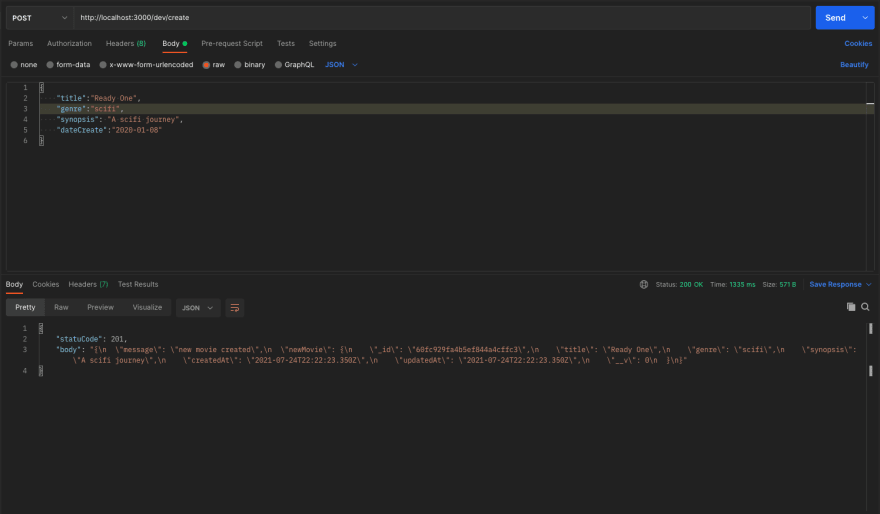
const create = async (event) => {
try {
const newMovie = await Movie.create(event.body); // Events are sent in JSON format
return {
statuCode: 201,
body: JSON.stringify(
{
message: 'new movie created',
newMovie,
},
null,
2
),
};
} catch (err) {
return {
statuCode: err.code || 500,
message: JSON.stringify(err),
};
}
};
...Next is the way we return responses, we will have to stringify (JSON.stringify(data)) the responses (AWS Lambda Recommended) and structure it as above.
Phew! that was a stretch, I need a cup of coffee ....Alright, let's continue
Now we can deploy our app to AWS!

Hehe, not yet young padwan.
Hehe, not yet young padwan.
Testing our application locally (dev) is really important so we don't end up causing cataclysmic situation. That's where serverless-offline comes in
Explanation Time!: Serverless Offline is a Serverless plugin that emulates AWS and API Gateway on your local machine to speed up your development cycles. - Serverless
How do we integrate it to our application? Glad you asked. It takes two easy steps
Install the npm package as devDependecy
Install the npm package as devDependecy
npm install --save-dev serverless-offlineNext we will plug-in 👓 it to our
serverless.yml file...
plugins:
- serverless-offlineYosh! let's now run it locally
sls offline startrunning this command will show this output
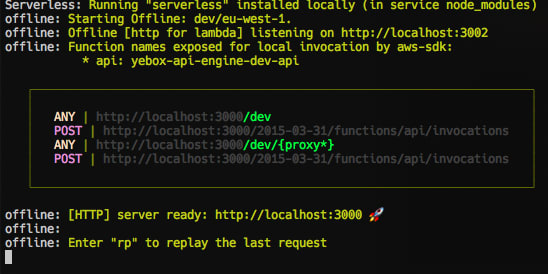
When we visit Postman (or any REST Client you use) and perform the CRUD Operations
Get all movies

Get one movie


Now that we are done testing our app locally, time to deploy it. Ah finally!
First we have to configure AWS CLI. Follow the steps here
First we have to configure AWS CLI. Follow the steps here
Done? Good, let's continue.
run
sls deployto deploy your application
PS: I couldn't deploy mine, for some reason, I can't access my AWS account, story for later.
It will display the url to your application should the deploy succeed, test the endpoints and you should be good to go
And that's it. You have successfully migrated your existing app to AWS Lambda using Serverless Framework.
The link to the Repository
Was the guide straightforward enough to follow?, did you get lost somewhere?, let me know in the comments.
Follow me for more 'straightforward' tutorials such as this.
KodeRant](https://koderant.hashnode.dev/)
44