
29
AUTOMATICALLY LOAD ENVIRONMENT VARIABLES IN FLASK
With the introduction of the Flask command line interface, one of the more annoying things you have to do during development is set the environment variables each time you work on your app, namely FLASK_ENV and FLASK_APP. Well, Flask has a way for you to handle those things in a way to where you only have to do it once. And through the same functionality, you can also add other environment variables for your project. In this article, I'll show you how to use python-dotenv to have your environment variables loaded and ready to go every time you run your app.
The one package that makes this all work is
python-dotenvI'm going to demo how this works through a very simple Flask app.
Let's start by creating the directories and empty files we'll need. This is what our project directory will look like:
demo/__init__.py
demo/settings.py
.env
.flaskenv
run.py
This app won't do anything special. It'll just show us what configuration values we have.
To start, on the command line create a new virtual environment and install flask and python-dotenv. I use
pipenv, so I can do this all in one step:pipenv install flask python-dotenv
pipenv shellNext, in your
demo/init.py, we'll need to create the basics of a Flask app, which means importing Flask, creating a application factory function (create_app), and instantiating Flask. Here's the code to do this.# demo/__init__.py
from flask import Flask
def create_app():
app = Flask(__name__)
return appIf you've worked with Flask at all, then you know exactly how this works.
Next, let's add in a simple route so we know our app actually works.
# demo/__init__.py
from flask import Flask

def create_app():
    app = Flask(__name__)

    @app.route('/')
    def index():
        return '<h1>Hey There!</h1>'

return appOnce we've done that, we can use the Flask CLI to run the app. To run the app, use the following command while in the top level directory of your project.
flask runBut when we do that, we already get an error!
Error: Could not locate a Flask application. You did not provide the "FLASK_APP" environment variable, and a "wsgi.py" or "app.py" module was not found in the current directory.
This is a common error though. Normally, to fix this, we would export the environment variable FLASK_APP to be equal to the name of our app directory like this:
export FLASK_APP=demoBut since we're using
python-dotenv and we want to avoid the inconvenience of using the command line, we'll have this load automatically by putting it in one of our dot files.We have two dot files:
.env and .flaskenv. We want to use .flaskenv for any Flask CLI configuration commands and use .env for our app configuration.We'll put our FLASK_APP enviornment variable inside of the
.flaskenv file.#.flaskenv
FLASK_APP=demoNow that we've added that one line, let's try running the app again.
flask runWe should be able to navigate to localhost:5000 or 127.0.0.1:5000 to see the result.

Note the message that appears on the command line that says we aren't in debug mode

Now if we were to stop working on this project and come back later, all we would need to do is use flask run and the app will start up without having to specify its location again.
Let's say we want to modify some other Flask CLI options, we can put those in our .flaskenv file.
Here are some options:
I think the most common ones you'll use are FLASK_ENV, FLASK_RUN_PORT, and FLASK_RUN_EXTRA_FILES, so I'll create examples with them here.
Let's start with FLASK_ENV. By default, it's 'production', which doesn't do anything noticeable. The point of the environment though is so you can decide on what actions to take in your app depending on the environment. For example, you could do something like instantiate the Sentry library for error logging when in production but not development.
If you change your FLASK_ENV to development, the biggest change you'll see is the reloader starts working and your app gets put into debug mode. So let's set that value in our
.flaskenv file.#.flaskenv
FLASK_APP=demo
FLASK_ENV=developmentLet's stop the server and run our app again.
flask run
Let's add another one for the port.
#.flaskenv
FLASK_APP=demo
FLASK_ENV=development
FLASK_RUN_PORT=8080After restarting, we'll have to access our on through port 8080:

What if we don't want to have to stop and restart our app when we change non-py files in our project? We can use FLASK_RUN_EXTRA_FILES for that. For example, to watch a files called config.yml and README.md
FLASK_RUN_EXTRA_FILES=config.yml:README.md(If you are on windows, you'll need to use a semicolon (;) instead of a colon (:) to separate multiple files)
Now that we've worked with .flaskenv, let's move on to adding variables to the .env file. We'll use these in our app.
One advantage of having .env hold our app environment variables is that we can easily have multiple versions of the file for each place we run our app. For example, we can have one for our local machine, one for a staging environment, and one for production, etc.
Let's add two:
#.env
SECRET_KEY=topsecretkey
API_KEY=donotsharethisapikeywithanyone
Unlike the values prepended with FLASK_ in our
.flaskenv file, the variables in .env aren't meant to work for us automatically. Instead, we need to load them into our app. For that, we'll use the settings.py file.Inside of settings.py, let's import environ from os so we have access to our environment variables.
#demo/settings.py
from os import environ
Next, we need to assign those variables to Python variables, and then later we'll load them into our app.
#demo/settings.py
from os import environ
SECRET_KEY = environ.get('SECRET_KEY')
API_KEY = environ.get('API_KEY')
We don't need to use the same name for the variable in Python as we do for Python, but I like to do it for consistency purposes.
Next, let's add the configuration from this file in our init.py.
# demo/__init__.py
from flask import Flask

def create_app():
    app = Flask(__name__)

    app.config.from_pyfile('settings.py')

    @app.route('/')
    def index():
        return '<h1>Hey There!</h1>'

    return app
Now our environment variables are ready to use. In the case of SECRET_KEY, normally some Flask extensions we use would pick this up and use it automatically. For the API_KEY, we would need to use this directly in our code.
In our code, we'll simply display the API_KEY in our route.
# demo/__init__.py
from flask import Flask

def create_app():
    app = Flask(__name__)

    app.config.from_pyfile('settings.py')

    @app.route('/')
    def index():
        return f'API_KEY = { app.config.get("API_KEY") }'

    return app
If you want to use your .dotenv files in production, you have to make a small change because you won't be using the Flask CLI on a production server.
If you want to see this work, you can install gunicorn so you don't have to use the development server for Flask.
pipenv install gunicornWe need to create a file that gunicorn can find the app object in. For this, we'll create run.py. Let's start with the standard code that doesn't load the environment variables, which is only two lines.
#run.py
from demo import create_app
app = create_app()
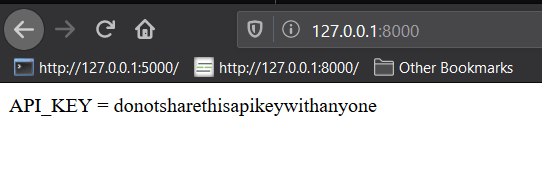
gunicorn run:appThis should run on port 8000 by default. If you navigate to the index, you'll see the value of API_KEY is None.

#run.py
from demo import create_app
from dotenv import load_dotenv

load_dotenv('.env') #the path to your .env file (or any other file of environment variables you want to load)

app = create_app()
Now if we start the server with gunicorn again we'll see our API_KEY value
Now you should understand how python-dotenv can be used in your Flask project to make handling Flask CLI configuration and general app configuration more convenient.
You'll be able to leave and come back to your project without having to re-set your environment variables, and you'll have a flexible way of having multiple configurations depending on where your app is running
29