
30
Going serverless with MongoDB Realm - React.js Version
Serverless architecture is a pattern of running and building applications and services without having to manage infrastructure. It involves the applications and services running on the server, but all the server management is done by a cloud provider.
This post will discuss building a fullstack user management application using MongoDB, MongoDB Realm, and React.js. At the end of this tutorial, we will learn how to create a database on MongoDB, serverless functions as our endpoints using MongoDB Realm and consume the endpoints in a React.js application.
MongoDB Realm is a development platform designed for building mobile, web, desktop, and IoT applications. It offers services like data synchronization, serverless functions, triggers, user authentication, e.t.c. We can build and maintain application on MongoDB Realm using any of the following:
In this post, we will be using Realm UI to build our applications.
You can code along by cloning this repository (main branch) here. If you prefer to view the complete code, checkout to the dev branch of this same repository.
In this tutorial, we will focus on implementations only. The project UI has already been set up with TailwindCSS.
You can check out the Vue.js version here.
The following steps in this post require JavaScript and React.js experience. Experience with TypeScript isn’t a requirement, but it’s nice to have.
We also need a MongoDB account to host database the and create serverless functions. Signup is completely free.
To get started, we need to navigate to the project location, open our terminal and install project dependency as shown below:
npm installWith that done, we can start a development server using the command below:
npm start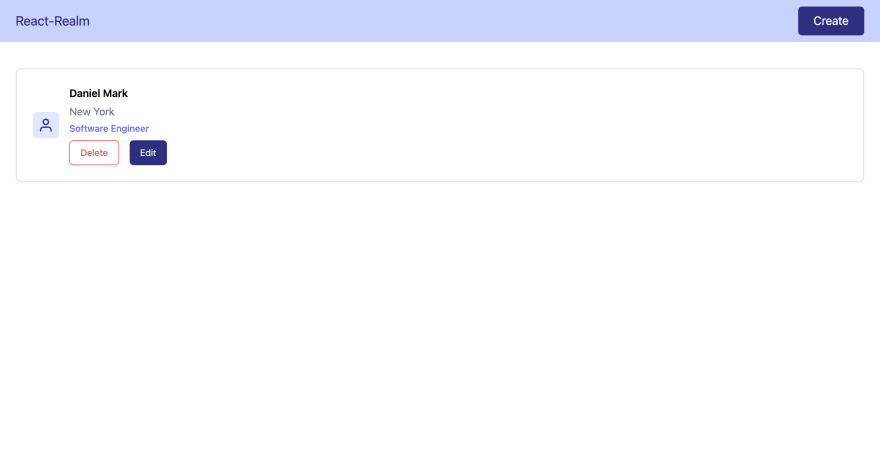
To get started, we need to log in or sign up into our MongoDB account and follow the option that applies to us:
For a New Account (Sign Up)
First, we need to answer a few questions to help MongoDB help set up our account. Then click on Finish.
First, we need to answer a few questions to help MongoDB help set up our account. Then click on Finish.

Select Shared as the type of database.

Click on Create to setup a cluster. This might take sometime to setup.

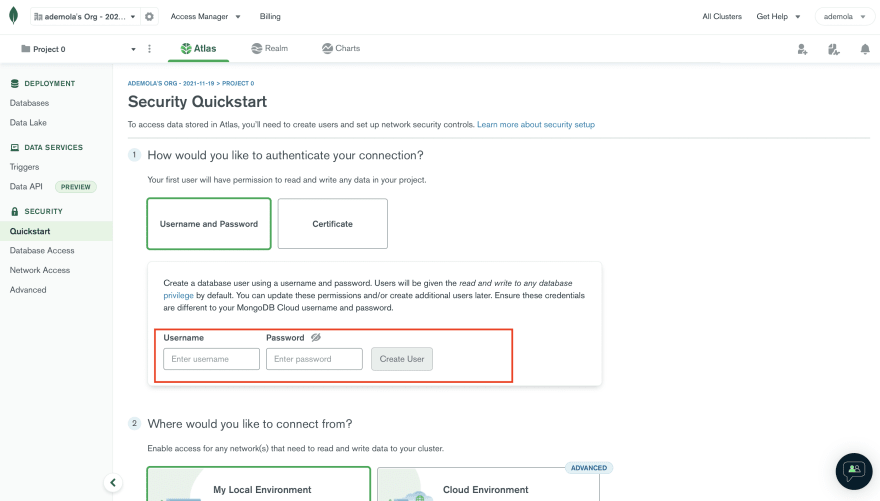
Next, we need to create a user to access the database externally by inputting the Username, Password and then click on Create User. We also need to add our IP address to safely connect to the database by clicking on the Add My Current IP Address button. Then click on Finish and Close to save changes.
On saving the changes, we should see a Database Deployments screen, as shown below:

For an Existing Account (Log In)
Click the project dropdown menu and click on the New Project button.
Click the project dropdown menu and click on the New Project button.

Enter the
reactRealm as the project name, click on Next and then click Create Project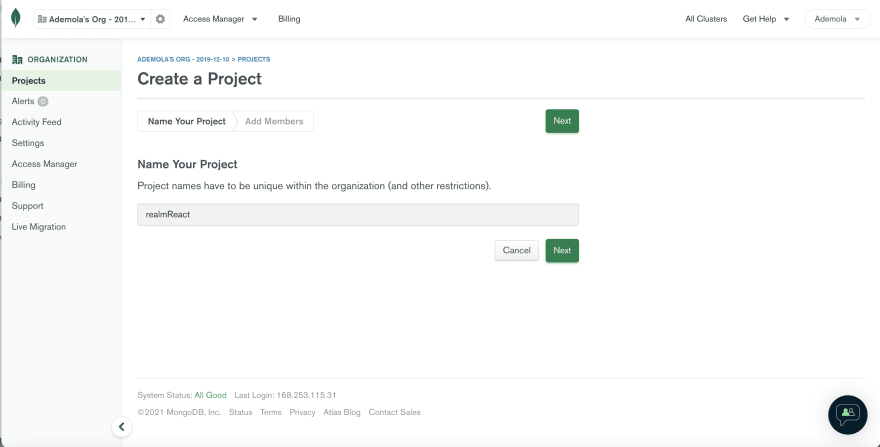
Click on Build a Database

Select Shared as the type of database.
Click on Create to setup a cluster. This might take sometime to setup.
Next, we need to create a user to access the database externally by inputting the Username, Password and then clicking on Create User. We also need to add our IP address to safely connect to the database by clicking on the Add My Current IP Address button. Then click on Finish and Close to save changes.
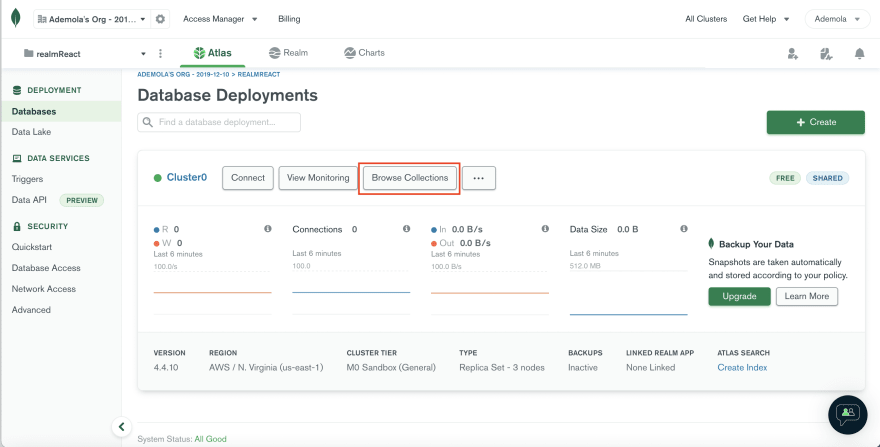
On saving the changes, we should see a Database Deployments screen, as shown below:
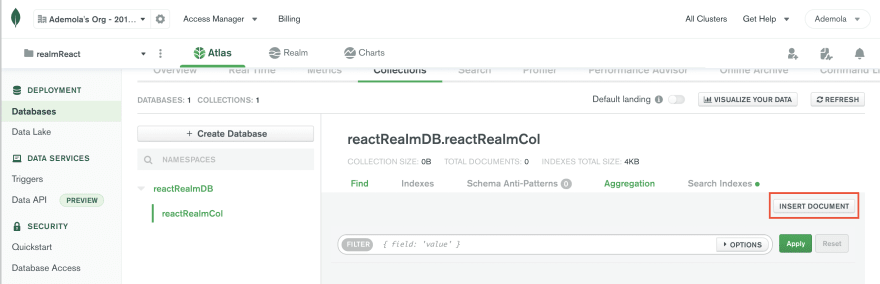
Next, we need to populate our database with users' sample data. To do this, click on the Browse Collections button
Click on Add My Own Data, input
reactRealmDB and reactRealmCol as the database and collection name, and click on Create.
Next, we need to insert these sample data:
This file contains hidden or bidirectional Unicode text that may be interpreted or compiled differently than what appears below. To review, open the file in an editor that reveals hidden Unicode characters.
Learn more about bidirectional Unicode characters
| { | |
| "name": "daniel mark" | |
| "location": "new york" | |
| "title": "software engineer" | |
| } | |
| { | |
| "name": "clara patrick" | |
| "location": "lisbon" | |
| "title": "data engineer" | |
| } |
To do this, click on the Insert Document button, fill in the details above and click on Insert to save.

With our database populated, we need to create serverless functions to perform Create, Read, Update and Delete (CRUD) on our database. To do this, select the Realm tab, click on Build your own App. Then click on Create Realm Application to setup our application.

MongoDB Realm also ships with templates that we can use to build our application quickly. For this tutorial, we will be building from scratch.
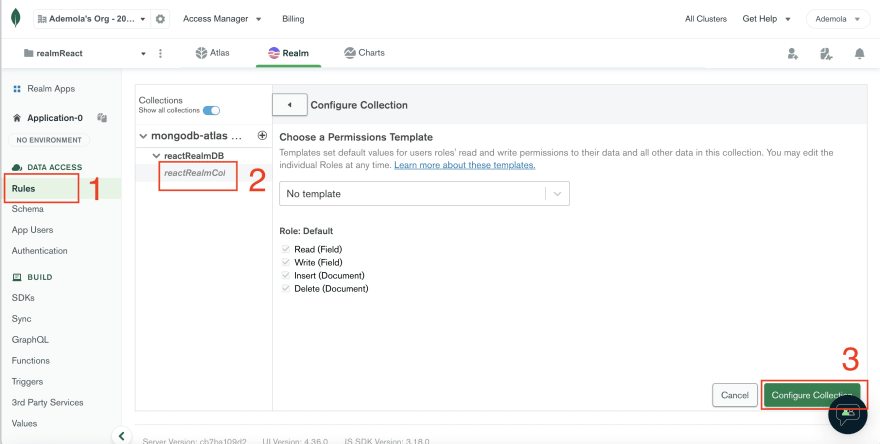
Next, we need to setup permission and rules for our functions. To do this, close the popup guide click on Rules, select the reactRealmCol and click on Configure Collection.
MongoDB Realm’s Save and Deploy
With that done, MongoDB Realm will show us a widget illustrating the concept of Save and Deploy.
With that done, MongoDB Realm will show us a widget illustrating the concept of Save and Deploy.

When writing a serverless function, clicking on Save creates a development draft that we can test and play around with. At the same time, Deploy makes our changes public to be consumed by another application(React.js in our case).
Click on Next and then Got it to continue.
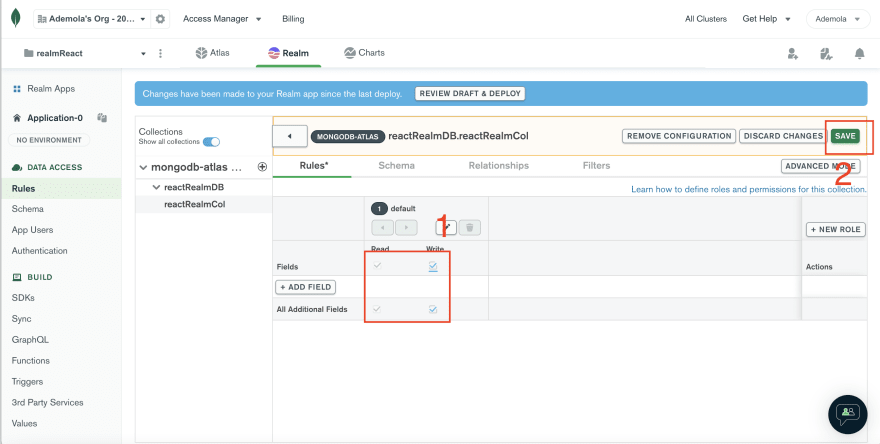
Next, we need to allow Read and Write permissions for our function and then Save.
Next, navigate to the Authentication tab, click on Allow users to log in anonymously, toggle it on and Save Draft.
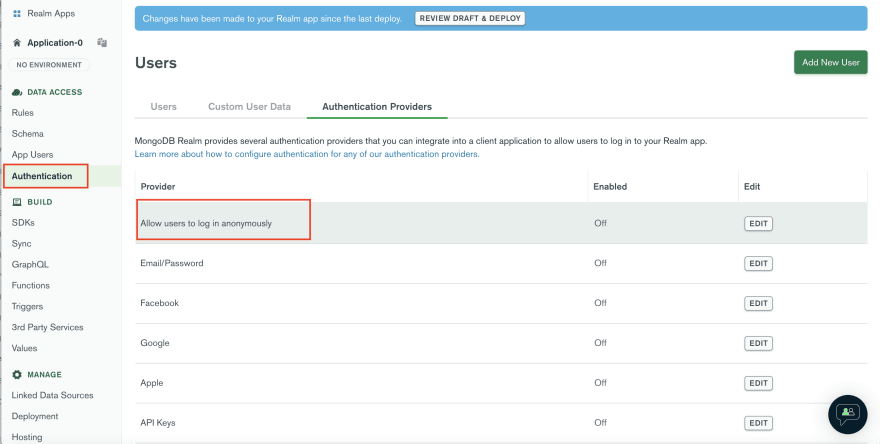
MongoDB Realm also ships with several authentication options that we can explore. For this tutorial, we will be using the anonymous option.
Get All Users Serverless Function
With the configuration done, we can now create a serverless function that returns list of users. To do this, navigate to the Functions tab, click on Create New Function, and input
With the configuration done, we can now create a serverless function that returns list of users. To do this, navigate to the Functions tab, click on Create New Function, and input
getAllUsers as the function name
Next, select the Function Editor tab and modify the function to the following:
This file contains hidden or bidirectional Unicode text that may be interpreted or compiled differently than what appears below. To review, open the file in an editor that reveals hidden Unicode characters.
Learn more about bidirectional Unicode characters
| exports = function(arg){ | |
| let collection = context.services.get("mongodb-atlas").db("reactRealmDB").collection("reactRealmCol"); | |
| return collection.find({}); | |
| }; |
The snippet above does the following:
reactRealmDB database and reactRealmCol collectionNext, we can test our function by clicking on Run button to see list of users.
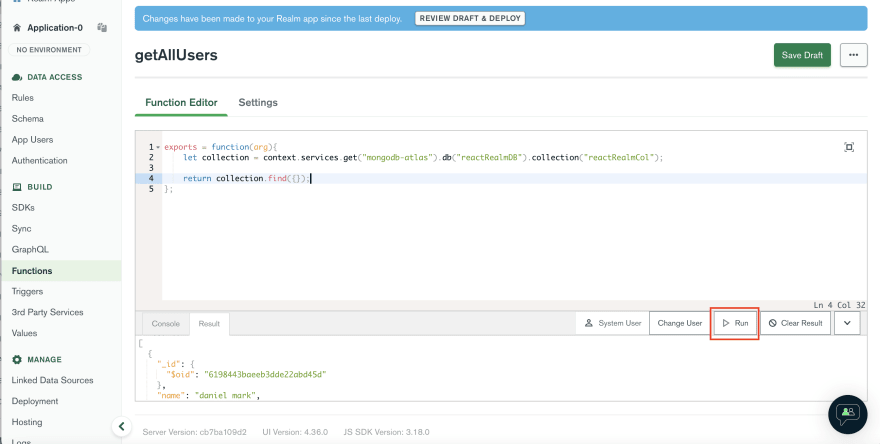
Finally, we need to copy any returned user’s
_id and save it somewhere; we need it for the next function. Then click on Save Draft to create a deployment draft for our function.
Get A User Serverless Function
To do this, click on the Functions tab, click on Create New Function, and input
To do this, click on the Functions tab, click on Create New Function, and input
getSingleUser as the function name
Next, select the Function Editor tab and modify the function to the following:
This file contains hidden or bidirectional Unicode text that may be interpreted or compiled differently than what appears below. To review, open the file in an editor that reveals hidden Unicode characters.
Learn more about bidirectional Unicode characters
| exports = function(arg){ | |
| let collection = context.services.get("mongodb-atlas").db("reactRealmDB").collection("reactRealmCol"); | |
| return collection.findOne({_id: BSON.ObjectId(arg)}); | |
| }; |
The snippet above does the following:
reactRealmDB database and reactRealmCol collection_id. Because MongoDB saves documents in BSON, we need to parse the arg as BSON using the BSON.ObjectId.To test our function, Navigate to the Console tab, replace the
Hello world! in the exports function with the user’s _id we copied earlier and then click on Run.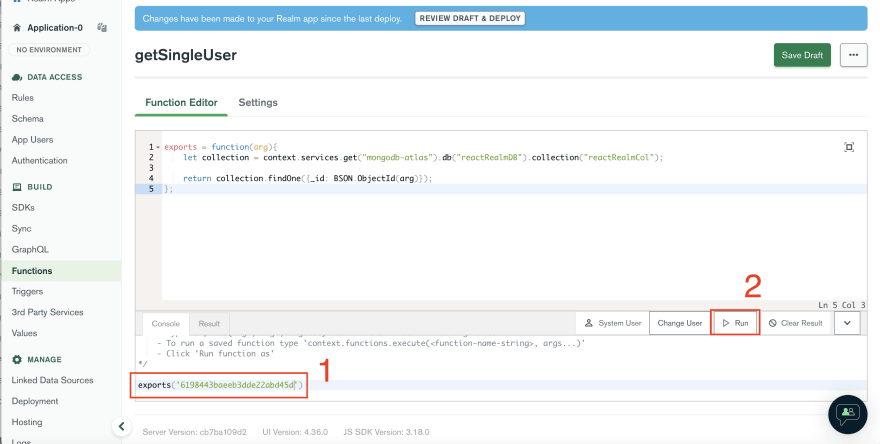
Finally, we need to save our function by clicking on the Save Draft button.
Edit A User Serverless Function
To do this, we need to follow the same steps as above.
To do this, we need to follow the same steps as above.
First, click on the Functions tab, click on Create New Function, and input
editUser as the function name.
Next, select the Function Editor tab and modify the function to the following:
This file contains hidden or bidirectional Unicode text that may be interpreted or compiled differently than what appears below. To review, open the file in an editor that reveals hidden Unicode characters.
Learn more about bidirectional Unicode characters
| exports = function(id, name, location, title){ | |
| let collection = context.services.get("mongodb-atlas").db("reactRealmDB").collection("reactRealmCol"); | |
| let updated = collection.findOneAndUpdate( | |
| {_id: BSON.ObjectId(id)}, | |
| { $set: { "name": name, "location": location, "title": title } }, | |
| { returnNewDocument: true } | |
| ) | |
| return updated; | |
| }; |
The snippet above does the following:
id, name, location, and title argumentsreactRealmDB database and reactRealmCol collectionupdated variable that finds the document by _id, update the collection fields, and set a returnNewDocument flag to return the updated document.Next, we can test our function by navigating to the Console tab, replace the
Hello world! in the exports function with required arguments(_id, name, location, and title), click on Run, and then Save Draft.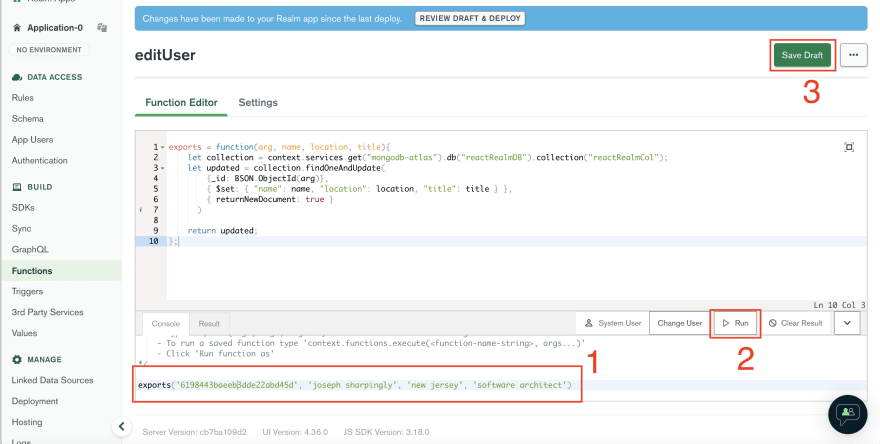
Create A User Serverless Function
To do this, we need to follow the same steps as before.
To do this, we need to follow the same steps as before.
First, click on the Functions tab, click on Create New Function, and input
createUser as the function name.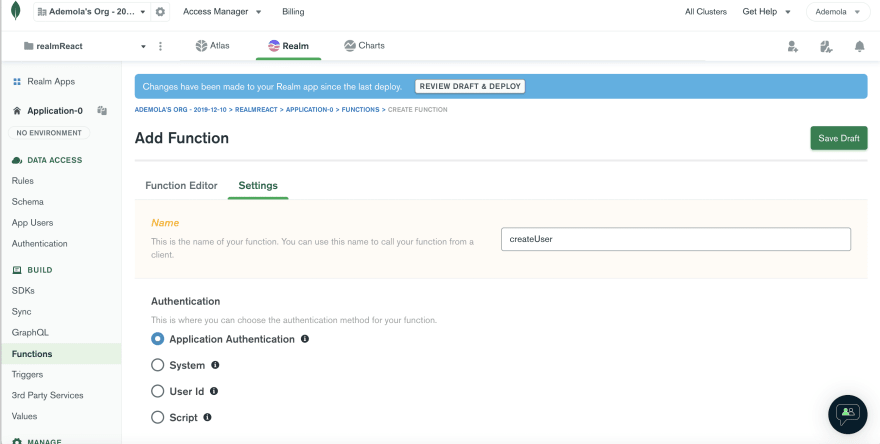
Next, select the Function Editor tab and modify the function to the following:
This file contains hidden or bidirectional Unicode text that may be interpreted or compiled differently than what appears below. To review, open the file in an editor that reveals hidden Unicode characters.
Learn more about bidirectional Unicode characters
| exports = function(name, location, title){ | |
| let collection = context.services.get("mongodb-atlas").db("reactRealmDB").collection("reactRealmCol"); | |
| let newUser = collection.insertOne({"name": name, "location": location, "title": title}) | |
| return newUser; | |
| }; |
The snippet above does the following:
name, location, and title arguments.reactRealmDB database and reactRealmCol collection.Next, we can test our function by navigating to the Console tab, replace the
Hello world! in the exports function with required arguments(name, location, and title), click on Run, and then Save Draft.
Delete A User Serverless Function
To do this, we need to follow the same steps as before.
To do this, we need to follow the same steps as before.
First, click on the Functions tab, click on Create New Function, and input
deleteUser as the function name.
Next, select the Function Editor tab and modify the function to the following:
This file contains hidden or bidirectional Unicode text that may be interpreted or compiled differently than what appears below. To review, open the file in an editor that reveals hidden Unicode characters.
Learn more about bidirectional Unicode characters
| exports = function(id){ | |
| let collection = context.services.get("mongodb-atlas").db("reactRealmDB").collection("reactRealmCol"); | |
| let deleteUser = collection.deleteOne({_id: BSON.ObjectId(id)}) | |
| return deleteUser; | |
| }; |
The snippet above does the following:
reactRealmDB database and reactRealmCol collection.deleteUser variable for deleting by _id.Next, we can test our function by navigating to the Console tab, replace the
Hello world! in the exports function with the required argument, click on Run, and then Save Draft.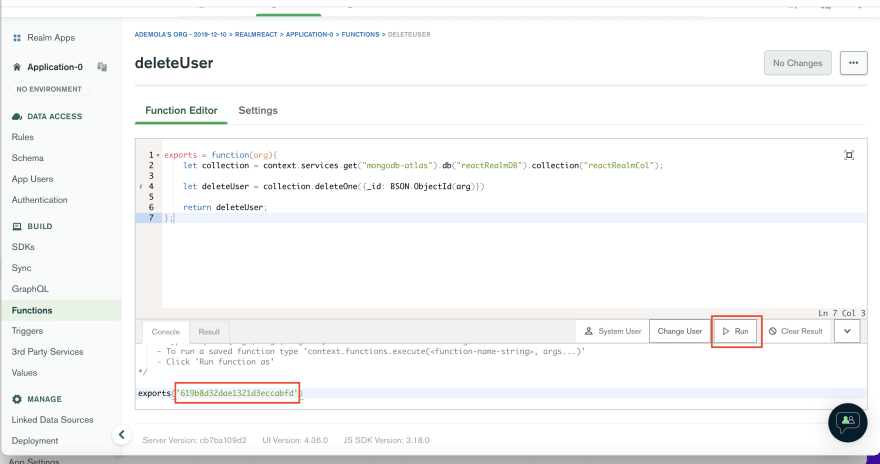
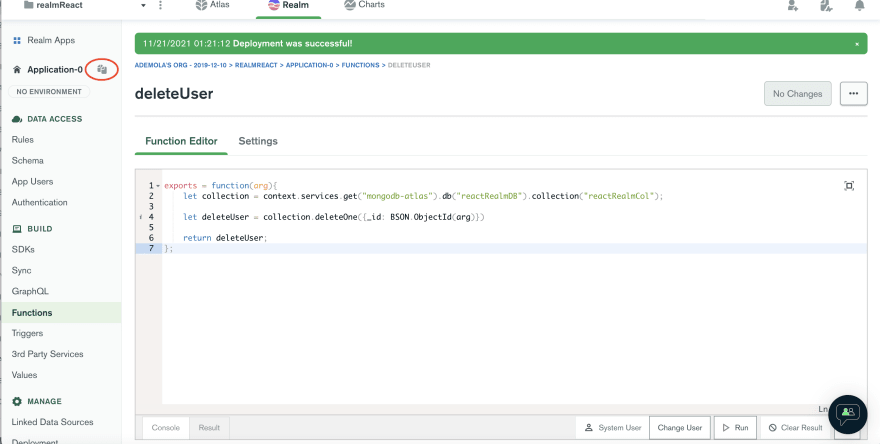
To start using the serverless functions in our application, we need to deploy them. To do this, click on the Review Draft & Deploy button, scroll down and then click on Deploy.

We should get a prompt showing the status of our deployment.
To integrate MongoDB Realm in our application, we need to install the dependencies with:
npm i realm-webrealm-web is a library for accessing MongoDB Realm from a web-browser.Setup an Environment Variable
First, we need to create a
First, we need to create a
.env file in the project root directory, and in this file, add the snippet below:REACT_APP_REALM_APP_ID=<your-realm-app-id>To get our Realm App ID, we need to click on the copy icon as shown below:
Setup MongoDB Realm
Next, we need to create a
Next, we need to create a
utils folder in the src folder, and in this folder, create a mongo.client.ts file and add the code snippet below:
This file contains hidden or bidirectional Unicode text that may be interpreted or compiled differently than what appears below. To review, open the file in an editor that reveals hidden Unicode characters.
Learn more about bidirectional Unicode characters
| import * as Realm from 'realm-web'; | |
| const REALM_APP_ID = process.env.REACT_APP_REALM_APP_ID; | |
| export const app: Realm.App = new Realm.App({ id: REALM_APP_ID! }); | |
| export const credentials = Realm.Credentials.anonymous(); |
The snippet above does the following:
! in front of REALM_APP_ID tells the compiler to relax the non-null constraint error(Meaning the parameter cannot be null or undefined)Get All Users
To get all users, we need to create an interface to describe the response properties. To do this, we need to create a
To get all users, we need to create an interface to describe the response properties. To do this, we need to create a
models folder in the src folder, and in this folder, create a user.interface.ts file and add the code snippet below:
This file contains hidden or bidirectional Unicode text that may be interpreted or compiled differently than what appears below. To review, open the file in an editor that reveals hidden Unicode characters.
Learn more about bidirectional Unicode characters
| export interface IUser { | |
| _id? : string; | |
| name: string; | |
| location: string; | |
| title: string | |
| } |
PS: The question mark in front of _id tells TypeScript that this property is optional since MongoDB automatically generates it.
Next, we need to modify
App.tsx by updating it with the snippet below:
This file contains hidden or bidirectional Unicode text that may be interpreted or compiled differently than what appears below. To review, open the file in an editor that reveals hidden Unicode characters.
Learn more about bidirectional Unicode characters
| //other imports goes here | |
| import { useEffect, useState } from 'react'; //update | |
| import { IUser } from './models/user.interface'; //add | |
| import { app, credentials } from './utils/mongo.client'; //add | |
| function App() { | |
| //states goes here | |
| const [users, setUsers] = useState<IUser[]>([]); //add | |
| useEffect(() => { | |
| async function getUsers() { | |
| const user: Realm.User = await app.logIn(credentials); | |
| const listOfUser = user.functions.getAllUsers(); | |
| listOfUser.then((resp) => { | |
| setUsers(resp); | |
| }); | |
| } | |
| getUsers(); | |
| return () => {}; | |
| }, []); | |
| const handleModalClose = () => { | |
| //code here | |
| }; | |
| return ( | |
| <div className=''> | |
| <header className='h-16 w-full bg-indigo-200 px-6 flex justify-between items-center'> | |
| <h1 className='text-xl text-indigo-900'>React-Realm</h1> | |
| <button | |
| className='text-lg text-white capitalize px-6 py-2 bg-indigo-900 rounded-md' | |
| onClick={() => setModal(true)} | |
| > | |
| create | |
| </button> | |
| </header> | |
| <section className='mt-10 flex justify-center px-6'> | |
| <ul className='w-full'> | |
| {users && | |
| users.map((user) => ( | |
| <li | |
| key={user._id} | |
| className='border-2 p-6 mb-3 rounded-lg flex items-center' | |
| > | |
| <section className='h-10 w-10 bg-indigo-100 rounded-md flex justify-center items-center mr-4'> | |
| <UserIcon /> | |
| </section> | |
| <section className=''> | |
| <h2 className='capitalize font-semibold mb-1'>{user.name}</h2> | |
| <p className='capitalize text-gray-500 mb-1'> | |
| {user.location} | |
| </p> | |
| <p className='capitalize text-indigo-500 font-medium text-sm mb-2'> | |
| {user.title} | |
| </p> | |
| <div className='flex'> | |
| <button className='text-sm text-red-500 capitalize px-4 py-2 mr-4 border border-red-500 rounded-md'> | |
| delete | |
| </button> | |
| <button | |
| className='text-sm text-white capitalize px-4 py-2 bg-indigo-900 rounded-md' | |
| onClick={() => { | |
| setModal(true); | |
| setIsEdit(true); | |
| }} | |
| > | |
| edit | |
| </button> | |
| </div> | |
| </section> | |
| </li> | |
| ))} | |
| </ul> | |
| </section> | |
| <Modal isOpen={modal} isEdit={isEdit} closeModal={handleModalClose} /> | |
| </div> | |
| ); | |
| } | |
| export default App; |
The snippet above does the following:
IUser interface, app, and credentials.getUsers function inside the useEffect hook to authenticate our application using the credentials imported, get the list of users by accessing the getAllUsers serverless function we created earlier, and then update the users state.
PS: The serverless function (getAllUsers in our case) called must be the same as the one defined on MongoDB Realm.
Complete App.tsx
This file contains hidden or bidirectional Unicode text that may be interpreted or compiled differently than what appears below. To review, open the file in an editor that reveals hidden Unicode characters.
Learn more about bidirectional Unicode characters
| import { useEffect, useState } from 'react'; | |
| import UserIcon from './assets/svg/UserIcon'; | |
| import Modal from './components/Modal'; | |
| import { IUser } from './models/user.interface'; | |
| import { app, credentials } from './utils/mongo.client'; | |
| function App() { | |
| const [modal, setModal] = useState(false); | |
| const [isEdit, setIsEdit] = useState(false); | |
| const [users, setUsers] = useState<IUser[]>([]); | |
| useEffect(() => { | |
| async function getUsers() { | |
| const user: Realm.User = await app.logIn(credentials); | |
| const listOfUser: Promise<IUser[]> = user.functions.getAllUsers(); | |
| listOfUser.then((resp) => { | |
| setUsers(resp); | |
| }); | |
| } | |
| getUsers(); | |
| return () => {}; | |
| }, []); | |
| const handleModalClose = () => { | |
| setModal(false); | |
| setIsEdit(false); | |
| }; | |
| return ( | |
| <div className=''> | |
| <header className='h-16 w-full bg-indigo-200 px-6 flex justify-between items-center'> | |
| <h1 className='text-xl text-indigo-900'>React-Realm</h1> | |
| <button | |
| className='text-lg text-white capitalize px-6 py-2 bg-indigo-900 rounded-md' | |
| onClick={() => setModal(true)} | |
| > | |
| create | |
| </button> | |
| </header> | |
| <section className='mt-10 flex justify-center px-6'> | |
| <ul className='w-full'> | |
| {users && | |
| users.map((user) => ( | |
| <li | |
| key={user._id} | |
| className='border-2 p-6 mb-3 rounded-lg flex items-center' | |
| > | |
| <section className='h-10 w-10 bg-indigo-100 rounded-md flex justify-center items-center mr-4'> | |
| <UserIcon /> | |
| </section> | |
| <section className=''> | |
| <h2 className='capitalize font-semibold mb-1'>{user.name}</h2> | |
| <p className='capitalize text-gray-500 mb-1'> | |
| {user.location} | |
| </p> | |
| <p className='capitalize text-indigo-500 font-medium text-sm mb-2'> | |
| {user.title} | |
| </p> | |
| <div className='flex'> | |
| <button className='text-sm text-red-500 capitalize px-4 py-2 mr-4 border border-red-500 rounded-md'> | |
| delete | |
| </button> | |
| <button | |
| className='text-sm text-white capitalize px-4 py-2 bg-indigo-900 rounded-md' | |
| onClick={() => { | |
| setModal(true); | |
| setIsEdit(true); | |
| }} | |
| > | |
| edit | |
| </button> | |
| </div> | |
| </section> | |
| </li> | |
| ))} | |
| </ul> | |
| </section> | |
| <Modal isOpen={modal} isEdit={isEdit} closeModal={handleModalClose} /> | |
| </div> | |
| ); | |
| } | |
| export default App; |
Create A User
To create a user, we must first modify
To create a user, we must first modify
App.tsx by creating a state variable to manage returned value when a user is created. We also need to add the state as dependency on the useEffect hook; so that when changes are made, it refreshes the page and load the latest list of users. Finally, we need to update the Modal component with the state function to update the value.
This file contains hidden or bidirectional Unicode text that may be interpreted or compiled differently than what appears below. To review, open the file in an editor that reveals hidden Unicode characters.
Learn more about bidirectional Unicode characters
| //other imports goes here | |
| function App() { | |
| //state goes here | |
| const [userValue, setUserValue] = useState<any>(); //add | |
| useEffect(() => { | |
| //get user function come here | |
| return () => {}; | |
| }, [userValue]); //add | |
| const handleModalClose = () => { | |
| //code here | |
| }; | |
| return ( | |
| <div className=''> | |
| {/* header JSX goes here */} | |
| <section className='mt-10 flex justify-center px-6'> | |
| {/* remaining JSX goes here */} | |
| </section> | |
| <Modal | |
| isOpen={modal} | |
| isEdit={isEdit} | |
| closeModal={handleModalClose} | |
| setUserValue={setUserValue} //add | |
| /> | |
| </div> | |
| ); | |
| } | |
| export default App; |
PS: TypeScript will complain about the
*Modal.tsx* component not having the setUserValue property. We will fix this.Next, navigate to the
Modal.tsx file inside the components folder, update the interface, and create a user.
This file contains hidden or bidirectional Unicode text that may be interpreted or compiled differently than what appears below. To review, open the file in an editor that reveals hidden Unicode characters.
Learn more about bidirectional Unicode characters
| //import goes here | |
| import { app, credentials } from '../utils/mongo.client'; //add | |
| export interface IModal { | |
| isOpen: boolean; | |
| isEdit: boolean; | |
| closeModal: () => void; | |
| setUserValue: (id: string) => void; //add | |
| } | |
| const Modal: FC<IModal> = ({ isOpen, isEdit, closeModal, setUserValue }) => { //add setUserId | |
| //state goes here | |
| const handleChange = (e: React.FormEvent<EventTarget>) => { | |
| //code goes here | |
| }; | |
| const handleModal = (e: MouseEvent<HTMLDivElement>) => { | |
| //code goes here | |
| }; | |
| const handleSubmit = async (e: React.FormEvent) => { | |
| e.preventDefault(); | |
| //add | |
| const user: Realm.User = await app.logIn(credentials); | |
| const create = user.functions.createUser( | |
| value.name, | |
| value.location, | |
| value.title | |
| ); | |
| create.then((resp) => { | |
| setUserValue(resp.insertedId); | |
| setValue({ name: '', location: '', title: '' }); | |
| }); | |
| }; | |
| return ( | |
| <div | |
| className={`h-screen w-screen bg-indigo-900 bg-opacity-30 z-30 top-0 fixed transform scale-105 transition-all ease-in-out duration-100 ${ | |
| isOpen ? 'block' : 'hidden' | |
| }`} | |
| > | |
| {/* remaining JSX goes here */} | |
| </div> | |
| ); | |
| }; | |
| export default Modal; |
The snippet above does the following:
handleSubmit function to authenticate our application using the credentials imported. Create a user by accessing the createUser serverless function we created earlier, passing the required arguments (name, location, and title)and then updating the userValue and form state.Edit A User
To edit a user, we must first modify
To edit a user, we must first modify
App.tsx by creating a state variable to manage the _id of the user we want to edit. We also updated the onClick event to update the state variable and pass it as props to the Modal component.
This file contains hidden or bidirectional Unicode text that may be interpreted or compiled differently than what appears below. To review, open the file in an editor that reveals hidden Unicode characters.
Learn more about bidirectional Unicode characters
| //other imports goes here | |
| function App() { | |
| //states goes here | |
| const [editingId, setEditingId] = useState<string>(); //add | |
| useEffect(() => { | |
| //get user function come here | |
| return () => {}; | |
| }, [userValue]); | |
| const handleModalClose = () => { | |
| //code here | |
| }; | |
| return ( | |
| <div className=''> | |
| {/* header JSX goes here */} | |
| <section className='mt-10 flex justify-center px-6'> | |
| <ul className='w-full'> | |
| {users && | |
| users.map((user) => ( | |
| <li | |
| key={user._id} | |
| className='border-2 p-6 mb-3 rounded-lg flex items-center' | |
| > | |
| {/* remaining JSX goes here */} | |
| <section className=''> | |
| {/* remaining JSX goes here */} | |
| <div className='flex'> | |
| <button className='text-sm text-red-500 capitalize px-4 py-2 mr-4 border border-red-500 rounded-md' | |
| > | |
| delete | |
| </button> | |
| <button | |
| className='text-sm text-white capitalize px-4 py-2 bg-indigo-900 rounded-md' | |
| onClick={() => { | |
| setModal(true); | |
| setIsEdit(true); | |
| setEditingId(user._id); //add this | |
| }} | |
| > | |
| edit | |
| </button> | |
| </div> | |
| </section> | |
| </li> | |
| ))} | |
| </ul> | |
| </section> | |
| <Modal | |
| isOpen={modal} | |
| isEdit={isEdit} | |
| closeModal={handleModalClose} | |
| setUserId={setUserId} | |
| editingId={editingId} //add | |
| /> | |
| </div> | |
| ); | |
| } | |
| export default App; |
Next, we need to populate our form when the Edit button is clicked. To do this, open
Modal.tsx and update as shown below:
This file contains hidden or bidirectional Unicode text that may be interpreted or compiled differently than what appears below. To review, open the file in an editor that reveals hidden Unicode characters.
Learn more about bidirectional Unicode characters
| //import goes here | |
| import { BSON } from 'realm-web'; | |
| import { IUser } from '../models/user.interface'; | |
| import { app, credentials } from '../utils/mongo.client'; | |
| export interface IModal { | |
| isOpen: boolean; | |
| isEdit: boolean; | |
| closeModal: () => void; | |
| setUserValue: (id: string) => void; | |
| editingId?: string; //add | |
| } | |
| const Modal: FC<IModal> = ({ | |
| isOpen, | |
| isEdit, | |
| closeModal, | |
| setUserValue, | |
| editingId, //add | |
| }) => { | |
| const [value, setValue] = useState({ | |
| name: '', | |
| location: '', | |
| title: '', | |
| }); | |
| const handleChange = (e: React.FormEvent<EventTarget>) => { | |
| //code goes here | |
| }; | |
| const handleModal = (e: MouseEvent<HTMLDivElement>) => { | |
| //code goes here | |
| }; | |
| const handleSubmit = async (e: React.FormEvent) => { | |
| //code goes here | |
| }; | |
| useEffect(() => { | |
| if (isEdit) { | |
| const getSingleUser = async () => { | |
| const user: Realm.User = await app.logIn(credentials); | |
| const getUser: Promise<IUser> = user.functions.getSingleUser(new BSON.ObjectID(editingId).toString()); | |
| getUser.then((resp) => { | |
| setValue({ | |
| name: resp.name, | |
| location: resp.location, | |
| title: resp.title, | |
| }); | |
| }); | |
| }; | |
| getSingleUser(); | |
| } | |
| return () => { | |
| setValue({ name: '', location: '', title: '' }); | |
| }; | |
| }, [isEdit]); | |
| return ( | |
| <div | |
| className={`h-screen w-screen bg-indigo-900 bg-opacity-30 z-30 top-0 fixed transform scale-105 transition-all ease-in-out duration-100 ${ | |
| isOpen ? 'block' : 'hidden' | |
| }`} | |
| > | |
| {/* remaining JSX goes here */} | |
| </div> | |
| ); | |
| }; | |
| export default Modal; |
The snippet above does the following:
editingId
useEffect to conditionally check if it’s editing or creating, get the selected user details using the getSingleUser serverless function and then update the form values. The getSingleUser function also required us to convert editingId to string using BSON.ObjectID function.Next, we need to update the
handleSubmit function to include updating the user’s details by conditionally checking if it is an update action or not. Next, we need to call the editUser serverless function and pass in the required parameters. Finally, update the userValue, restore the form back to default and close the Modal component.
This file contains hidden or bidirectional Unicode text that may be interpreted or compiled differently than what appears below. To review, open the file in an editor that reveals hidden Unicode characters.
Learn more about bidirectional Unicode characters
| //import goes here | |
| export interface IModal { | |
| //code goes here | |
| } | |
| const Modal: FC<IModal> = ({ | |
| isOpen, | |
| isEdit, | |
| closeModal, | |
| setUserValue, | |
| editingId, //add | |
| }) => { | |
| const [value, setValue] = useState({ | |
| name: '', | |
| location: '', | |
| title: '', | |
| }); | |
| const handleChange = (e: React.FormEvent<EventTarget>) => { | |
| //code goes here | |
| }; | |
| const handleModal = (e: MouseEvent<HTMLDivElement>) => { | |
| //code goes here | |
| }; | |
| const handleSubmit = async (e: React.FormEvent) => { | |
| e.preventDefault(); | |
| //modify | |
| const user: Realm.User = await app.logIn(credentials); | |
| if (isEdit) { | |
| const edit: Promise<IUser> = user.functions.editUser( | |
| new BSON.ObjectID(editingId).toString(), | |
| value.name, | |
| value.location, | |
| value.title | |
| ); | |
| edit.then((resp) => { | |
| setUserValue(resp._id!); | |
| setValue({ name: '', location: '', title: '' }); | |
| closeModal(); | |
| }); | |
| } else { | |
| const create = user.functions.createUser( | |
| value.name, | |
| value.location, | |
| value.title | |
| ); | |
| create.then((resp) => { | |
| setUserValue(resp.insertedId); | |
| setValue({ name: '', location: '', title: '' }); | |
| }); | |
| } | |
| }; | |
| useEffect(() => { | |
| //code goes here | |
| }, [isEdit]); | |
| return ( | |
| <div | |
| className={`h-screen w-screen bg-indigo-900 bg-opacity-30 z-30 top-0 fixed transform scale-105 transition-all ease-in-out duration-100 ${ | |
| isOpen ? 'block' : 'hidden' | |
| }`} | |
| > | |
| {/* remaining JSX goes here */} | |
| </div> | |
| ); | |
| }; | |
| export default Modal; |
Complete Modal.tsx
This file contains hidden or bidirectional Unicode text that may be interpreted or compiled differently than what appears below. To review, open the file in an editor that reveals hidden Unicode characters.
Learn more about bidirectional Unicode characters
| import { FC, MouseEvent, useEffect, useState } from 'react'; | |
| import { BSON } from 'realm-web'; | |
| import CloseIcon from '../assets/svg/CloseIcon'; | |
| import { IUser } from '../models/user.interface'; | |
| import { app, credentials } from '../utils/mongo.client'; | |
| export interface IModal { | |
| isOpen: boolean; | |
| isEdit: boolean; | |
| closeModal: () => void; | |
| setUserValue: (id: string) => void; | |
| editingId?: string; | |
| } | |
| const Modal: FC<IModal> = ({ | |
| isOpen, | |
| isEdit, | |
| closeModal, | |
| setUserValue, | |
| editingId, | |
| }) => { | |
| const [value, setValue] = useState({ | |
| name: '', | |
| location: '', | |
| title: '', | |
| }); | |
| const handleChange = (e: React.FormEvent<EventTarget>) => { | |
| let target = e.target as HTMLInputElement; | |
| setValue({ ...value, [target.name]: target.value }); | |
| }; | |
| const handleModal = (e: MouseEvent<HTMLDivElement>) => { | |
| const target = e.target as HTMLDivElement; | |
| if (target.classList.contains('open-nav')) { | |
| closeModal(); | |
| } | |
| }; | |
| const handleSubmit = async (e: React.FormEvent) => { | |
| e.preventDefault(); | |
| const user: Realm.User = await app.logIn(credentials); | |
| if (isEdit) { | |
| const edit: Promise<IUser> = user.functions.editUser( | |
| new BSON.ObjectID(editingId).toString(), | |
| value.name, | |
| value.location, | |
| value.title | |
| ); | |
| edit.then((resp) => { | |
| setUserValue(resp._id!); | |
| setValue({ name: '', location: '', title: '' }); | |
| closeModal(); | |
| }); | |
| } else { | |
| const create = user.functions.createUser( | |
| value.name, | |
| value.location, | |
| value.title | |
| ); | |
| create.then((resp) => { | |
| setUserValue(resp.insertedId); | |
| setValue({ name: '', location: '', title: '' }); | |
| }); | |
| } | |
| }; | |
| useEffect(() => { | |
| if (isEdit) { | |
| const getSingleUser = async () => { | |
| const user: Realm.User = await app.logIn(credentials); | |
| const getUser: Promise<IUser> = user.functions.getSingleUser( | |
| new BSON.ObjectID(editingId).toString() | |
| ); | |
| getUser.then((resp) => { | |
| setValue({ | |
| name: resp.name, | |
| location: resp.location, | |
| title: resp.title, | |
| }); | |
| }); | |
| }; | |
| getSingleUser(); | |
| } | |
| return () => { | |
| setValue({ name: '', location: '', title: '' }); | |
| }; | |
| }, [isEdit]); | |
| return ( | |
| <div | |
| className={`h-screen w-screen bg-indigo-900 bg-opacity-30 z-30 top-0 fixed transform scale-105 transition-all ease-in-out duration-100 ${ | |
| isOpen ? 'block' : 'hidden' | |
| }`} | |
| > | |
| <div | |
| className='flex flex-col justify-center items-center h-full w-full open-nav' | |
| onClick={handleModal} | |
| > | |
| <div className='flex justify-end w-11/12 lg:w-1/2 2xl:w-6/12'> | |
| <div | |
| role='button' | |
| className='cursor-pointer w-6 h-6 rounded-full flex items-center justify-center bg-white' | |
| onClick={() => closeModal()} | |
| > | |
| <CloseIcon /> | |
| </div> | |
| </div> | |
| <section className='w-11/12 lg:w-1/2 2xl:w-6/12 bg-white flex justify-center items-center mt-5 rounded-lg'> | |
| <div className='w-11/12 py-8'> | |
| <h2 className='capitalize text-xl text-gray-500 font-medium mb-4'> | |
| {isEdit ? 'Edit User' : 'add user'} | |
| </h2> | |
| <form onSubmit={handleSubmit}> | |
| <fieldset className='mb-4'> | |
| <label className='block text-sm text-gray-500 capitalize mb-1'> | |
| name | |
| </label> | |
| <input | |
| type='text' | |
| name='name' | |
| value={value.name} | |
| onChange={handleChange} | |
| required | |
| className='w-full h-10 border border-gray-500 rounded-sm px-4' | |
| /> | |
| </fieldset> | |
| <fieldset className='mb-4'> | |
| <label className='block text-sm text-gray-500 capitalize mb-1'> | |
| location | |
| </label> | |
| <input | |
| type='text' | |
| name='location' | |
| value={value.location} | |
| onChange={handleChange} | |
| required | |
| className='w-full h-10 border border-gray-500 rounded-sm px-4' | |
| /> | |
| </fieldset> | |
| <fieldset className='mb-4'> | |
| <label className='block text-sm text-gray-500 capitalize mb-1'> | |
| title | |
| </label> | |
| <input | |
| type='text' | |
| name='title' | |
| value={value.title} | |
| onChange={handleChange} | |
| required | |
| className='w-full h-10 border border-gray-500 rounded-sm px-4' | |
| /> | |
| </fieldset> | |
| <button className='text-white capitalize px-6 py-2 bg-indigo-900 rounded-md w-full'> | |
| save | |
| </button> | |
| </form> | |
| </div> | |
| </section> | |
| </div> | |
| </div> | |
| ); | |
| }; | |
| export default Modal; |
Delete A User
To delete a user, we need to modify
To delete a user, we need to modify
App.tsx by creating a handleDelete function as shown below:
This file contains hidden or bidirectional Unicode text that may be interpreted or compiled differently than what appears below. To review, open the file in an editor that reveals hidden Unicode characters.
Learn more about bidirectional Unicode characters
| //other imports goes here | |
| import { BSON } from 'realm-web'; //add | |
| function App() { | |
| //state goes here | |
| useEffect(() => { | |
| //get user function come here | |
| return () => {}; | |
| }, [userValue]); | |
| const handleModalClose = () => { | |
| //code here | |
| }; | |
| const handleDelete = async (id: string) => { | |
| const user: Realm.User = await app.logIn(credentials); | |
| const delUser = user.functions.deleteUser(new BSON.ObjectID(id).toString()); | |
| delUser.then((resp) => { | |
| setUserValue(resp.deletedCount); | |
| }); | |
| }; | |
| return ( | |
| <div className=''> | |
| {/* header JSX goes here */} | |
| <section className='mt-10 flex justify-center px-6'> | |
| {/* remaining JSX goes here */} | |
| <div className='flex'> | |
| <button | |
| onClick={() => handleDelete(user._id!)} | |
| className='text-sm text-red-500 capitalize px-4 py-2 mr-4 border border-red-500 rounded-md'> | |
| delete | |
| </button> | |
| <button | |
| {/* remaining JSX goes here */} | |
| </button> | |
| </div> | |
| </section> | |
| <Modal | |
| isOpen={modal} | |
| isEdit={isEdit} | |
| closeModal={handleModalClose} | |
| setUserValue={setUserValue} | |
| editingId={editingId} | |
| /> | |
| </div> | |
| ); | |
| } | |
| export default App; |
The snippet above does the following:
handleDelete function that takes an id as an argument, authenticate our application using the credentials. Delete selected user using the deleteUser serverless function and update the userValue state.Complete App.tsx
This file contains hidden or bidirectional Unicode text that may be interpreted or compiled differently than what appears below. To review, open the file in an editor that reveals hidden Unicode characters.
Learn more about bidirectional Unicode characters
| import { useEffect, useState } from 'react'; | |
| import { BSON } from 'realm-web'; | |
| import UserIcon from './assets/svg/UserIcon'; | |
| import Modal from './components/Modal'; | |
| import { IUser } from './models/user.interface'; | |
| import { app, credentials } from './utils/mongo.client'; | |
| function App() { | |
| const [modal, setModal] = useState(false); | |
| const [isEdit, setIsEdit] = useState(false); | |
| const [users, setUsers] = useState<IUser[]>([]); | |
| const [userValue, setUserValue] = useState<any>(); | |
| const [editingId, setEditingId] = useState<string>(); | |
| useEffect(() => { | |
| async function getUsers() { | |
| const user: Realm.User = await app.logIn(credentials); | |
| const listOfUser: Promise<IUser[]> = user.functions.getAllUsers(); | |
| listOfUser.then((resp) => { | |
| setUsers(resp); | |
| }); | |
| } | |
| getUsers(); | |
| return () => {}; | |
| }, [userValue]); | |
| const handleModalClose = () => { | |
| setModal(false); | |
| setIsEdit(false); | |
| }; | |
| const handleDelete = async (id: string) => { | |
| const user: Realm.User = await app.logIn(credentials); | |
| const delUser = user.functions.deleteUser(new BSON.ObjectID(id).toString()); | |
| delUser.then((resp) => { | |
| setUserValue(resp.deletedCount); | |
| }); | |
| }; | |
| return ( | |
| <div className=''> | |
| <header className='h-16 w-full bg-indigo-200 px-6 flex justify-between items-center'> | |
| <h1 className='text-xl text-indigo-900'>React-Realm</h1> | |
| <button | |
| className='text-lg text-white capitalize px-6 py-2 bg-indigo-900 rounded-md' | |
| onClick={() => setModal(true)} | |
| > | |
| create | |
| </button> | |
| </header> | |
| <section className='mt-10 flex justify-center px-6'> | |
| <ul className='w-full'> | |
| {users && | |
| users.map((user) => ( | |
| <li | |
| key={user._id} | |
| className='border-2 p-6 mb-3 rounded-lg flex items-center' | |
| > | |
| <section className='h-10 w-10 bg-indigo-100 rounded-md flex justify-center items-center mr-4'> | |
| <UserIcon /> | |
| </section> | |
| <section className=''> | |
| <h2 className='capitalize font-semibold mb-1'>{user.name}</h2> | |
| <p className='capitalize text-gray-500 mb-1'> | |
| {user.location} | |
| </p> | |
| <p className='capitalize text-indigo-500 font-medium text-sm mb-2'> | |
| {user.title} | |
| </p> | |
| <div className='flex'> | |
| <button | |
| onClick={() => handleDelete(user._id!)} | |
| className='text-sm text-red-500 capitalize px-4 py-2 mr-4 border border-red-500 rounded-md' | |
| > | |
| delete | |
| </button> | |
| <button | |
| className='text-sm text-white capitalize px-4 py-2 bg-indigo-900 rounded-md' | |
| onClick={() => { | |
| setModal(true); | |
| setIsEdit(true); | |
| setEditingId(user._id); | |
| }} | |
| > | |
| edit | |
| </button> | |
| </div> | |
| </section> | |
| </li> | |
| ))} | |
| </ul> | |
| </section> | |
| <Modal | |
| isOpen={modal} | |
| isEdit={isEdit} | |
| closeModal={handleModalClose} | |
| setUserValue={setUserValue} | |
| editingId={editingId} | |
| /> | |
| </div> | |
| ); | |
| } | |
| export default App; |
Finally, we can test our application by starting the development server and performing CRUD operations.
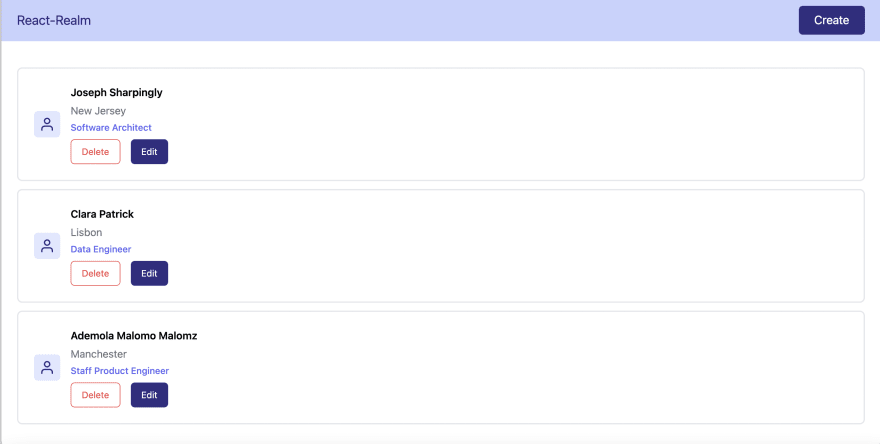
This post discussed how to create a database on MongoDB, create and deploy serverless functions using MongoDB Realm and consume the endpoints in a React.js application.
You may find these resources helpful:
30