31
How to Serve Different Content Based on User Data/Membership with Strapi and React
Strapi has grown so large in a short period that it has become the most generally used headless CMS platform for developers and companies in the development of their products. With this stremendous trend, we'll learn how to generate content based on a user in this lesson.
In this article, we will look at how to connect the Strapi backend to our React frontend, save and fetch data from Strapi using Axios. We'll also go through how to create database collections and create relationships between them.
This tutorial will be a hands-on demonstration. If you'd like to follow along, be sure you have the following installed
A headless CMS is a content management system (CMS) created from the ground up as a content repository that makes content accessible via a RESTful API or GraphQL API for display on any device, with an interface to manage content and a RESTful or GraphQL API to deliver content wherever you need it. A headless CMS, as a result of this strategy, is agnostic about how and where your content is presented. It has only one goal to store and provide structured material while also allowing content editors to collaborate on new content.
Strapi is an open-source headless CMS that allows developers to use their preferred tools and frameworks while allowing editors to manage and distribute their content through their application's admin panel. Strapi is a modular CMS built on a plugin architecture, with an extensible admin panel and API, and every component modifiable to fit any use case. Strapi also has an in-built user system for controlling what administrators and end-users have access to.
Now that we have to know what Strapi is all about, let’s go ahead and create a Strapi project for our application. To get started, first create a dedicated directory of our project with the command below:
mkdir Strapi-ReactApp && cd Strapi-ReactAppWe are now in the
*Strapi-ReactApp* director, go ahead and create our Strapi backend with the command below:npx create-strapi-app strapi-server --quickstartThe command will create a
strapi-server directory in the *Strapi-ReactApp* directory we created, with the files and configurations required for our backend.If the command above runs successfully, you should get an output like the one on the screenshot below on your terminal, which are the details of our project.

Open your favourite browser, and go to
http://localhost:1337/admin to open the admin page for our project. Fill in your details in the form Strapi provides and press the LET’S START button.
Then you’ll be redirected to the Strapi admin Dashboard, from here we will create our content-type, define our content fields, and add records to our content collections.
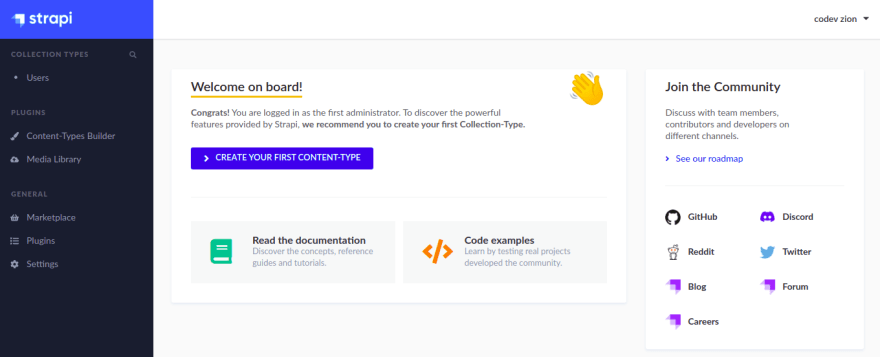
At this point, our Strapi application is set. Now let’s proceed to create some collection types. Click on Content-Types Builder at the left-hand side of our admin dashboard. We’ll create two contents types, the Users_detail, Business, and Comment content-types. The Users_details content-type will have a one-to-many relationship with the Business content-type, while the Business will also have a one-to-many relationship with the Comment content-type.
Creating our Business Content-Type
We want our users to register their business on our application. So we will create Business content-type to save the details of the user’s business. First, create the Business content-type by clicking the Create new collection type button under collection types.

Then, enter
Business as the content-type display name and click the Continue button to proceed. A modal will pop up for you to choose the fields you want in the collection. 
For our Business content-type, we will use the Text field type to save the business name, slogan, city, phone, state, status, and postal_code, then we will use the Boolean field type for the isApproved field.
Select Text from the field collection types, the name field will be called name, choose the short text type, and click the add another field button.
We will also create other fields for the slogan, city, phone, state, and postal_code with the same process. Select the Boolean field type and name it isApproved. When we are done creating our field types, we will click the Finish button.
You will see all our created fields nicely displayed on the screen.
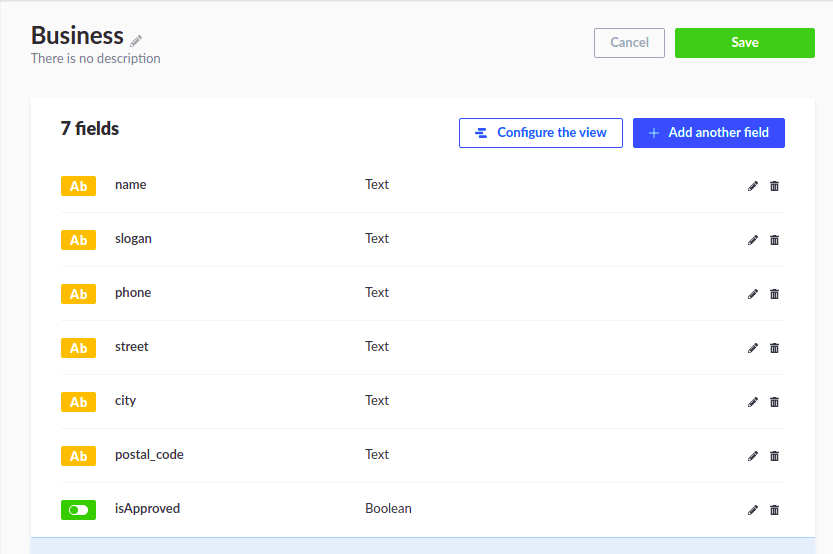
Finally, click on the save button to save our content-type.

Creating our Users _detail Content-Type
We want all users of our application to be registered with the application. Let’s get started. First, create the User_detail content-type by clicking the Create new collection type button under collection types.

Then, enter the content-type display name and click the Continue button to proceed. A modal will pop up for you to choose the fields you want in the collection.

For our Users_detail content-type, we are using the fields below:
We will use the text field for the user's full name and role, the email field we will use to save the user's email, the password field for the user's password, and the relation to connecting the Users_detail's content-type with the Business content-type.
Now, select Text from the field collection types, name it
fullname, choose the short text type since we will save the user’s full name in this field. Click on the add another field button, and repeat the step for the role field, but this time, the field name should be called role. The role field will enable differentiate our normal users from the admin users.Next, select Email from the field collection type for our user’s email address, the field should be named
We create another field for our user’s password, we name it a
email, and it should be of short text type. We create another field for our user’s password, we name it a
password, and it will be of short text type.Finally, we create our relation field to create a relationship with the Business content-type. Select the relation field type, name it
businesses and make it have a One-to-Many relationship with the Business content-type by selecting Business content-type in the select field at the right hand of the page.
Then click on finish, and save the fields and the event type.

Creating our Comment Content-Type
We also need to save the user's comment on the businesses registered in our application. We need to create a Comment content-type by clicking the Create new collection type button under collection types as we did in the previous sections.
We also need to save the user's comment on the businesses registered in our application. We need to create a Comment content-type by clicking the Create new collection type button under collection types as we did in the previous sections.

Then, name it
Comment, and click the Continue button to proceed. We will be using the Text and Number field types in our comment content-type. The Text type for the comment **and **user field, then the Number type for the businessId.
Finally, click on finish, and save the fields and the event type.

We have successfully created our strapi backend, so let’s move on to our React frontend. Before that, we need to enable CRUD in our Strapi Strapi instance by going to Settings → under USERS & PERMISSIONS PLUGIN*, Role → Public →* Under Permission, Application. We will click the select all input box for each of the collection types to provide our frontend end access to do CRUD operations on our backend.
Next, we need to move out the folder with the command below:
cd ..Then create our react application with the command below:
npx create-react-app strapi-clientWait for some minutes for the installation to finish depending on the speed of your network connection.
When the installation is complete, run the command below to confirm it.
When the installation is complete, run the command below to confirm it.
create-react-app --versionIf everything went well during the installation, you should see the create-react-app version printed out on the console like in the screenshot below.

Now change the directory to the
strapi-client , and delete the boilerplate code/files from the codebasecd strapi-clientNext, we need to install the Axios module which will be used to make API calls to the strapi backend, and react-router version 5.3.0 with the command below:
npm install axios react-router-dom@5.3.0Then, remove some start the react application with the command below:
npm run startOpen your favorite browser and navigate to
localhost:3000 to view the application.We need to create a User component to handle our user’s registration and authentication. To get started, on the
This component will be in charge of our users' registrations. Open the Signup.jsx file and paste the following code:
strapi-client/src folder, create a components directory. We will separate our authentication components from other components by creating an authentication folder in the components directory. Then, create Signup.jsx file in the authentication folder.This component will be in charge of our users' registrations. Open the Signup.jsx file and paste the following code:
import axios from "axios";
    import { useState } from "react";
    import { useHistory } from "react-router";
    function SignUp(props) {
      return (
        <section>
          <div>
            <form action="" onSubmit={(e) => handleSubmit(e)}>
              <input
                type="text"
                placeholder="Fullname"
                onChange={(e) => setName(e.target.value)}
                name="Name"
              />
              <input
                type="text"
                placeholder="Email"
                onChange={(e) => setEmail(e.target.value)}
                name="Email"
              />
              <input
                type="password"
                placeholder="Password"
                onChange={(e) => setPassword(e.target.value)}
                name="Password"
              />
              <button type="submit">Login</button>
            </form>
          </div>
        </section>
      );
    }
    export default SignUp;
In our code, we’ll import
Axios, to enable sending API requests to the backend. Then we imported useState and useHistory. The useState hook will enable us to handle our application states, while useHistory will enable us to redirect our users on successful login to our application.Next, in our functional component, we returned our registration form, created our handleSubmit handler which we will be creating later in this section. Then we created our onChange handlers on all the input fields to set and reset the input value states, which we will be creating shortly.
Now let’s create our states, and state function handlers. In the
Signup.jsx file, before the return keyword, add the code below:const [name, setName] = useState("");
const [email, setEmail] = useState("");
const [password, setPassword] = useState("");
const history = useHistory()
const { setActiveUser, setLoggedIn } = props;
const handleSubmit = async (e) => {
e.preventDefault();
const reqBody = {
fullname: name,
email,
password,
};
const res = await axios.post(
"http://localhost:1337/users-details",
reqBody
);
if (res.statusText === "OK") {
setActiveUser(res.data);
setLoggedIn(true);
history.push('/')
}
};Here, we created the email, password, history states hooks. Then we created the handleSubmit. When a user submits the registration form, we send a Post request to our Strapi backend to save the user’s records and return the user to the application Home Component which we are yet to create on successful registration.
Finally, we add the registered user to our
Finally, we add the registered user to our
activeUser state and reset the isLoggedIn state which we will be creating on our App component later in the section to true, to update our components that a user is logged in.
At this point, we've created our user Component to manage our users' registration. Let's move on to authenticate users in our application. Create a
Signin.jsx file in the authentication folder we created, and add the following code:import axios from "axios";
import { useState } from "react";
import { useHistory } from "react-router";
import { Link } from "react-router-dom";
function SignIn(props) {
const [email, setEmail] = useState();
const [password, setPassword] = useState();
const [errorMessage, setErrorMessage] = useState("");
const history = useHistory();
const { setActiveUser, setLoggedIn } = props;
const handleSubmit = async (e) => {
e.preventDefault();
const res = await axios.get(
`http://localhost:1337/users-details?email=${email}&password=${password}`
);
if (res.data.length === 0) {
setErrorMessage("Incorrect Email or password");
} else {
setActiveUser(res.data);
setLoggedIn(true);
history.push("/");
}
};
return (
<section>
<div>
<form action="" onSubmit={(e) => handleSubmit(e)}>
<input
type="text"
placeholder="Email"
onChange={(e) => setEmail(e.target.value)}
/>
<input
type="password"
placeholder="Password"
onChange={(e) => setPassword(e.target.value)}
/>
{errorMessage && <p>{errorMessage},<Link to="/signup"> Signup </Link>instead</p>}
<button type="submit">Login</button>
</form>
</div>
</section>
);
}
export default SignIn;If you look closely, you will notice that our Signin component is similar to our Signup component, except for a few minor differences that I will highlight. To begin, we imported the Link component from the react-router-dom package to create a link to our Signup component. Then we added an errorMessage state hook, which shows an error message if a user login fails.
Next, we created a
handleSubmit function to handle form submissions, but this time we're sending a Get request and passing the user's email and password as query parameters. If the user's email and password match any record in our Strapi User_details content-type collection, we add the user's data to the active user's state and reset the isLoggedIn state to true.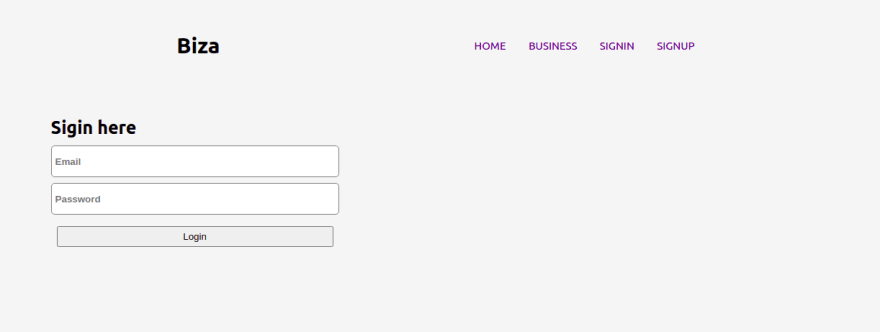
We’ll create a Business component to manage our user’s business. For the separation of concern, we will create a
Business folder in our components folder for all our business-related components. Then we’ll create three components Business.jsx BusinessList.jsx, and BusinessDetails.jx file in the Business folder.In our Business.jsx files, add the code below:
import BusinessList from "./BusinessList";
    import { useState } from "react";
    import Modal from "../Modal";
    function Business(props) {
      const { isLoggedIn, business } = props;
     const [showModal, setShowModal] = useState(false);
      return (
        <section className="container">
          <h4>Business Listings</h4>
          <div className={"form"}>
            {isLoggedIn && <button className={"btn-danger"} onClick={() => setShowModal(true)}>Add business</button>}
            <input type="text" name="" id="" />
            <button className={"btn-info"}>Search</button>
          </div>
          <div className={"row"}>
            {business.map((data) => (
              <BusinessList business={data} />
            ))}
          </div>
        </section>
      );
    }
    export default Business;
First, we’ll import our BusinessList Component where we will display all the businesses approved by the admin, useState to handle the display, and hide our modal. The next thing is to inherit the Business and is logged in the state from the App Component. We also import our Modal Component which we will be creating later and listen to onClick event to show and hide our modal when the Add Business button is clicked.
Then, in our jsx elements, we created an Add Business button, which will available only when a user is logged in to our application.
Then, in our jsx elements, we created an Add Business button, which will available only when a user is logged in to our application.
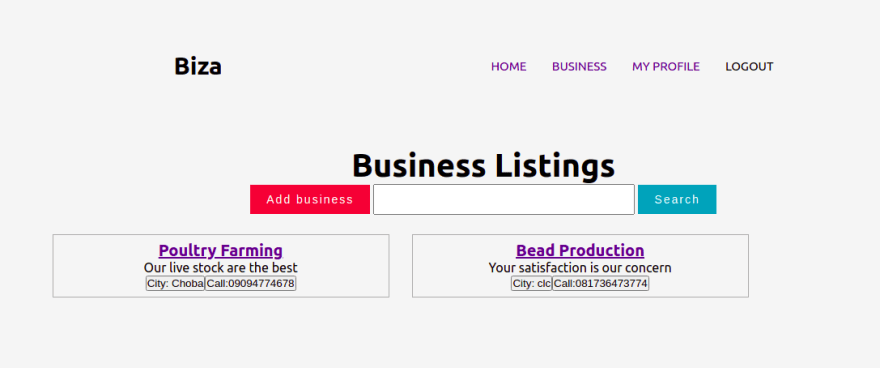
Our Add Business button will display a modal, which will enable them to create a new business. When a new business is created, isApproved has to be set to true in our Business content type before the business can be displayed.
Users that are not logged in to our application can only view the business listing, but can not comment or create their own business.
Then, we loop through all available business listings with the map function and pass the details to our BusinessList Component.
Users that are not logged in to our application can only view the business listing, but can not comment or create their own business.
Then, we loop through all available business listings with the map function and pass the details to our BusinessList Component.
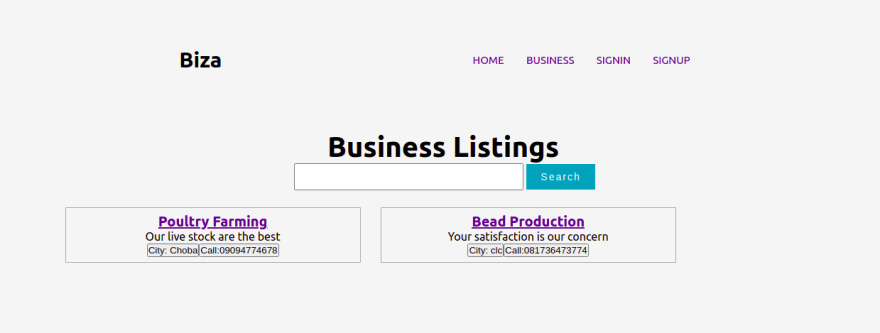
Next, we will update our BusinessList Component with the code below:
import { Link } from "react-router-dom";
    function BusinessList(props) {
      const { business } = props;
      return (
        <section>
          <div className={"row"}>
            <div className={"card"}>
              <div className={"col-md-12"}>
                <h4>
                  <Link to={`/business/${business.id}`}>{business.name}</Link>
                </h4>
              </div>
              <div className={"col-md-12"}>
                <p>{business.slogan}</p>
              </div>
              <div className={"handles"}>
                <button>City: {business.city}</button>
                <button>Call:{business.phone}</button>
              </div>
            </div>
          </div>
        </section>
      );
    }
    export default BusinessList;
We import the
Now, for each of the businesses in our collection, we created a link to the BusinessDetails Component, passing the business id as params to the URL where the users can see more information about a business, and as well drop comments. Then, using the business object from the Business Component, we displayed the business details
Link Component from react-router-dom, which we know allows linking our Components together. Then we also inherited the business state from our Business Component to have access to the business listings.Now, for each of the businesses in our collection, we created a link to the BusinessDetails Component, passing the business id as params to the URL where the users can see more information about a business, and as well drop comments. Then, using the business object from the Business Component, we displayed the business details

Next, we will update our BusinessDetails we import the
Update our
Link, and useParams Hooks from react-router-dom. The useParams Hook will enable getting the business id from the URL params. Then we import useState, and useEffect hooks for state management. We get the business id from the URL parameters const { id } = useParams();, so for each business, we will access their details from theirs ids.Update our
BusinessDetails Component with the code below:import { Link, useParams } from "react-router-dom";
import { useState, useEffect } from "react";
import axios from "axios";
function BusinessDetails(props) {
const { id } = useParams();
const [comment, setComment] = useState();
const [comments, setComments] = useState();
const { business, activeUser, isLoggedIn } = props;
const businessDetail = business.filter((data) => data.id == id);
return (
<section className={"container"}>
<div className={"details"}>
<h4>{businessDetail[0]?.name}</h4>
<div className={"location"}>
<p>Call:{businessDetail[0]?.phone}</p>
<p>City: {businessDetail[0]?.city}</p>
<p>Street: {businessDetail[0]?.street}</p>
</div>
</div>
</section>
);
}
export default BusinessDetails;Next, we create a
In our comment form, we added an onSubmit event which will be triggered when the handleSubmit function which we will be creating shortly is called. We add an onChange event to the input to update our comment with the text in the input field.
Add the code below to our
comment, and a comments state, we will use the comment state to get the users to comment from the comment form, and the comments state will be we will use to save the user's comments on a particular business. In our comment form, we added an onSubmit event which will be triggered when the handleSubmit function which we will be creating shortly is called. We add an onChange event to the input to update our comment with the text in the input field.
Add the code below to our
BusinessDetails Component, inside the <section> jsx element.<div className={"comments"}>
{comments?.length > 0 ? (
<div>
{comments.map((comment) => (
<p>
<span>{comment.user}: </span>
{comment.comment}
</p>
))}
</div>
) : (
<p>No comments</p>
)}
<form action="" onSubmit={(e) => handleSumbit(e)}>
<textarea
name=""
id=""
cols="40"
rows="3"
onChange={(e) => setComment(e.target.value)}
></textarea>
<button className={"btn-info"}>
{isLoggedIn ? "Send" : <Link to="/signin">Send</Link>}
</button>
</form>
</div>Then, we used the businessDetail object to display the business details, we also loop through the comments object to display all the comments on this business which is empty for now.
Now let’s fetch the user's comment from our Strapi business collection. Before the return key, add the code below to our BusinessDatails Component.
Now let’s fetch the user's comment from our Strapi business collection. Before the return key, add the code below to our BusinessDatails Component.
useEffect(() => {
        async function fetchData() {
          const response = await axios.get(
            `http://localhost:1337/comments?businessId=${id}`
          );
          setComments(response.data);
        }
        fetchData();
      }, []);
We made a Get request to our Strapi backend using Axios inside our useEffect hook, passing the business id as a required parameter, to fetch all the comments for a business whose details are currently viewed by a user. Then we change the comments state to store the comments.
Next, we will create a handlerSubmit function to save our user's comments on a business. Then we send a POST request to our Strapi backend, creating a reqBody object, which contains the user fullname, comment, and id of the business they are commenting on.
Add the code below to our BusinessDetails Component after the useEffect hook.
const handleSumbit = async (e) => {
        e.preventDefault();
        const reqBody = {
          user: activeUser[0].fullname,
          comment,
          businessId: id,
        };
        const resComment = await axios.post(
          "http://localhost:1337/comments",
          reqBody
        );
        setComments([...comments, resComment.data]);
    };
We need our users to add their business to our application. To get started, we will create our Modal.jsx Component. We will do that in our Component directory. First, we will import useState hook to get the user input from our form, we also need
Axios to send requests to our Strapi backend. Then we add a close button to hide the modal when clicked, and we create a Business form with the following field:We will add an onChange event to our forms fields to get the value when the fields are changed. We will also add an onSubmit handler function to our form, which will enable us to save the user’s Business records when the form is submitted.
import { useState } from "react";
    import axios from "axios";
    const Modal = (props) => {
      return (
        <div className="modal">
          <div className="close" onClick={() => props.setShowModal(false)}>
            X
          </div>
          <hr />
          <form onSubmit={(e) => handleSubmit(e)}>
            <label className="control"> Name: </label>
            <input
              className="control"
              type="text"
              onChange={(e) => setName(e.target.value)}
            />
            <label className="control"> Slogan: </label>
            <input
              className="control"
              type="text"
              onChange={(e) => setSlogan(e.target.value)}
            />
            <label className="control"> Phone: </label>
            <input
              className="control"
              type="text"
              onChange={(e) => setPhone(e.target.value)}
            />
            <label className="control"> Street: </label>
            <input
              className="control"
              type="text"
              onChange={(e) => setStreet(e.target.value)}
            />
            <label className="control"> Postal Code: </label>
            <input
              className="control"
              type="text"
              onChange={(e) => setCode(e.target.value)}
            />
            <label className="control"> City: </label>
            <input
              type="text"
              className="control"
              onChange={(e) => setCity(e.target.value)}
            />
            <button className="control-1">Submit</button>
          </form>
        </div>
      );
    };
    export default Modal;
Next, we will create states for our form fields and our
In our
handleSubmit function.In our
handleSubmit function, we will create a reqBody object where we will save all the user's input values, and send a Post request to our Strapi backend to save the records.const [name, setName] = useState();
const [slogan, setSlogan] = useState();
const [phone, setPhone] = useState();
const [city, setCity] = useState();
const [street, setStreet] = useState();
const [code, setCode] = useState();
const handleSubmit = async (e) => {
e.preventDefault();
const reqBody = {
name,
slogan,
phone,
city,
street,
postal_code: code,
isApproved: false,
};
await axios.post("http://localhost:1337/businesses", reqBody);
};
Now back to our App Component, let’s now connect our other Components to our App Component. First, we need to import our modules and components into the App Component. Open the App.js and update it with the code below:
import React, { useEffect, useState } from "react";
    import axios from "axios";
    import Header from "./components/Header";
    import Home from "./components/Home";
    import Business from "./components/Business/Business";
    import SignIn from "./components/Authentication/Signin";
    import SignUp from "./components/Authentication/Signup";
    import Profile from "./components/Profile";
    import BusinessDetails from "./components/Business/BusinessDetails";
    import { Switch, Route } from "react-router-dom";
The key things to point in our code are the Switch and Router components, which we import from the react-router-dom to handle our application’s routing.
function App() {
      return (
        <div className="App">
           <Header isLoggedIn={isLoggedIn} setLoggedIn={setLoggedIn} setActiveUser={setActiveUser}/>
          <Switch>
            <Route path="/" component={Home} exact />
            <Route path="/business" exact>
              <Business isLoggedIn={isLoggedIn} business={business} />
            </Route>
            <Route path="/business/:id">
              <BusinessDetails business={business} activeUser={activeUser} isLoggedIn={isLoggedIn}/>
            </Route>
            <Route path="/signin">
              <SignIn setActiveUser={setActiveUser} setLoggedIn={setLoggedIn} />
            </Route>
            <Route path="/signup">
              <SignUp setActiveUser={setActiveUser} setLoggedIn={setLoggedIn} />
            </Route>
            <Route path="/profile">
              <Profile business={business} activeUser={activeUser}/>
            </Route>
          </Switch>
        </div>
      );
    }
    export default App;
Next, we’ll set up six routes
/, /business /business/:id , /signin, /signup, and /profile. The / toute will render our Home, /business route will render the Business Component, the /business/:id route will render the BusinessDetail Component, the /signin route will render our Signin component, the /signup route will render our Signup Component.The
Header component will be rendered in all the Components which we have not created yet. Create a
Switch component wraps the dynamic routes and the Route configures the specific routes and wraps the component the route will render. Then ourHeader component will be rendered in all the Components which we have not created yet. Create a
Header.jsx and Home.jsx component in our component directory. Add the code below to the
Header.jsx component.import { Link } from "react-router-dom";
function Header(props) {
const { isLoggedIn, setLoggedIn, setActiveUser } = props;
const handleLogout = () => {
setLoggedIn((prev) => !prev);
setActiveUser([]);
};
return (
<header>
<div className={"logo"}>
<h4>Biza</h4>
</div>
<div className={"navbar"}>
<ul>
<li>
<Link to="/"> Home </Link>
</li>
<li>
<Link to="/business"> Business </Link>
</li>
{isLoggedIn ? (
<>
<li onClick={handleLogout}>Logout</li>
</>
) : (
<>
<li>
<Link to="/signin"> Signin </Link>
</li>
<li>
<Link to="/signup"> Signup </Link>
</li>
</>
)}
</ul>
</div>
</header>
);
}
export default Header;We import
Link component from react-router-dom, destructure our isLoggedIn, setLoggedIn, setActiveUser from our props. We’ll use conditional rendering to display the Logout link only when a user is logged in our application, then display the Signup and Sign in links when they are not.Next, we’ll create a handleLogout handler function to log our users out by changing the isLoggedIn state and removing the logged-in user from the ActiveUser state.
Add the code below to the
Home.jsx component.function Home(){
return(
<section className={'homepage'}>
<h4><span>Tell the World</span> about your Business</h4>
<button>Get Started</button>
</section>
)
}
export default Home;Next, we will create
Add the code below to our App.js Component before the return keyword
isLoggedIn, activeUser, and business state. Our isLoggedIn state will help us know if a user is logged in to our application, the activeUser state will enable us save the details of the currently logged in user, and our business state will enable use save all the approved business from our Business content-type collection. Because when a user is logged into our application, we need to persist their data to get it accross all the components where they will be used. Add the code below to our App.js Component before the return keyword
const [isLoggedIn, setLoggedIn] = useState(false);
      const [activeUser, setActiveUser] = useState();
      const [business, setBusiness] = useState([]);
      useEffect(() => {
        async function fetchData() {
          // You can await here
          const response = await axios.get(`http://localhost:1337/businesses?isApproved=${true}`);
          setBusiness(response.data);
        }
        fetchData();
      }, []);
Now, let’s now modify our
We will import
Index.js Component with the code below:We will import
BrouserRouter from react-router-dom module, the BrowserRouter component will initialize the routing system for our Components.import React from "react";
import ReactDOM from "react-dom";
import "./style.css";
import App from "./App";
import { BrowserRouter } from "react-router-dom";
ReactDOM.render(
<BrowserRouter>
<App />
</BrowserRouter>,
document.getElementById("root")
);Finally, create a
style.css file in our src directory. Copy the styles from the Github repository of this project and paste them into the style.css file.We have completed our Strapi business Directory application. Let’s test our app. Go to
http://localhost:3000/, feel to test all the routes./signup
/signin
/business
/business/id
/profile
Throughout this tutorial, you’ve learned how to serve different content based on user data/membership with Strapi and React.
We learned what Strapi is all about, and how it makes building APIs more efficient. We learned what a Headless CMS is all about, and how to set up a Strapi Project. We created a business directory application with Strapi and React.js.
Now you've known how efficient it is to build APIs with Strapi, how would use Strapi in your future project; perhaps you also want to learn more about Strapi.
31
