

25
Building dApp with Near Protocol and React
In this tutorial you can learn how to build web application using React.js, build and deploy a smart contract on the Near Blockchain and connect web app with the smart contract to have a working web application which will interact with the smart contract.
You also need to create a testnet account, go to the testnet wallet and create one, it's easy and free:

The easiest way to get started is using npx - Node Package Execute
npm install -g npxLet's generate the new project. Go to a directory where you want to have your project in the terminal. In our case we will be using home directory.
For near dapps there is a
npx binary create-near-app. It has some options to choose what type of frontend you are going to use and also what type of smart contract you are going to use. Here are the option you can use:➜ ~ npx create-near-app -h
create-near-app <projectDir>
Create a new NEAR project
Options:
--version Show version number [boolean]
--frontend template to use
[choices: "vanilla", "react", "vue", "angular"] [default: "vanilla"]
--contract language for smart contract
[choices: "assemblyscript", "rust"] [default: "assemblyscript"]
--help Show help [boolean]
Examples:
create-near-app new-app Create a project called "new-app"For this tutorial we are going to use
react as a frontend and assemblyscript as a smart contract.Open terminal and execute the command:
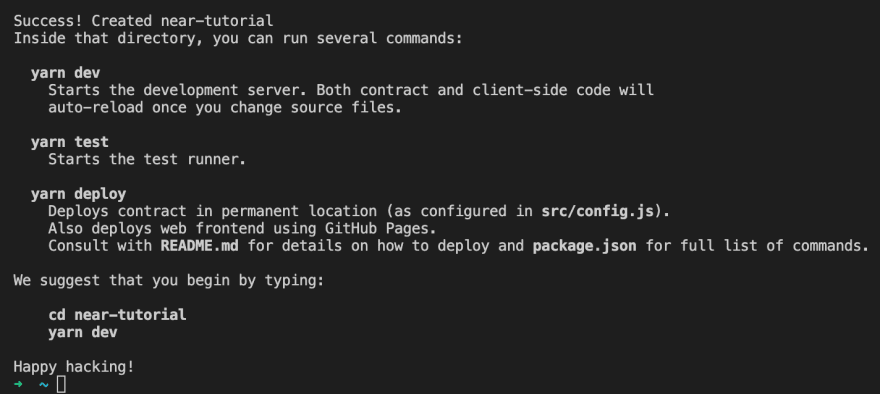
npx create-near-app near-tutorial --frontend=react --contract=assemblyscriptWait a bit to download everything and when it finish you will see something like this:
In general our new project is ready to be started, the only thing you still need is to login in your near testnet account you should have create before. To do this open the terminal and call:
near loginIt should open the browser where you approve login, after that you are ready to interact with the near blockchain using `near cli.
That's it we have created our project, now we can get hands dirty in the code. Open the project in you favourite IDE, the recommended option is using free VS Code:
bash

cd near-tutorial

code .

Our newly created project has several main places:
src - React source codecontract - Smart contract source codepackage.json - Project dependencies and running scriptsReadme.md - Project documentation and development tipsneardev - Configuration for smart contract developmentFirst of all we need to install dependencies using
yarn command:bash
yarn
It can take some minutes depending on your network, be patient :)
After that we can already run the project in the dev environment. You can use one simple command:
bash

yarn dev
After a couple of seconds you should see something similar in your terminal and it should also open the app in your default browser:
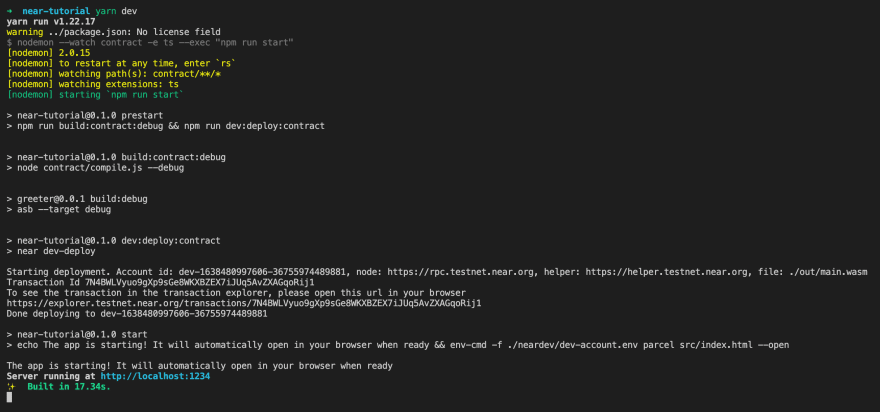
In the dev console you can also see that you dev smart contract was deployed to the blockchain, it starts with
Opening the link in your terminal will show you similar:

dev- and have some random numbers, in our case its dev-1638480997606-36755974489881. You can also see the link to the smart contract transaction deployment: https://explorer.testnet.near.org/transactions/7N4BWLVyuo9gXp9sGe8WKXBZEX7iJUq5AvZXAGqoRij1Opening the link in your terminal will show you similar:
Now let's jump in the browser and test how it works.
Generated project has predefined greeting smart contract, you can enter the custom greeting message and it will save it in the smart contract storage, change it to something custom and press save. It should redirect you to the wallet where you can sign the smart contract with your near testnet account.
Generated project has predefined greeting smart contract, you can enter the custom greeting message and it will save it in the smart contract storage, change it to something custom and press save. It should redirect you to the wallet where you can sign the smart contract with your near testnet account.
Press allow to approve transaction:

After successful approval you will be redirected back to the ui and will see the new greeting which is loaded from the smart contract:

Smart contract is located in
contract/assembly/index.ts:
It has the default message which we saw in the browser right after the opening:
javascript

const DEFAULT_MESSAGE = "Hello";
And it has two methods
getGreeting(accountId: string) and setGreeting(message: string)javascript
export function setGreeting(message: string): void {
const accountId = Context.sender;
// Use logging.log to record logs permanently to the blockchain!
logging.log(Saving greeting "${message}" for account "${accountId}");
storage.set(accountId, message);
}
As you can see this method contains one argument
message which was send when we approved the transaction. Inside the method we are extracting a the sender accountId from the Context class:javascript
const accountId = Context.sender;
Context is a class provided from the
near-sdk-as and it has some useful data you may need in your during the development:
You may find the whole class clicking on it in IDE or you can also check it out on near-sdk-as docs
After extracting the accountId we are using another class
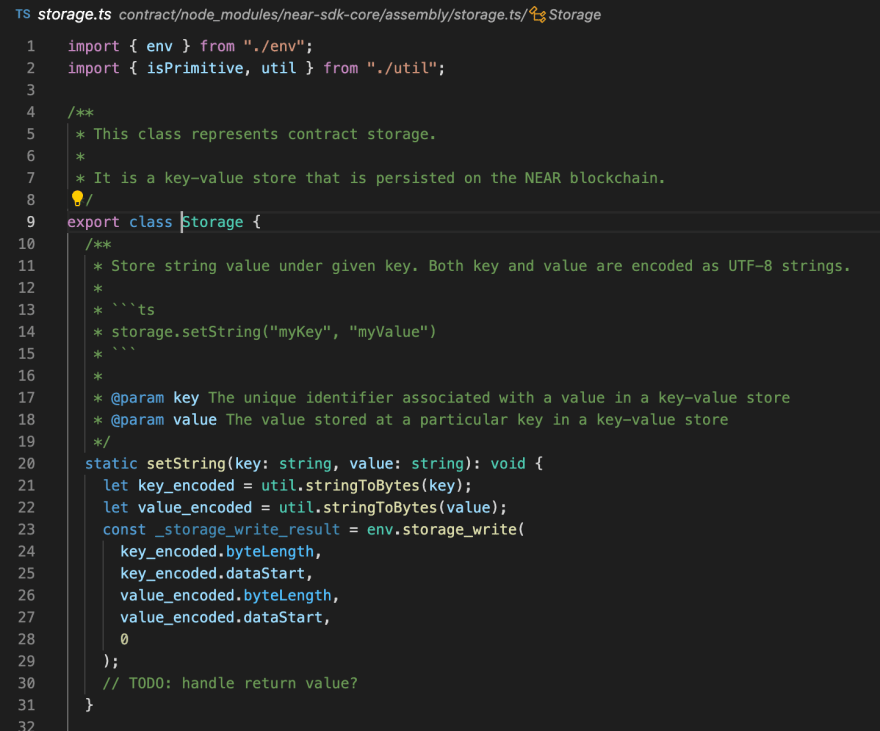
storage and its method storage.set:javascript
storage.set(accountId, message);
Storage is a key-value store that is persisted on the NEAR blockchain. Read the docs to check all the available methods.
Lets test the method using the
near cli.To make is easy we will set the
CONTRACT_NAME env variable, and to do so we can call neardev/dev-account.env which has our contract name inside:
Call this in the terminal and check if you have exported the variable:
bash

source neardev/dev-account.env

echo $CONTRACT_NAME
Call result:

One more thing to do is to set our testnet account as
ID env variable:bash
export ID=your-account.testnet
echo $ID
Call result:

If you want to pass a method argument using
Now we can set the greeting using
near-cli you can pass a json string afther the contract name.Now we can set the greeting using
near-cli:bash
near call $CONTRACT_NAME setGreeting '{"message": "Near CLI Greeting"}' --accountId $ID
It will call the smart contract and print you the transaction id:

getGreeting method is a readonly method, which mean we cannot use the context.sender to get the account id, its only accessible in mutating state calls:javascript
export function getGreeting(accountId: string): string | null {
// This uses rawstorage.get, a low-level way to interact with on-chain
// storage for simple contracts.
// If you have something more complex, check out persistent collections:
// https://docs.near.org/docs/concepts/data-storage#assemblyscript-collection-types
return storage.get < string > (accountId, DEFAULT_MESSAGE);
}
It is doing one call to
storage to get the greeting from the smart contract storage or the default method, if there is no message in the storage for the account we use. Readonly methods are using view instead of call we used for setGreeting:bash
near view $CONTRACT_NAME getGreeting "{\"accountId\": \"$ID\"}"
Boom, we can see the greeting we set in the previous step:

Let go to the browser and refresh the page to verify that our message is also there. If everything goes well you will see this after refresh:

Now lets check how we interact with the Near Blockchain in frontend
In our react application we have
two configuration files where we connect to the blockchain: config.js and utils.js:
Inside
config.js we define our contract name, which is also taken from environment variable :javascript
const CONTRACT_NAME = process.env.CONTRACT_NAME || "near-tutorial";
And we also have
getConfig function with the blockchain configuration for testnet, mainnet and some other environments:function getConfig(env) {
switch (env) {
case 'production':
case 'mainnet':
return {
networkId: 'mainnet',
nodeUrl: 'https://rpc.mainnet.near.org',
contractName: CONTRACT_NAME,
walletUrl: 'https://wallet.near.org',
helperUrl: 'https://helper.mainnet.near.org',
explorerUrl: 'https://explorer.mainnet.near.org',
}
case 'development':
case 'testnet':
return {
networkId: 'testnet',
nodeUrl: 'https://rpc.testnet.near.org',
contractName: CONTRACT_NAME,
walletUrl: 'https://wallet.testnet.near.org',
helperUrl: 'https://helper.testnet.near.org',
explorerUrl: 'https://explorer.testnet.near.org',
}
...
}
`
The next file is
utils.js where we use the config from config.js, wand the main is initContract() method, where we connect to the blockchain rpc and list all the available methods in our contract:import { connect, Contract, keyStores, WalletConnection } from "near-api-js";
import getConfig from "./config";
const nearConfig = getConfig(process.env.NODE_ENV || "development");
// Initialize contract & set global variables
export async function initContract() {
// Initialize connection to the NEAR testnet
const near = await connect(
Object.assign(
{ deps: { keyStore: new keyStores.BrowserLocalStorageKeyStore() } },
nearConfig
)
);
export async function initContract() {
// Initialize connection to the NEAR testnet
const near = await connect(
Object.assign(
{ deps: { keyStore: new keyStores.BrowserLocalStorageKeyStore() } },
nearConfig
)
);
// Initializing Wallet based Account. It can work with NEAR testnet wallet that
// is hosted at https://wallet.testnet.near.org
window.walletConnection = new WalletConnection(near);
// is hosted at https://wallet.testnet.near.org
window.walletConnection = new WalletConnection(near);
// Getting the Account ID. If still unauthorized, it's just empty string
window.accountId = window.walletConnection.getAccountId();
window.accountId = window.walletConnection.getAccountId();
// Initializing our contract APIs by contract name and configuration
window.contract = await new Contract(
window.walletConnection.account(),
nearConfig.contractName,
{
// View methods are read only. They don't modify the state, but usually return some value.
viewMethods: ["getGreeting"],
// Change methods can modify the state. But you don't receive the returned value when called.
changeMethods: ["setGreeting"],
}
);
}
`
We expand the global
window object with the methods we will be using to interact with the blockchain and our smart contract. And here we also list viewMethods which we were calling with near view and changeMethods which we were calling with near call. So whenever you add new methods to your contract you have to update this file and list all the methods in the appropriate section, so that you can also use them later in your React Components.In
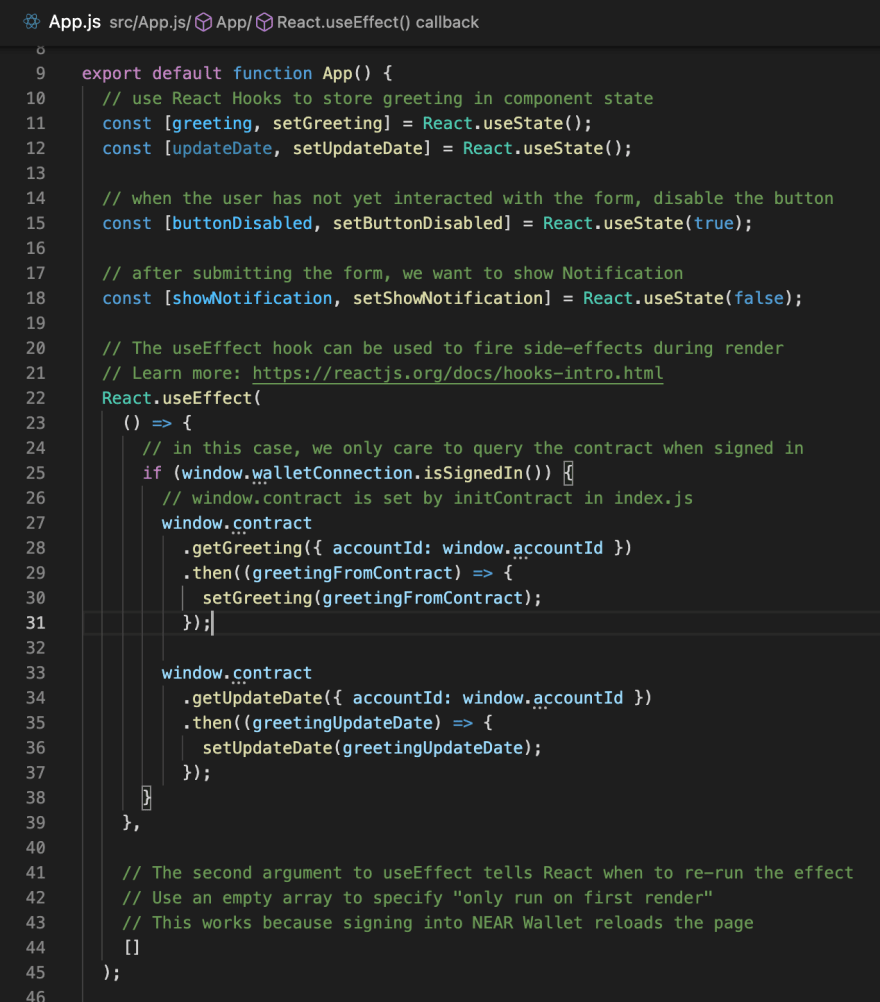
src/App.js you can see how the contract is used:// The useEffect hook can be used to fire side-effects during render
// Learn more: https://reactjs.org/docs/hooks-intro.html
React.useEffect(
() => {
// in this case, we only care to query the contract when signed in
if (window.walletConnection.isSignedIn()) {
// window.contract is set by initContract in index.js
window.contract
.getGreeting({ accountId: window.accountId })
.then((greetingFromContract) => {
setGreeting(greetingFromContract);
});
}
},
// The second argument to useEffect tells React when to re-run the effect
// Use an empty array to specify "only run on first render"
// This works because signing into NEAR Wallet reloads the page
[]
);
`
// Use an empty array to specify "only run on first render"
// This works because signing into NEAR Wallet reloads the page
[]
);
`
So now when we know how everything is connected to each other let's make it ours by making some changes.
Let's expand our smart contract with some properties, like date when the most recent greeting has been set.
In VSCode open
contract/assemble/index.ts and add replace setGreeting method with the following:javascript
export function setGreeting(message: string): void {
const accountId = Context.sender;
const timestamp = Context.blockTimestamp;
// Use logging.log to record logs permanently to the blockchain!
logging.log(
Saving greeting "${message}" with timestamp: ${timestamp} for account "${accountId}"
  );

  storage.set(accountId, message);

  storage.set(
,
${new Date(timestamp / 1000000).toDateString()} ${new Date(timestamp / 1000000
).toTimeString()}
  );

}
We have added two lines, first one is getting the block timestamp, which is provided in nanoseconds:
javascript

const timestamp = Context.blockTimestamp;
Second one - convert set the storage to contains last update date of the greeting:
javascript

storage.set(
${accountId}_last_updated,
${new Date(timestamp / 1000000).toDateString()} ${new Date(timestamp / 1000000
).toTimeString()}
);
Then let's add the method to get last update value from the smart contract using the
${accountId}_last_updated key:javascript
export function getUpdateDate(accountId: string): string | null {
return (
storage.get < string > (${accountId}_last_updated, "No custom greeting.")
);
}
Now let's use our new method in the React Code.
First of all we need to add them to the contract definition inside
src/utils.js. Go and add new method getUpdateDate to viewMethods and save file so it will look like this: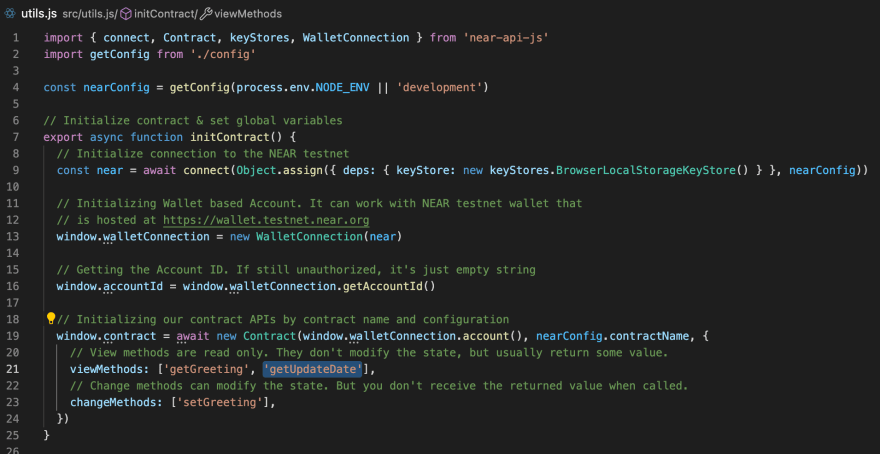
Then open
src/App.js and add a new state variable to store our update date:javascript
const [updateDate, setUpdateDate] = React.useState();
After that inside
useEffect hook where we are getting the greeting add one more call to get the getLastUpdate and when we fetch the value we can update our updateDate state hook by calling setUpdateDate. The code we add should look as following:javascript
window.contract
.getUpdateDate({ accountId: window.accountId })
.then((greetingUpdateDate) => {
setUpdateDate(greetingUpdateDate);
});
And here how the file should look after we added those changes:
And the last part is to show the updateDate in the UI. Find the
h1 tag where you show current greeting and add some other tag for example h3 after to show the last update date.Last Update: {updateDate}
`
Then if you open the browser you will see the default response because we have to call
So let's update the greeting and press save again, approve the transaction and when getting back we will see the date (refresh the page to see the latest changes):
setGreeting again to save the timestamp in the smart contract storage.So let's update the greeting and press save again, approve the transaction and when getting back we will see the date (refresh the page to see the latest changes):

Great we did it, it looks awesome, isn't it?
When you save any file in your project it is automatically rebuild and redeployed to the dev in terminal, so you should be ready to use it. If it didn't happen or you have stopped your app, just use
yarn dev again and it will start up.The project is already set to be deployed to the Github Pages, check
package.json for all the commands available, but to simply deploy it as is you can use yarn deploy:pages or to deploy everything including your smart contract you can use command yarn deploy which will build and deploy both the contract, and also the ui app.But make sure to first commit and push your app to Github and also add the
homepage property to the package.json. More details can be found hereThat's it for now, we learned how to generate a new react app connect it with the near smart contract, how to add new methods to the smart contract, and how to use them in the UI.
You can add some more methods by your own, for example add some change methods to have some custom logic for your greeting, for example return it as a reversed string, or maybe store some custom colours or font settings for the greeting in the smart contract.
The tutorial source code is accessible here and demo app is deployed to GithubPages.
To learn more check https://near.org/learn/ or https://near.academy/
Happy coding!
25