31
Understanding Angular Component
Today we will be learning what is an Angular Component.
First of all you need to have angular installed in your system. If you don't have it installed you can quickly install it by following the below link
setup-angular
When you visit any website say dev.to

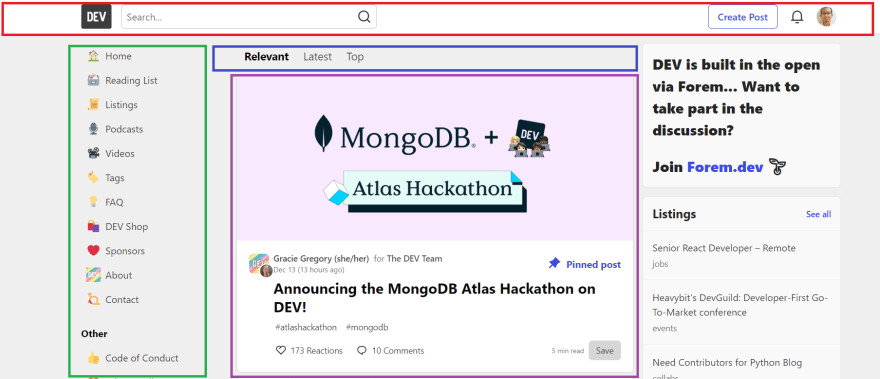
on the first glance you will see it as a pretty big application. A big application is always difficult to manage. So the Angular team came up with a concept called components where they broke a big chunk of the application into smaller pieces. These smaller pieces are combined together to form a big application which is easy to maintain also. Another advantage is reusability (which I will show you later). So now lets see how we can break the above diagram into various components.

Now if we try to break the above big application there can be multiple ways one of them could be having one nav bar component at the top (colored in red). One side bar component colored in green, one more component colored in blue, the main section component colored in violet, which is a long scrollable one. Now the main section have multiple topics which you can read and they are represented in cards (we developers call so :P) are repeated. So that can also be a card-component. So here comes the reusability. Using the same card again and again with different content. Develop once use again and again.
So, till now we understood what is a component and its advantage.
First of all you need to have angular installed in your system. If you don't have it installed you can quickly install it by following the below link
setup-angular
When you visit any website say dev.to

on the first glance you will see it as a pretty big application. A big application is always difficult to manage. So the Angular team came up with a concept called components where they broke a big chunk of the application into smaller pieces. These smaller pieces are combined together to form a big application which is easy to maintain also. Another advantage is reusability (which I will show you later). So now lets see how we can break the above diagram into various components.

Now if we try to break the above big application there can be multiple ways one of them could be having one nav bar component at the top (colored in red). One side bar component colored in green, one more component colored in blue, the main section component colored in violet, which is a long scrollable one. Now the main section have multiple topics which you can read and they are represented in cards (we developers call so :P) are repeated. So that can also be a card-component. So here comes the reusability. Using the same card again and again with different content. Develop once use again and again.
So, till now we understood what is a component and its advantage.
When you create a new angular project (using the command

Now if you open a command prompt from the same path of the project and run the application by typing in

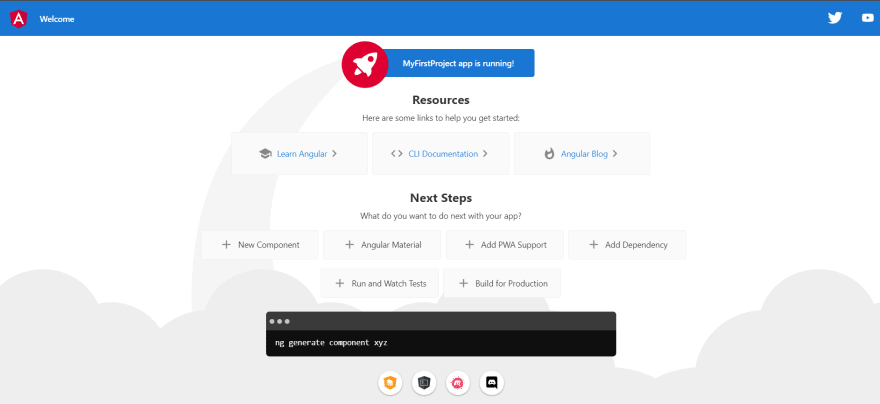
At this moment you must be wondering how this beautiful page came up. So the answer is Angular team already provided the first component to us which is shown when the application is loaded.
ng new MyFirstProject) and open in your fav editor (I used VS Code) you should see something like below -
Now if you open a command prompt from the same path of the project and run the application by typing in
npm start you will see your application running in localhost:4200 like below - 
At this moment you must be wondering how this beautiful page came up. So the answer is Angular team already provided the first component to us which is shown when the application is loaded.
Let's now slowly introspect the component provided by Angular.
Under app folder (refer the above diagram) you will see a file named with app.component.ts. This is the core part of this component. If you open the file you will get to see the below code
Under app folder (refer the above diagram) you will see a file named with app.component.ts. This is the core part of this component. If you open the file you will get to see the below code
import { Component } from '@angular/core';

@Component({
  selector: 'app-root',
  templateUrl: './app.component.html',
  styleUrls: ['./app.component.css']
})
export class AppComponent {
  title = 'MyFirstProject';
}
Every normal typescript class can be converted into a component if we put the decorator
a. selector - Its a string (there are few other variations available which I will discuss in advanced component part) which determines the name of the component or by which you can use the component
b. templateUrl - A relative URL path pointing to the html that will be rendered when Angular sees the above selector
c. styleUrls - An array of stylesheets to style the above html file content.
@Component on the top of the class. Decorator is actually a function which takes in an object as an argument. So here you can see @Component has a () that means a function call is happening and it is taking an object. This object we call as metadata. Here we can see that there are three (3) metadata present namely - selector, templateUrl, styleUrls.a. selector - Its a string (there are few other variations available which I will discuss in advanced component part) which determines the name of the component or by which you can use the component
b. templateUrl - A relative URL path pointing to the html that will be rendered when Angular sees the above selector
c. styleUrls - An array of stylesheets to style the above html file content.
Now if you remove the whole content from the app.component.html file and replace with any of your favorite string and save then you will se that the page in browser (which you opened earlier) reloads and is displaying the text you just now typed in.
The next question can come to your mind why this particular component is getting displayed? For that you need to navigate to the index.html file located in the project. It would like something like below
<!doctype html>
<html lang="en">
<head>
  <meta charset="utf-8">
  <title>MyFirstProject</title>
  <base href="/">
  <meta name="viewport" content="width=device-width, initial-scale=1">
  <link rel="icon" type="image/x-icon" href="favicon.ico">
</head>
<body>
  <app-root></app-root>
</body>
</html>
Now if you look at the third last line you will see some unusual html element . But if you look closely you will see its the same selector name
'app-root' that we came across in the @Component decorator selector metadata.So when the index.html page loads and angular sees this selector it pulls the component and displays it to the screen.
So by now you must be having a fair bit of idea on what is a component, its use and its different parts.
Challenge Section
india.india) replacing app-root what you just gave in your selector in the index.html file and let me know what happens. So it should be <india></india>.Hope you had a great learning session.
Cheers !!!
Happy Coding
Happy Coding
31

