To upgrade gradle version to 7.1
$ ./gradlew wrapper --gradle-version=7.1 --distribution-type=bin

In this article, we are going to explain how to set up and customise a health endpoint in a Spring Boot application via Spring Actuator.
The code for this demo could be found here:
$ ./gradlew wrapper --gradle-version=7.1 --distribution-type=bin
Spring Boot Actuator is part of the Spring ecosystem and provides a plethora of functionalities, including the ability to scan the health of your application. This is often called a health endpoint.
Health Indicator is a component that returns a health status (UP, DOWN, etc). This component could perform an action, like calling an API or querying a database or service.
Health Aggregator, as the name implies, processes the various Health Status (of the Health Indicators) and produces a general Health Status for the application.
For the demo let's create a Spring Boot app with the following specs:
Press Generate which will download a zip file and unzip the file in the directory of your preference.

To run the application you can either use your IDE (if you use Intellij and Java 16 make sure to update to the latest version) or you can use your terminal and the Gradle Wrapper (gradlew).
Navigate to the directory you extracted the zip and run from the terminal
$ ./gradlew bootRunJust by adding the Actuator in the project dependencies you enable the health auditing of your app which is accessible from /actuator/health.
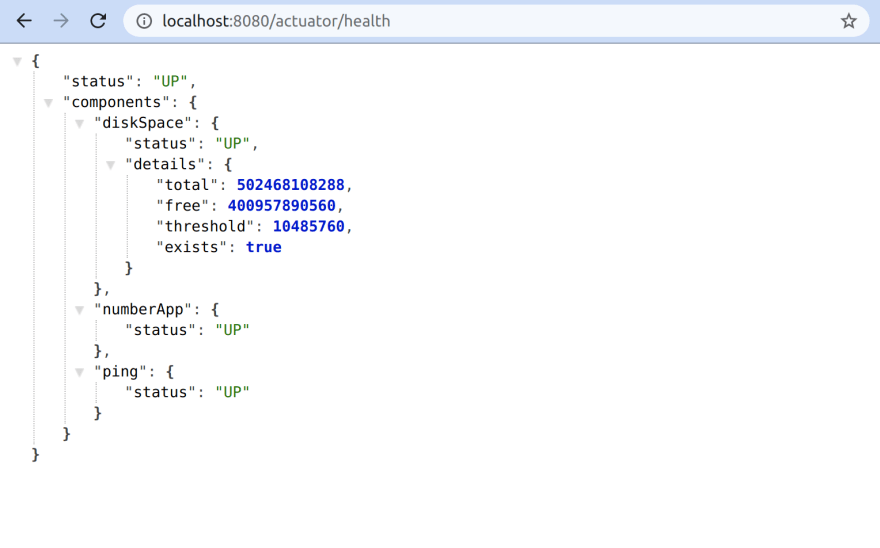
As we are running the application locally we need to access http://localhost:8080/actuator/health and the status should be UP.

You have the option to either extent the AbstractHealthIndicator or implement the HealthIndicator. In our case we choose the former.
Make sure you annotate your Health Indicator with @Component (you could use other Stereotype annotations or @Configuration if you prefer) in order for Spring to create a bean.
The following Indicator is creating a random number and conditionally returns status UP or DOWN with the error details.
package com.psideris.springhealthaggregatordemo;

import org.springframework.boot.actuate.health.AbstractHealthIndicator;
import org.springframework.boot.actuate.health.Health;
import org.springframework.stereotype.Component;

import java.util.Random;

@Component
public class NumberAppHealthIndicator extends AbstractHealthIndicator {

    @Override
    protected void doHealthCheck(Health.Builder builder) {
        int number = getRandomNumber();

        if (number > 5) {
            builder.up().build();
        } else {
            builder.down().withDetail("error", "Number was less than 5").build();
        }
    }

    private int getRandomNumber() {
        return new Random().ints(1, 10).findFirst().orElseThrow(() -> new RuntimeException("Failed to generate random number"));
    }
}
Bear in mind that you can create as many Health Indicators as you want but Spring checks the health of natively supported services (e.g. SQL DBs, mongoDB, elasticsearch, etc) without requiring any customisation, just adding the Actuator dependency.
For the heath aggregator we are going to implement the
StatusAggregator.
As we mentioned before the aggregator accumulates the health status from multiple Indicators, which means you can define the logic to indicate when the app is up or down.
package com.psideris.springhealthaggregatordemo;

import org.springframework.boot.actuate.health.Status;
import org.springframework.boot.actuate.health.StatusAggregator;
import org.springframework.stereotype.Component;

import java.util.Set;

@Component
public class AppHealthAggregator implements StatusAggregator {

    @Override
    public Status getAggregateStatus(Set<Status> statuses) {
        boolean statusUp = statuses.stream().allMatch(s -> s.equals(Status.UP));

        return statusUp ? Status.UP : Status.DOWN;
    }
}To display additional details you can add in the application.properties or application.yml file.
// application.yml

management:
  endpoint:
    health:
      show-details: always
// application.properties
management.endpoint.health.show-details=alwaysThe health endpoint should now include the following details.
To configure the url which exposes the health status you can add the following properties in the application.properties or application.yml file.
// application.yml

management:
  endpoints:
    web:
      base-path: /api
      path-mapping:
        health: health-status
// application.properties
management.endpoints.web.base-path=/api
management.endpoints.web.path-mapping.health=health-statusNow the url that we need to access is /api/health-status.
By default when creating a Health Indicator it is being exposed in the URL that matches its name (Spring removes the HealthIndicator suffix from the url).
If you provide a value inside the annotation then the URL changes to reflect that. In our case the new one is http://localhost:8080/actuator/health/numberService.
@Component("numberService")
public class NumberAppHealthIndicator extends AbstractHealthIndicator {

    ...

}You can find more about Spring Boot Actuator in the official documentation
25