
35
Integrate Salesforce to ServiceNow in minutes
In this article we will see how quickly in just few minutes we can integrate the Salesforce and ServiceNow applications.
This document is intended for the users who wants to integrate Salesforce and ServiceNow using webMethods.io platform
User should have access to
- Salesforce developer account ( Refer Salesforce Developers )
- ServiceNow account ( Refer Home | ServiceNow Developers )
- Active webMethods.io subscription ( Refer SOFTWARE AG Cloud )
Let’s see how we can integrate the Salesforce and ServiceNow applications with the below use case
- User creates case in the Salesforce platform,
- Create a new ServiceNow incident with the desired severity and details in the ServiceNow platform.
- Upon successful creation of ServiceNow incident, create a follow up task in the Salesforce platform.
Below is all we need to do
Step 1: Create a New workflow in webMethods.io

Rename the Workflow “SalesforceToServiceNow” and Click on “Done”.

Step 2: Configure the start trigger with Salesforce
Click on Start trigger symbol and click on gear icon.

Search for out of the box Salesforce connector, select the desired salesforce connector. In this sample am selecting the typical Salesforce connector and click on “Next”.

Provide the desired label for the trigger. Select the action on which the trigger needs to be activated.
In this use case, we will select the action as “New Case”. So that the workflow will be triggered whenever the new case is created in Salesforce.

As a last step, configure the Authorization.
Hover on the plus icon next to the “Authorize Salesforce” section in the dialogue. Authorization to Salesforce can be configured in two ways.

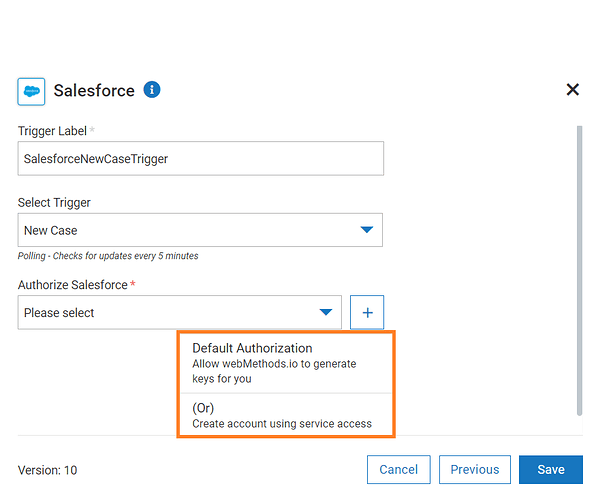
In the default authorization method , webMethods.io Integration platform generates necessary keys to access the account data. To do so, user need to grant the webMethods.io Integration platform the relevant permissions.
This will take the user to the salesforce login page.

Provide salesforce user domain and click on Allow to give necessary permissions for webMethods.io to access the Salesforce account.
Once the account is saved successfully Click on “Save”.

Create account using service access token and other configurations
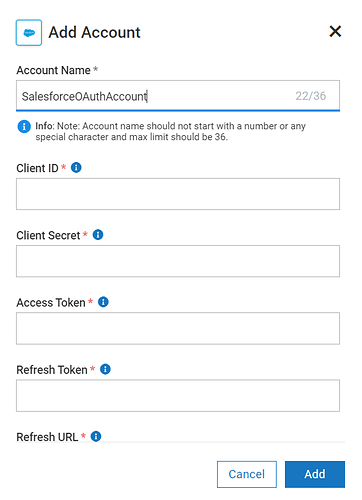
If we have all the necessary token and account details required to create an account, we can choose the second method. To do this, click the + button and select the (Or) option.
A pop-up window will appear on screen, where user will be prompted to enter the relevant information required to create the Salesforce account.
For more details on configuring Salesforce using OAuth, please refer the article Salesforce OAuth Configuration in webMethods.io Integration and webMethods.io Flow Editor
Upon clicking on Save, there will be an option to test the trigger to see if configurations are fine.

If the configurations are fine, the below screen will be displayed with the corresponding Input/Output tabs. Click on “Done”.
Now we have completed configuring the Salesforce trigger.

Note:
The account configuration for the connectors can be done in two ways. The connectors account configured are available for all the workflows created under the specified project.
- Directly add the connector to canvas and then configure the Authorization section (as shown in the previous section)
- Configure the account under Projects → Connectors → Predefined section

Step 3: Configure ServiceNow step
After configuring the Salesforce as Start trigger, we will now add the ServiceNow connector which will take the input from the Salesforce trigger and then creates an incident in the ServiceNow platform.
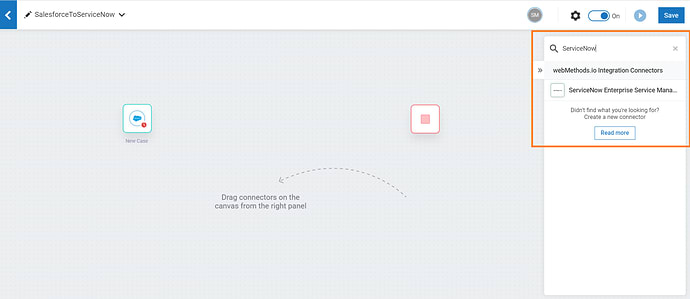
Search for ServiceNow in the right-hand side connectors search bar. Drag the ServiceNow connector on to the canvas next to Salesforce trigger.
The webMethods.io automatically connects the Salesforce trigger and ServiceNow connector

Configure the ServiceNow connector by clicking on the gear icon which appears when we hover the ServiceNow connector

Provide the action that we want the ServiceNow to perform. In this case, we will select “createIncident” action.

Configure the connection for ServiceNow instance. Click on plus icon next to “Connect to ServiceNow”
A pop-up window will appear asking for ServiceNow instance details. Provide the necessarily details and click on “Add”

Once done, click on “Next”

Mapping screen will appear, where we can map the necessary parameters from the previous step, in this case Salesforce to ServiceNow “createIncident” action.

Once Mapping is done, click on “Next”. We can test the configurations by clicking on “Test” button.

Upon successful configuration, the below screen pops up. Click on “Done”

Step 4: Configure Salesforce to create a follow up task after successfully creating the incident.
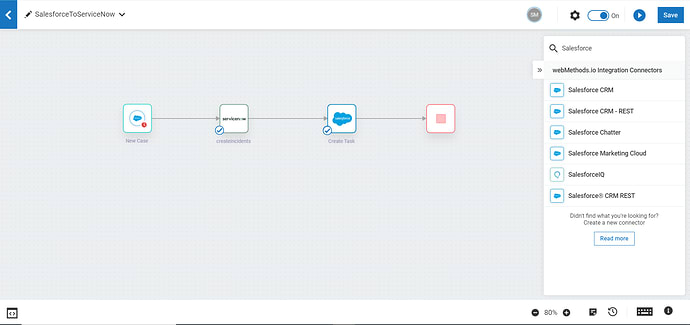
Search for Salesforce connector in the right-hand side connector search bar. Drag the “Salesforce CRM – REST” connector to canvas and connect it to ServiceNow. Also connect the connector to “End” step as it’s the last step of our workflow.

Click on the gear icon on the “Salesforce CRM – REST” connector. Select the required action “Create Task” and configure the Authorize section. Here we can use the same account we configured in Step 2 while creating the Salesforce trigger.
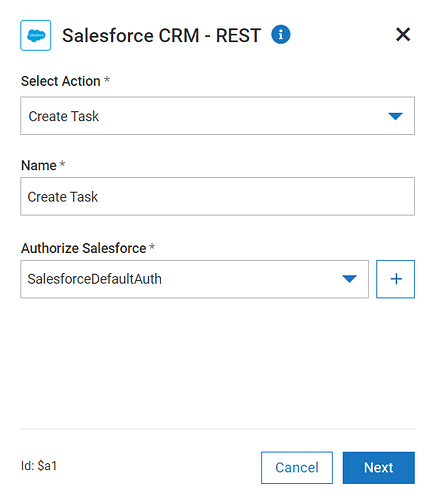
Click on “Next”, this will lead to mapping screen. Map the required parameters

Click on “Next”.
Test the configuration by clicking on “Test”.
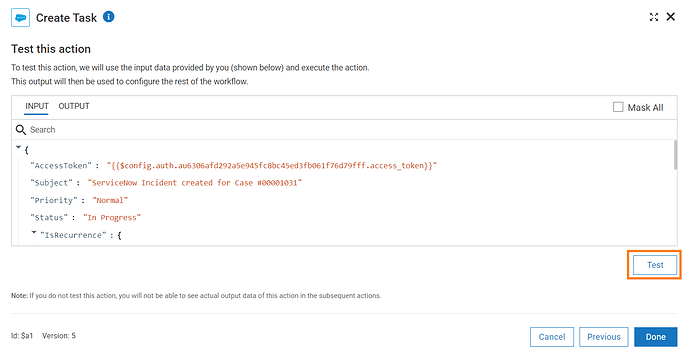

Click on “Done”.
The complete workflow looks like below
Step 5: Test the entire workflow
Now that we have configured all the steps needed for our usecase, we will test the entire workflow end to end.
The workflow will be triggered whenever a new case is created in Salesforce CRM.
Create case in Salesforce
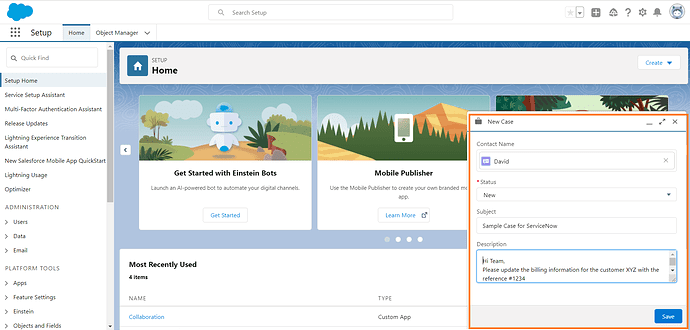

This will initiate the workflow in webMethods.io

Corresponding Incident gets created in ServiceNow
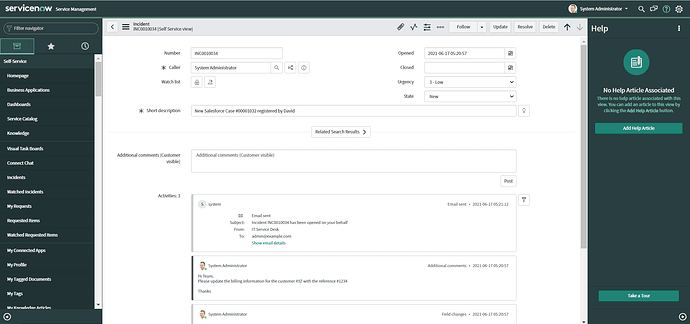
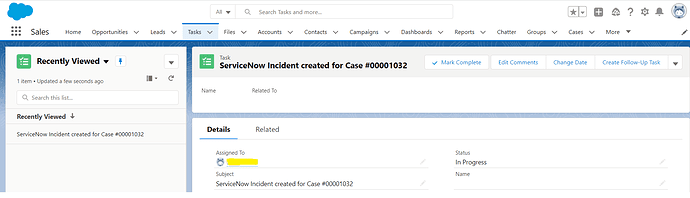
After which task will be created in Salesforce.
35