50
Breaking Up the God Service Using Heroku

For the last ten years, I have been a part of projects which I would classify as “application modernization initiatives.” The goal of such endeavors is to replace a legacy application or service using more recent (and often more supportable) frameworks, design patterns, and languages.
In every one of those cases, at least two of the following three lessons have proven true:
This reminds me of a time when I purchased a pickup truck that was several years old. I was proud of my purchase, and the truck was a lot of fun to drive. In fact, I was talking to my father about wanting to do some improvements to the truck. You know, changes that would make it look really nice inside … and even add an improved sound system.
My father listened to my grand plans with great interest. When I finished, he confirmed that I could do all of those things. However, in the end he said I would “still have an old truck.”
His point was clear. I could put a lot of money into making the truck look better — but if I did not replace the underlying components, I would still have the same truck. That meant I was likely to face the challenges often encountered by owners and their aging vehicles.
I feel like a great deal of those “application modernization” projects are quick to make conservative decisions which ultimately render those “new” solutions not so new and improved. In the same way as my “old truck” example, it is only a matter of time before those legacy design decisions start to introduce challenges into the new application.
Each of the three lessons learned could be the topic of an individual publication. For this article, I will focus on how to avoid replacing a legacy monolith application with another monolith disguised as a modernized application.
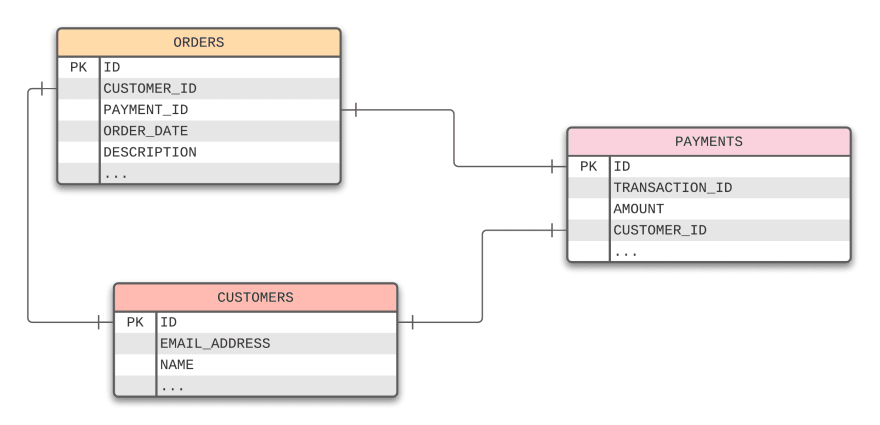
Consider a very simple commerce solution which allows customers to submit orders. The original application contains a single database with three tables:

The CUSTOMERS table maintains customer information. The ID column in the table is linked to the ORDERS table, matching the order to the customer. The ID column for the customer is also linked to the PAYMENTS table.
Oftentimes, the decision is made to keep everything in a single database. This leads to a single new service getting created which includes components and services to interact between these same exact tables.
The illustration below is intended to present a design which merely replaces the monolithic application with a RESTful API. The database is left unchanged as a result of this work.

While the idea sounds good in theory, this often results in a new service which is just as complicated as the original system … if not more complicated. This is what is often referred to as a God service.
What further compounds the issue is the fact that scaling up and down to meet customer demand requires all the APIs (noted above) to be scaled in unison. Depending on the underlying design, the scaling options may even be limited to vertical scaling, which invokes the “throw hardware at the problem” resolution.
This is where the “Don’t replace a monolith with another monolith disguised as a modernized service” lesson is validated.
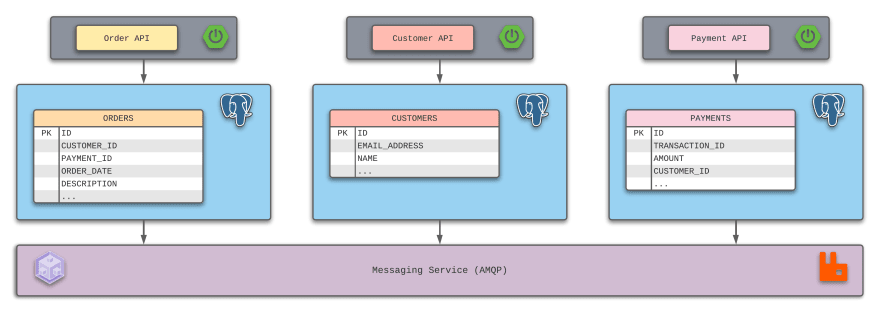
Using the same example, consider this: What if the following design was utilized for the application modernization initiative?

With this design, three new microservices are being introduced to house their domain ownership for the application. Most importantly, each microservice and its dedicated objects have their own database.
Connectivity between these services would utilize a messaging service, often employing the request-response pattern.
As an example, consider the use case of placing an order. An order provides the known customer data to the Customer API using a message. The Customer API would process the request and either return an existing CustomerDto (DTO is a data transfer object) or create a new CustomerDto via a response to the original request.
The identifier for the customer can then be associated with both the order and the request to make a payment using the Payment API. Here, the same pattern is followed, but will leverage the information gained from the Customer API request.
When the Payment API has responded, the new order can be persisted to the respective database and confirmed by the customer making the request.
Since each microservice stands on its own, scaling up and down to meet customer demand is isolated to the services which currently recognize higher (or lower) request levels.
I wanted to see how easy it would be to create the desired pattern in Heroku. Within a matter of minutes, I was able to establish three applications in Heroku to model the following design:

Each of the three services contains their own Heroku Postgres database and a Spring Boot service. The CloudAMQP (RabbitMQ) service was added to the jvc-order application in order to keep this example as simple as possible. WSO2 API Cloud is part of the design, but will not be documented in this article.
From the Heroku dashboard, the three applications appeared as shown below:

The following SQL was utilized to create basic tables. These can be used to validate the functionality of these services:
CREATE TABLE orders (
id INT PRIMARY KEY NOT NULL,
customer_id INT NOT NULL,
payment_id INT NOT NULL,
order_date timestamp NOT NULL,
description VARCHAR(255)
);
CREATE TABLE customers (
id INT PRIMARY KEY NOT NULL,
email_address VARCHAR(255) NOT NULL,
name VARCHAR(255),
UNIQUE (email_address)
);
CREATE TABLE payments (
id INT PRIMARY KEY NOT NULL,
transaction_id VARCHAR(36) NOT NULL,
amount DECIMAL(12,2),
customer_id INT NOT NULL
);Remember, each CREATE TABLE command was executed against the PostgreSQL database associated with the respective microservice.
Consider the following OrderRequest payload:
{
   "description" : "Sample Order #4",
   "emailAddress" : "bjohnson@example.com",
   "name" : "Brian Johnson",
   "amount" : 19.99
}
Normally, a real order would contain several other attributes, but the goal is to follow the “keep it simple” approach and focus on the design principles instead.
As part of the order, the system will need to know the identifiers for the customer placing the order and the transaction for the request.
In order to request the customer information, the following CustomerDto payload can be placed on a request queue:
{
   "emailAddress" : "bjohnson@example.com",
   "name" : "Brian Johnson"
}
Within the Order API, the following method leverages Cloud AMQP in Heroku, the concept of a direct exchange and the spring-boot-starter-amqp in Spring Boot:
public CustomerDto getCustomer(String emailAddress, String name) {
CustomerDto customerDto = new CustomerDto();
customerDto.setEmailAddress(emailAddress);
customerDto.setName(name);
return rabbitTemplate.convertSendAndReceiveAsType(customerDirectExchange.getName(),
messagingConfigurationProperties.getCustomerRoutingKey(),
customerDto,
new ParameterizedTypeReference<>() {});
}In the example, this request is a blocking request — meaning, processing from the Order API waits until the Customer API provides a response.
Within the Customer API, there is a listener waiting for requests on the customerDirectExchange:
@RabbitListener(queues = "#{messagingConfigurationProperties.customerRequestQueue}")
@Transactional(propagation = Propagation.REQUIRES_NEW)
public CustomerDto receive(CustomerDto customerDto) {
log.debug("CustomerProcessor: receive(customerDto={})", customerDto);
Customer customer = customerRepository.findByEmailAddressEquals(customerDto.getEmailAddress());
if (customer != null) {
log.debug("Found existing customer={}", customer);
// return customer as a CustomerDto
} else {
log.info("Creating new customer={}", customerDto);
// return new customer as a CustomerDto
}
log.debug("customerDto={}", customerDto);
return customerDto;
}In this example, the customerDto object contains the following information:
@AllArgsConstructor
@NoArgsConstructor
@Data
public class CustomerDto {
    private int id;
    private String emailAddress;
    private String Name;
}By leveraging the PaymentDto, the same pattern can be employed to request a payment:
@AllArgsConstructor
@NoArgsConstructor
@Data
public class PaymentDto {
    private int id;
    private String transactionId;
    private BigDecimal amount;
    private int customerId;
}
The customerId property is the result of the request/response pattern. Of course, the id property would not be set until processing has been completed by the Payment API, which uses another very simple payment example:
@RabbitListener(queues = "#{messagingConfigurationProperties.paymentRequestQueue}")
@Transactional(propagation = Propagation.REQUIRES_NEW)
public PaymentDto receive(PaymentDto paymentDto) {
log.debug("PaymentProcessor: receive(paymentDto={})", paymentDto);
Payment payment = new Payment();
payment.setAmount(paymentDto.getAmount());
payment.setCustomerId(paymentDto.getCustomerId());
payment.setTransactionId(UUID.randomUUID().toString());
paymentRepository.save(payment);
paymentDto.setId(payment.getId());
paymentDto.setTransactionId(payment.getTransactionId());
return paymentDto;
}With the completed transaction in place, the process to place an order can be completed using the Postman client or even a simple cURL command:
curl --location --request POST 'https://jvc-order.herokuapp.com/orders' \
--header 'Content-Type: application/json' \
--data-raw '{
    "description" : "Sample Order #4",
    "emailAddress" : "bjohnson@example.com",
    "name" : "Brian Johnson",
    "amount" : 19.99
}'
The Order API will accept the POST request and return a HTTP 201 (Created) status along with the following payload:
{
   "id": 4,
   "customerId": 4,
   "paymentId": 4,
   "orderDate": "2021-06-07T04:31:52.497082",
   "description": "Sample Order #4"
}
Standard RESTful APIs for each of the three microservices allow full payload data results to be retrieved.
Below is the example of a call to the Customer API:
GET https://jvc-customer.herokuapp.com/customers/4This returns the following payload and a HTTP 200 (OK) status:
{
    "id": 4,
    "emailAddress": "bjohnson@example.com",
    "name": "Brian Johnson"
}
Below is an example of a call to the Payment API:
GET https://jvc-payment.herokuapp.com/payments/4This also returns a HTTP 200 (OK) status and the following payload:
{
    "id": 4,
    "transactionId": "3fcb379e-cb89-4013-a141-c6fad4b55f6b",
    "amount": 19.99,
    "customerId": 4
}
Finally, an example of a call to the Order API is noted below:
GET https://jvc-order.herokuapp.com/orders/4A HTTP 200 (OK) status is returned here with the following payload:
{
   "id": 4,
   "customerId": 4,
   "paymentId": 4,
   "orderDate": "2021-06-07T04:31:52.497082",
   "description": "Sample Order #4"
}Starting in 2021, I began focusing on the following mission statement which I feel can apply to any IT professional:
“Focus your time on delivering features/functionality which extends the value of your intellectual property. Leverage frameworks, products, and services for everything else.”
- J. Vester
The Heroku ecosystem makes adhering to the mission statement quite easy. In the span of a few hours, I was able to fully build out and prototype three microservices containing a Spring Boot RESTful API and Heroku Postgres database. Cloud AMQP was added, integrated into the solution, and validated during that same amount of time.
I cannot imagine how long this would have taken if I were using a standard cloud services provider. The ability to attach a PostgreSQL database and cloud-based AMQP instance, plus handling the permissions, would have consumed all my available time — leaving me with no time to prove out this functionality.
If you are interested in seeing the actual source code for this project, please take a look at the following repositories on GitLab:
Have a really great day!
50
