48
How to Recover RAID 5 Data from SAN D-Link DSN-1100
This guide will show you how to recover lost data from a NAS storage system, with the example of D-link DSN-1100. Also, it will help you to retrieve information from the hard disks of an inoperable SAN device.

It is common knowledge that NAS is a server-type storage system designed to store various information at the file level. In fact, this is a computer with an array of disks inside, which is connected to a network. Every authorized user can interact with any files stored in a NAS. Such storage systems are becoming more and more popular because most of them make use of the RAID technology: It provides a serious boost in fault tolerance and increases security of storing large amounts of data. However, there is no system to give you a 100% guarantee against data loss. Sometimes, users have to recover lost information, but it is not always clear what to do.
YouTube:
Most devices of this type don’t have any operating system, and the RAID array is created with the help of a controller. That is why you can’t choose the easy way – install and run a data recovery tool on the NAS device. If a NAS device is damaged, broken or inoperable, its disks have to be directly connected to a personal computer with a certain operating system. But still, you can’t just plug the data cables into your computer’s ports and copy the information without using specialized software tools. When the disks are connected to the computer, the operating system won’t be able to recognize them, and it will suggest to initialize the disks for further use. However, initialization will erase all the data which is still on the disk, and any recovery operations you conduct later can hardly be successful. That is why you should always cancel the initialization if you want to keep the data which is still there on the disk.

You can recover data which is lost, deleted or missing from a NAS storage system with the help of specialized software tool, Hetman RAID Recovery. It supports direct data recovery from almost all known array types. Hetman RAID Recovery is able to identify file systems used in MacOS, Windows, Unix, Linux, to fix logical errors in the hard disk structure and recover the disk contents.
If the program failed to build and display a RAID system automatically (which is what happened in our case), you can help it by specifying additional properties in the Constructor app to get that array created in the right way.
I will show you how it’s done with the example of a hardware RAID 5 consisting of five hard disks and based on D-link DSN-1100 storage device.
If you want to see the process of building and configuring the RAID system on this device in detail, follow the link in the description for a dedicated video.
Let’s simulate a situation when a NAS storage system fails. As a result, all that we have is 5 hard disks containing user data. Connect them directly to the computer with a Windows operating system. The Disk Management utility recognizes such disks as unallocated devices.

It can recognize all the disks but it is unable to rebuild the damaged RAID array automatically; it means we’ll have to create it manually.

This NAS model is based on the following principle: at the beginning of the disk, the controller writes various service information, after that – the partition style, MBR or GPT, and this is what makes it different from other controllers. As the beginning of the disk is not a specific value, you’ll have to find it manually. There are certain signatures which can be useful to find the beginning of the disk. For MBR it looks like this (33c08ed0 bc007c8e c08ed8be 007cbf00), and for GPT – like that (45464920 50415254). However, as this specific controller type writes data in its own way – it takes every 4 bytes and places them in an inverted manner – we’ll have to change those signatures (d08ec033 8e7c00bc bed88ec0 00bf7c00).

Depending on the RAID type, the beginning of the disk can be located on one or even on several drives. In our case with RAID 5, the beginning of the array is located on one of the drives.
If you know the partition style and the order of the disks that were included into your array, start searching from the first drive; if you don’t know this information, search every drive – at first by the MBR signature, and then by the GPT signature.
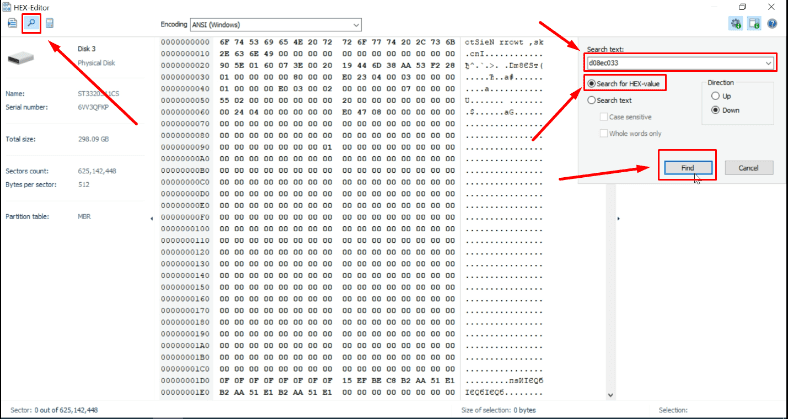
Open the disk in HEX editor – it is integrated into the program, so you don’t need to look for extra tools. Right-click on the disk and select the HEX-Editor line from the menu.
Click on the Search icon, type the signature into the search field, check the option Search for HEX-value and click Find.

Service information doesn’t take up much space so don’t wait for the search to be complete: after waiting a little, try searching another drive. If you couldn’t find the beginning of the disk by MBR signature, repeat the search by GPT, and if the search gives no result, try searching by the inverse 4-byte sequence.

In our case, the beginning of the array turned out to be located on the second disk.

Judging from the signature we have found, this drive has MBR partition style, and it’s time to memorize the sector number.
Now we can start building the array.
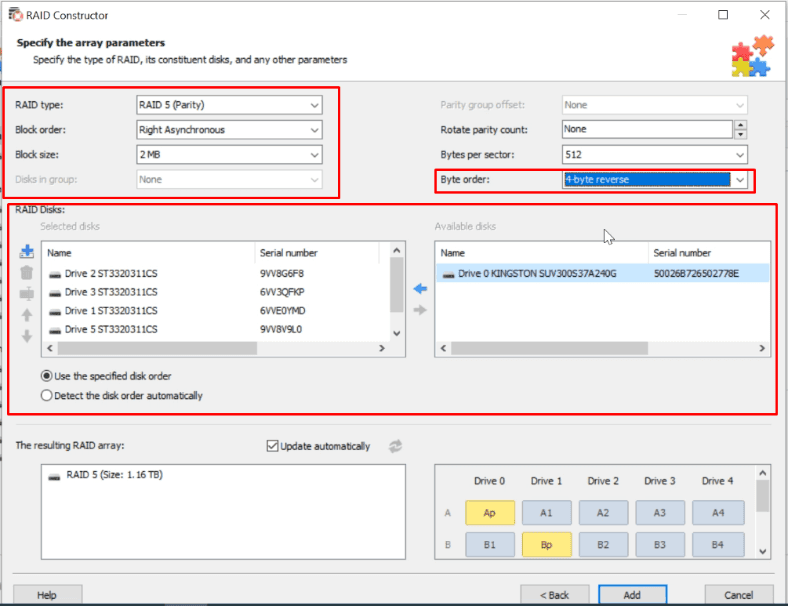
Open the RAID Constructor, click Next, then Manual mode and specify all the known properties:

If you don’t know all properties of the array, it is OK to only specify the RAID type and offset, and other properties will be selected automatically, but it’s going to take much longer.
Even with two drives being damaged (out of the five disks that make up the array) the program was able to recover a part of the files which are still intact.

In the course of building the array with the RAID Constructor, you should add a few empty disks – the number equal to the number of the disks that have failed before.

It is well-known that the failure of a single drive in this RAID type makes it inoperable and puts the whole storage system out of action. That is why it is still a good result that some of the remaining information could be recovered.

The procedure of recovering user files from NAS-based RAID storage systems is very complicated, and that is why it is extremely important to know what you’re doing and use reliable software tools because even a slight error may result in losing all the information in a second. Always remember to back up your data regularly – it will help you to secure your files against irreversible loss. Luckily, regardless of the device type you are using and the controller type that your RAID system is based on, you can still recover your data as long as you follow the steps described in this guide.
See the full article with all additional video tutorials. Also visit our Youtube channel, there are over 400 video tutorials.
48
